Configuring synchronization for importing entitlements
As in the steps above, where the AD PowerShell connector was used as the example, the synchronization configuration process will be described for this connector as well.
To configure synchronization, follow the steps below.
- Go to webconsole > Provisioning > Synchronization**.
The synchronization page contains ready-made examples of synchronization for various objects. If you are new to OpenIAM, then please leverage these examples instead of creating a new configuration.
However, in case you want to configure a custom synchronization process, use the steps below.
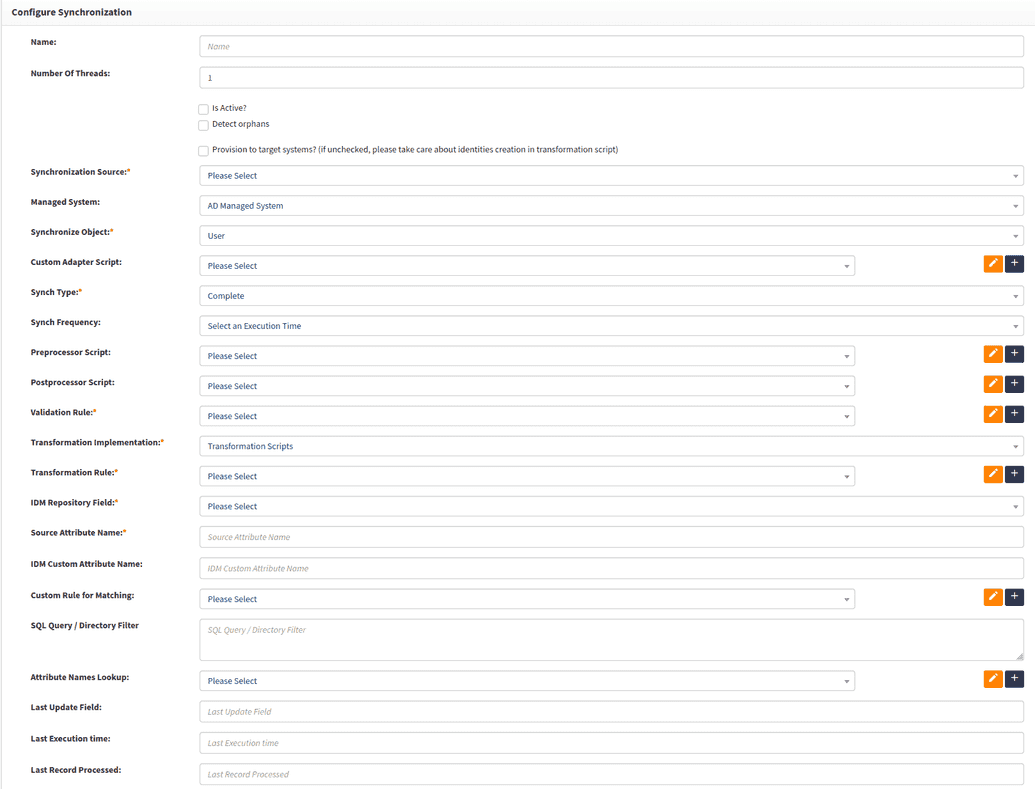
- Click on Create Synchronization in the left-hand menu. You will see the screen below.
Complete the form based on the table below.
| Field name | Description |
|---|---|
| Name | Descriptive value to identify this configuration. |
| Number of Threads | This controls how many threads will be created to process data coming from the connector or CSV file. Set this value to 1, which is the default, since creating too many threads can take away resources from other operations and thereby have a negative impact. |
| Is active? | Flag, which determines if the synchronization configuration can be executed. In-active value disables the task. |
| Detect orphan | Orphan management is used to detect records in a target system which are not in source. This notion is covered in detail in the Administration guide Orphan management section. |
| Provision to target systems | This flag enables downstream provisioning to the target system. Once you have configured your synchronization and managed systems, you MUST enable this checkbox to allow for downstream provisioning. |
| Synchronization source | Determine if you will be importing the data using connectors or from a CSV file. |
| Managed System | Indicates which managed system the user should automatically be added to. |
| Synchronization object | Defines the type of object that will be imported. Select Group in this case. |
| Synch type | Allows you to define if this should be an incremental or complete synchronization. For the initial synchronization, use the complete option. |
| Synch Frequency | Describes how often the synchronization process should run, if you want it to be running automatically. The frequency is expressed as a Cron expression. More details on how to set a Cron expression can be found by this link in Cron expressions section. |
| Pre-processor script | Pre-processor script runs before synchronization starts. Use this link to find out more about pre/post processor scripts. |
| Post-processor script | Post-processor script runs after synchronization has been completed. |
| Validation Rule | Groovy script to validate the incoming data from the file. |
| Transformation Implementation | This can be either based on a policy map or a transformation scripts (aka. Groovy script). Select Transformation Scripts |
| Transformation rule | Select the Groovy script which will be responsible for mapping data from the source to objects which OpenIAM understands. The example of a script for importing groups for connected applications and CSV files can be found by the link. |
| IDM Repository Field | Field which uniquely identifies a user in OpenIAM. Select from one of the following: EMPLOYEE ID, IDM USER ID (internal guid), PRIMARY EMAIL ADDRESS, PRINCIPAL NAME. If these do not apply, then select CUSTOM ATTRIBUTE and enter the attribute name. |
| Source Attribute Name | Attribute name form your source (connector or CSV) which uniquely identifies a user. |
| Custom Rule for Matching | In cases where it's not possible to match on a single field, you can create a custom match rule, using Groovy script, which will allow more complex matching algorithms. |
| Attribute names lookup | When getting data from connectors, the attribute name lookup is a simple script, which defines the list of attributes from the source system to be made available to the transformation script. For example, if you are working with LDAP or Active Directory, you will only be able to map attributes in the transformation script which have first been defined in the Attribute names lookup script. |
| File Name | Name of the CSV file that has been uploaded. Use the Choose file button to upload the file. |
Upon completion of the fields, the synchronization is configured. Now you can import entitlements.
