Create user
OpenIAM provides several ways in which new users can be created:
- Administration interface
- Self-service requests using workflow
- Self-registration
- Automated provisioning via integration with an authoritative source
- OpenIAM API
This section focuses on creating users through the user manager in the OpenIAM Administration portal.
To create a new user follow the steps described below:
- Log in to the webconsole.
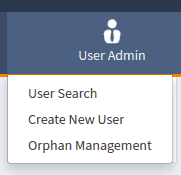
- Go to
User Admin -> Create New Useras shown below.
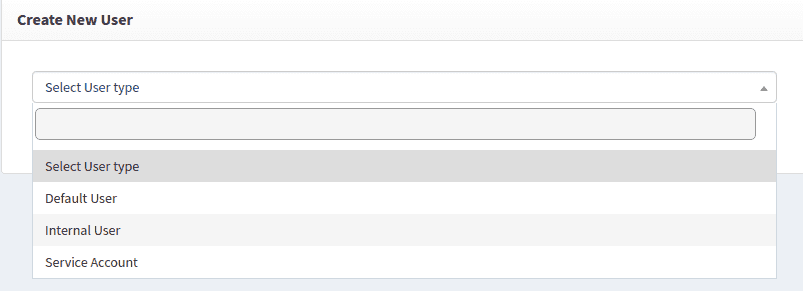
- Selecting the
Create New Useroption will open the screen below.Select user typedetermines the type of user that you will be creating. OpenIAM allows you to configure new types of users with custom attributes to better represent your environment. Examples of types of users can be Employees, Contractors, Vendors, etc. You can also define types for service accounts. The User types section describes how you can create custom types.
- Provide user information: The screen that follows the type selection is a form to provide user information. The default form is a
Template viewand can be customized to suit your needs. The Custom templates section describes how to create and manage these templates. Alternatively, you can switch to theClassic viewwhich provides a broader set of fields to work from without having to modify the UI templates. Long term, you will want to customize the templates based on your needs.
The sections below describe how to use the template view and the classic view.
Template view
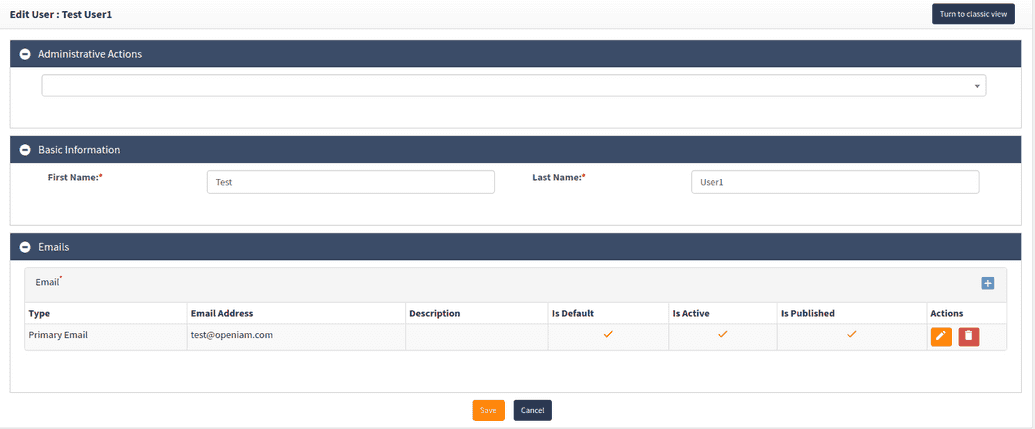
The example below shows the default template. As mentioned above, it is unlikely that this template will serve your needs and should be customized.
If you continue with this template, follow the steps described below.
- Provide the user's first and last names.
- Notification: enable this checkbox to email the new user's credentials to the address specified below. Email delivery will only work if the SMTP gateway has been configured and an email address has been provided for the logged in user. The E-mail templates section describes how you can customize emails to suit your needs.
- Enter an email address by expanding the
Emailssections and then click on the+sign. This will open a dialog to enter the email address as shown below.
Complete the dialog box as described below:
- Select the
Email Type: OpenIAM allows fornemail addresses to be associated with a user. Some default types include: Primary e-mail, work e-mail, home e-mail. The primary email address should be used if no other email addresses will be provided. - Enter the
Email Address: Email address of the user that is being created. In most deployments, email generation should be configured such that it is automatically generated during the provisioning process. - Enter a
Description: This is an optional field which can be used to capture a descriptive value to help identify this email address.
Is Active: This is a flag which can be used to disable the use of an email address. Unless you want to disable this address, ensure that this checkbox has been enabled.Is Default: This is a flag which determines which address will serve as the default email address for this user. This email address will be used by the system for operations such as password resets and workflows. At least one email address must have the Is Default flag enabled.Is Published: This is a flag which determines if the email address should be published to the OpenIAM directory.
Successfully completing the above steps will result in a user being created in OpenIAM as shown in the image below. If the template has been customized to allow for entitlements to be associated with this user, then downstream provisioning to integrated applications will also be triggered at this point.
Attributes such as the OpenIAM identity will be generated automatically using the attribute policies.
Classic view
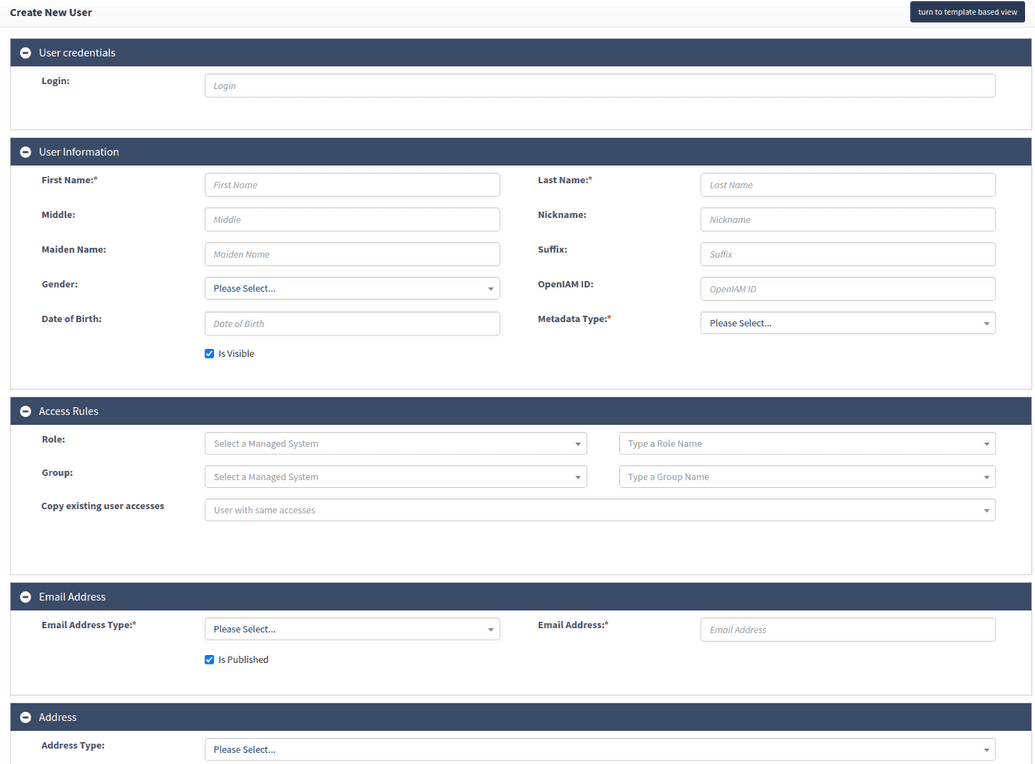
The classic view provides administrators with a broad set of attributes for creating users. This view was introduced into early versions of OpenIAM and hence referred to as a classic view. While this form provides many options, it may provide many fields which are not necessary during daily use. For this reason, it's recommended that templates be used in a production setting.
The classic view form is segregated into sections which are described below.
User credentials
The classic view allows administrators to enter a predefined Login ID. This field is optional and if left blank, the system will generate a login ID automatically.
To specify a login ID, simply enter a unique Login ID into the field shown below. The login will be validated for uniqueness when the form has been submitted.
User information
The user information section shown below provides fields to capture common user profile attributes.
The table below provides a description of each attribute.
| Attribute Name | Is Required | Description |
|---|---|---|
| First name | Y | User's first name |
| Last name | Y | User's last name |
| Middle | N | User's middle name or initial |
| Nickname | N | Alternate or preferred name for a user |
| Maiden name | N | Person's last name before getting married |
| Suffix | N | Suffix to a person's last name. This include values such as Jr., Sr., etc. |
| Gender | N | User's gender. Values include: Male, Female, or Declined to State |
| OpenIAM ID | Read-only field which will be an immutable system generated ID used internally by OpenIAM to identify each user. | |
| Date of birth | N | Date of the user's birth. |
| Metadata types | Y | OpenIAM type used to classify a user. Metadata types can also be associated with custom attributes. |
Access rules
The access rules section is to be used to associate both business and application level entitlements to a user. It is not required that entitlements be defined at the time of user creation. Entitlements can be added/modified after user creation.
You can select entitlements from any of the three options described below.
| Option | Description |
|---|---|
| Role | To select a business role, select OpenIAM from theSelect managed system drop-down. To select a technical role, select the application name from the same drop-down. Next, select the role name from the Type a role name drop-down. |
| Group | First select the application to which the group belongs to from the Select managed system drop-down. Next, select the group name from the Type a group name drop-down. |
| Clone a user's access | Select the user whose rights you want clone. |
Email address
The email address is required for user creation. Note: if you need to dynamically generate the mailbox, then use a custom template.
- Select the type of email address that you are setting. Select
Primary emailif this is the main email address which will be used for operations such as password resets, MFA, etc.
Address
Entering the user's address information is not required during user creation. However, if you are going to define the address, then populate the fields as described below.
| Attribute Name | Description |
|---|---|
| Address type | Select the type of address. Select Primary location if this is the default address that should be used for the user. If multiple addresses will be provided, you can also select from Home Address, Office Address, or a custom type. |
| Building | Building number of your business location |
| Address 1 | Street name. Two fields are provided to capture the street information. |
| Address 2 | Second street information field |
| City | Name of the city, town, village, etc. |
| State | Name of the state or province |
| Postal code | Zip code or postal code |
| Country | Name of country |
| Is Published | Flag indicating if this address should be published in the OpenIAM address book. |
Phone
Entering the user's phone information is not required during user creation. However, if you are going to define the phone number, then populate the fields as described below.
| Attribute Name | Required | Description |
|---|---|---|
| Phone type | Y | Select the type of phone number that is being entered. Select Cell Phone (Primary phone) if this is the default phone number for the user. If multiple phone numbers will be provided, you can also select from Home phone, Office phone, or a custom type. |
| Country code | Y | Phone number country code. A plus sign before the code should be omitted (e.g., 1 and not +1). |
| Area code | Y | Phone number area code |
| Phone number | Y | Phone number |
| Extension | N | Extension number. This is often used in office settings. |
| Is Published | N | Flag indicating if this phone number should be published in the OpenIAM address book. |
| Is for SMS | N | Flag indicating if this number can be used to send SMS messages. SMS messages are used for OTP-based authentication, forgot password and self-registration. |
Organization information
The organization information section provides fields to capture information related to a user's employment in an organization. Entering the user's organization information is not required during user creation. However, if you are going to define the organization, then populate the fields as described below:
| Attribute name | Description |
|---|---|
| Functional title | A user's job title. Often this value comes from the HR system and can be used to grant birthright access. |
| Job code | A code representing a user's position in the company. Often this value comes from the HR system and can be used to grant birthright access. |
| Classification | Classification code or description used to categorize an employee |
| Employee ID | Unique ID representing an employee. This value normally comes from the HR system. |
| User type | Attribute which can be used to categorize a user |
| Employee type | Attribute which can be used to categorize a user/employee. This can often include values such as employee, contractor, temp-worker, contingent worker, etc. This value should come from the HR system for employees. |
| Start date | The day a person starts their job at the company. This is an important value as access should be enabled on this day. |
| Last date | A person's last day at the company. This is an important value as access should be disabled on this day. |
Organization membership
The organization membership section allows you to define the organization units that a person belongs to.
The structure of your organization is defined under Adminstration -> System configuration. Based on this structure, as you select one organization unit, the next child organization selection box will be shown. In the image below a hierarchy with Organization -> Division -> Department objects is shown.
Supervisor and user's assistants
The supervisor section allows you to define a user's:
- Immediate supervisor
- Alternate contact
- Certification delegate: Often, senior executives don't complete their own user access reviews. In these cases, the review can be completed by the delegate defined here.
| Attribute Name | Required | Description |
|---|---|---|
| Supervisor type | Y | Select the type of supervisor. In most cases, you will only have a default/primary supervisor. In some cases, you will need to be able to support a secondary supervisor (e.g., employees can have a primary supervisor and a "dotted line" to a second supervisor). |
| Supervisor | Y | Enter the name of the supervisor. The system will search for the user. Note that a supervisor must exist in OpenIAM to enable this association. |
| Alternate contact | N | Alternate contact for the employee. This value can be used in workflows. |
| Start date | N | Date this Supervisor -> Employee relationship started |
| End date | N | Date this Supervisor -> Employee relationship ended |
| Certification delegate | N | Person to whom access review privileges have been delegated |
| Start date | N | Date from which this delegate was assigned for access reviews |
| End date | N | Date after which this delegate is no longer needed for access reviews |
Notifications
The notifications section allows you to select who should be notified after you have submitted your request for user creation.
The table describes each option.
| Notification Option | Description |
|---|---|
| Notify user of the credentials via email. Requires an email address. | Temporary credentials or activation links are sent to the user by email. |
| Notify supervisor of the credentials for the new user via e-mail. Requires a supervisor to be selected. | The user's temporary credentials are sent to the immediate supervisor. |
| Delay user provisioning till start date | Provides the administrator with the option to delay the creation of the user until the start date |
Custom Information
In this tab, you can add any attribute name and its value, as well as a metadata element. More on metadata elements can be found in the document by the link.
 To add a new metadata element, click on the + sign in the tab's right corner. Then you will be able to add a new name for the attribute, select the metadata element from the dropdown, provide its value, and save it. After saving, you will see the attribute and metadata element added to the list. You can create the metadata element for any object you want, depending on the business need.


