Microsoft Graph PowerShell connector
General description
Microsoft PS Graph OpenIAM connector is an agent that allows managing Azure identities from OpenIAM by running Microsoft Graph PowerShell module. More on this module can be found in the respective Microsoft Graph PowerShell documentation.
Connector is provided as a template that allows to use most common operations such as:
- Creating and modifying users in Azure AD.
- License management for end users (adding, removing, setting granular permissions for products within license packages).
- Resetting passwords.
- Suspending/resuming users.
- Removing users.
- Synchronize users from Azure to OpenIAM.
Connector business logic is an open source and could be easily customized. So, above list of actions is just a list of most typical actions that are required in majority of environments. However, one can easily adjust connector to work with other entities by using other cmdlets of Microsoft Graph PowerShell documentation.
Prerequisites
- Windows Server 2016 or upper OS (from the 'server' family).
- .NET 4.8 or any newer version from a 'Classic' .NET family.
- Microsoft Graph PowerShell module should be installed (see 'Preparing Environment' section for more details).
- Connector machines should have internet connection enabled to be able to connect to Azure tenant via Microsoft Graph PowerShell module.
Preparing environment
In this scenario we assume that you run installation on a clean instance of Windows Server 2016 (which is a minimum required version of Windows Server to run a connector). To prepare the environment follow the steps below.
Step-1: .NET 4.8
You can check Microsoft documentation to check what .NET Framework version is installed by default on your OS version.
Like mentioned earlier in our installation scenario Windows Server 2016 is used, so .NET 4.8 is not available out of the box. To install it you need to go to official Microsoft download page Download .NET Framework 4.8 (this link is valid as at the time of writing of this article - February 2024; if it is not available - please search official Microsoft resource for downloading .NET 4.8) download installation Runtime installation package and install it.
Step-2: Installing Microsoft Graph PowerShell module
Before installing a module it is possible to check if it is already installed. You can open PowerShell console and run:
Get-Module Microsoft.Graph -ListAvailable
If you would have an empty result like below - the module is not installed.
If the output is different and you get details about a module that is already installed - you can skip this step.
To install Microsoft.Graph module run the following command.
Install-Module Microsoft.Graph -Scope AllUsers
Once a module is installed you can verify installation using the command listed at the beginning of this step. The output should be similar to one depicted below (versions may vary).
Troubleshooting tip #1
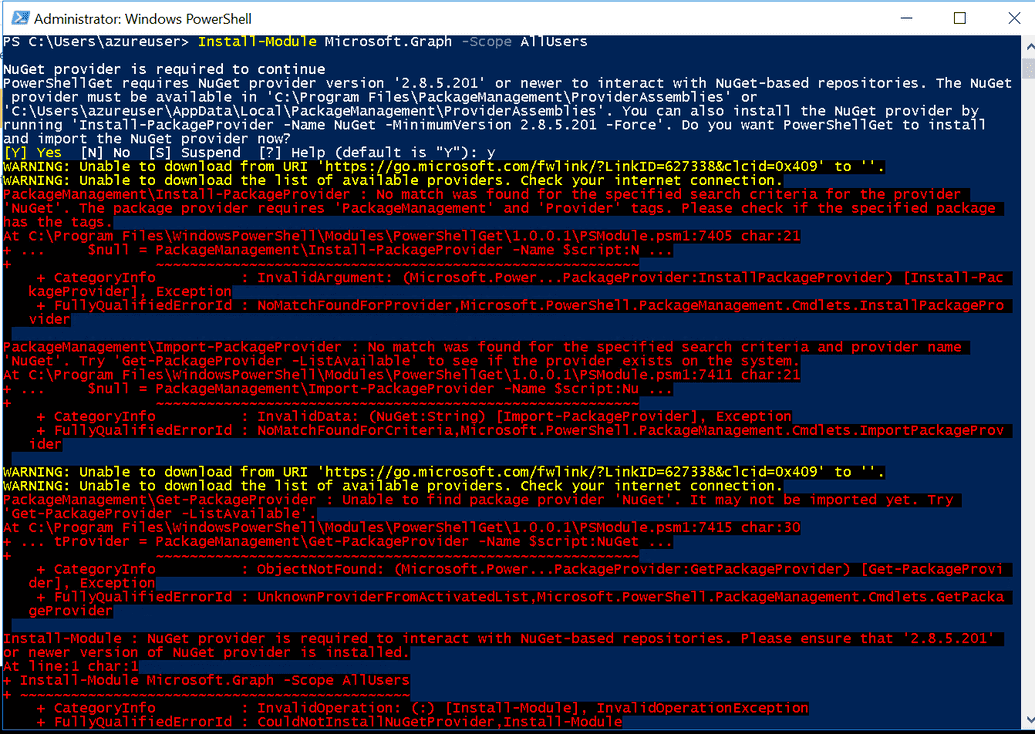
If you run the command above and got the following error
This most probably means that you are not using at least TLS 1.2 and you need to configure it for your session. So, run the following commands.
[System.Net.ServicePointManager]::SecurityProtocol =[System.Net.SecurityProtocolType]::Tls12
And repeat the installation command.
Step-3: Registering connector application in Azure
Microsoft Graph PowerShell module is designed to be used either by end users in the interactive mode or automated scripts/applications. In this case OpenIAM connector is a standalone application and should be registered as such inside Azure tenant. Unlike several older Microsoft PowerShell modules for Azure where it was enough to authenticate using just username and password, this module (while running in app-only mode) requires a bit more complex steps that include certificate generation and application registration. Despite some one-time configuration efforts, this approach is a lot more secure.
3.1 Generating application certificate
First, you need to generate a self-signed certificate - this certificate will be used for application registration. Run below commands in PowerShell, but set your own certificate name that makes sense for your environment. Also, in the example below a 10-year certificate with a key length of 2048 was created, an exportable one. You may adjust settings if needed.
$certname = "OIAM_Test1" #Give your certificate nameNew-SelfSignedCertificate -Subject "CN=$certname" -CertStoreLocation"Cert:\LocalMachine\My" -KeyExportPolicy Exportable -KeySpec Signature -KeyLength 2048 -KeyAlgorithm RSA -HashAlgorithm SHA256 -NotAfter (Get-Date).AddYears(10)
After executing the command above you will see the output that proves that certificate is created.
3.2 Running registration script
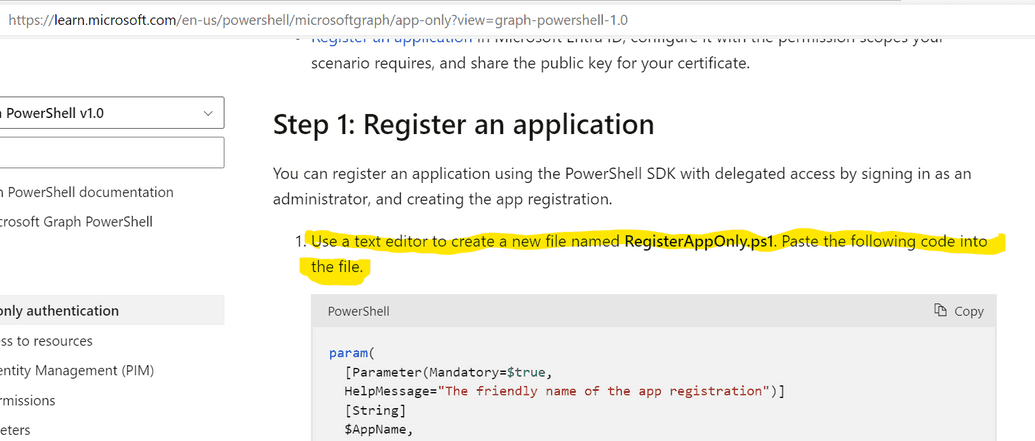
When certificate is created, go to official Microsoft documentation page to take a registration script to run Use app-only authentication with the Microsoft Graph PowerShell SDK. This link is valid at the time of writing of this article (February 2024), if link is no longer available - please search for the respective section at the official Microsoft documentation portal.
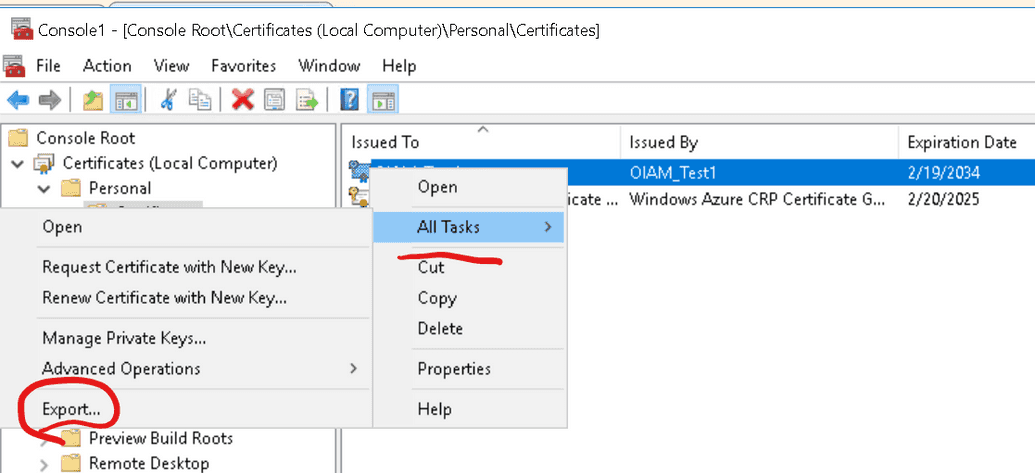
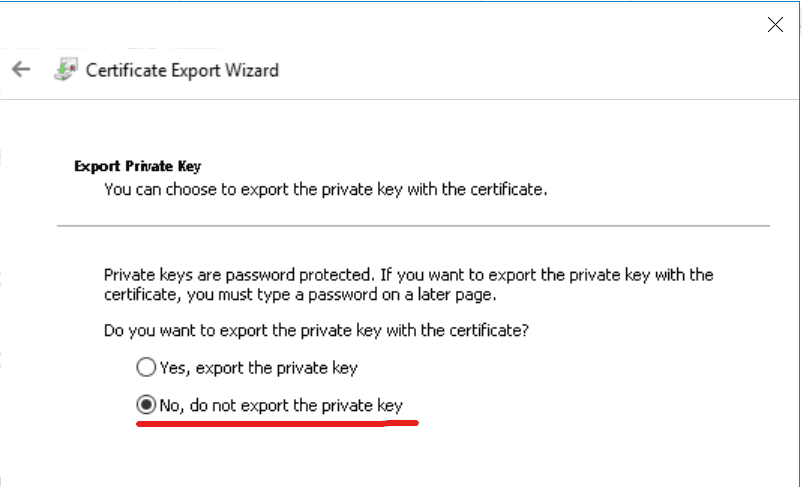
Follow Microsoft documentation guidelines and save the script for executing. To prepare for executing the script you will need to export the certificate (not the public key, just a certificate) that you've just created on the previous step. To do this you need to go to the certificate console, select the certificate and press Export like shown below.
You will need the certificate path for executing a script. Run the script that was saved on a previous step. To do this you can open PowerShell console and run the command
.\[SCRIPT_NAME] -AppName [NAME_YOU_GIVE_AN_APPLICATION] -CertPath [PATH_TO_EXPORTED_CERTIFICATE]
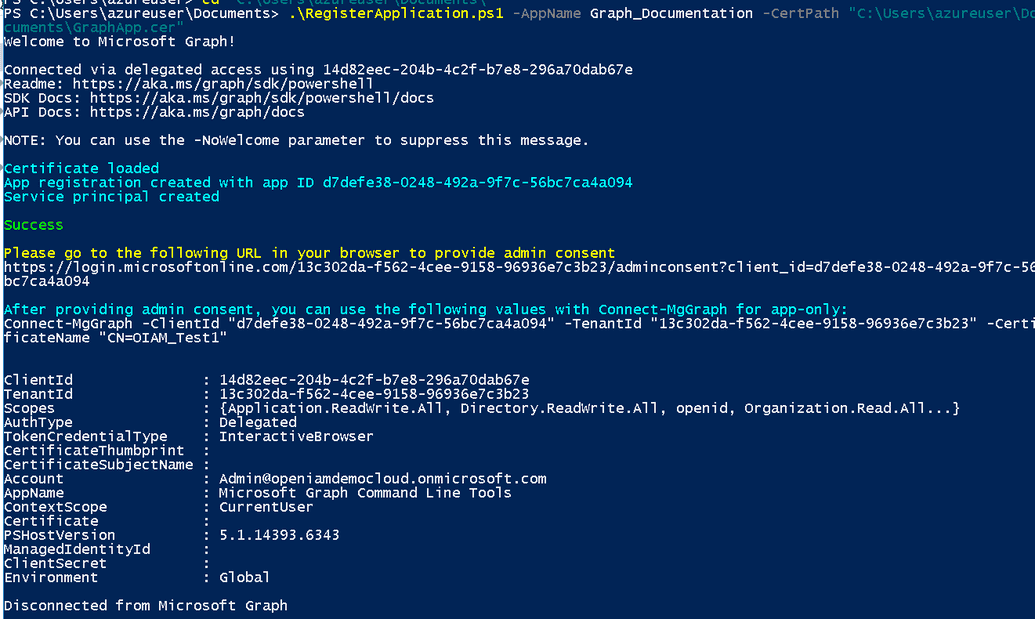
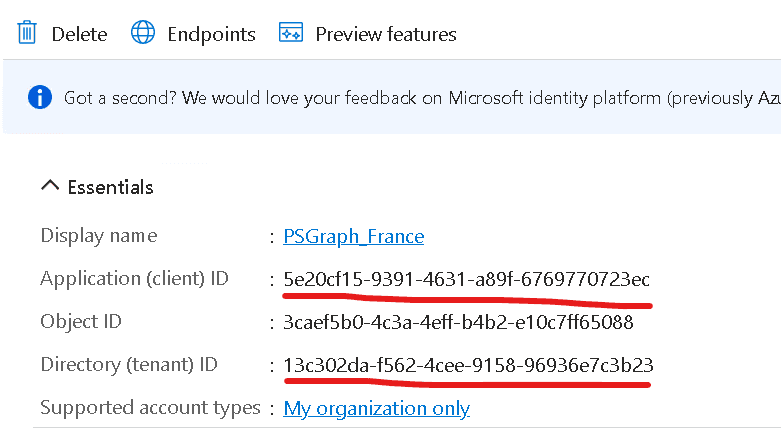
After specifying those parameters, the script will open a browser window for authentication. You should have sufficient permissions to register applications inside your Azure tenant. If everything is fine you will see the summary of registration similarly as below.
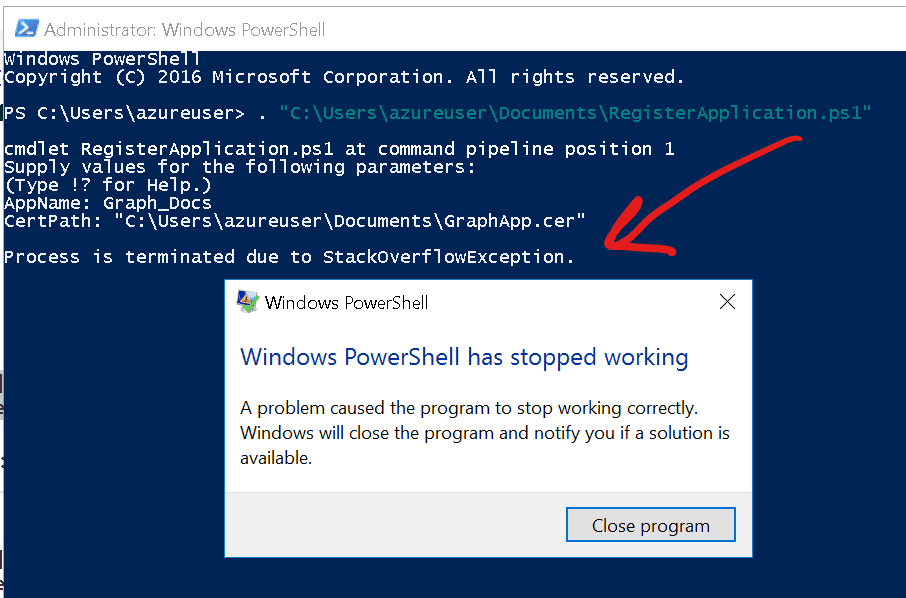
Troubleshooting tip #1
If you get below error message while trying to run the registration script
Before running the registration script, try setting TLS 1.2 protocol for this session as follows.
[System.Net.ServicePointManager]::SecurityProtocol =[System.Net.SecurityProtocolType]::Tls12
Step-4: Granting admin consent and adjusting application permissions
4.1 Granting admin consent
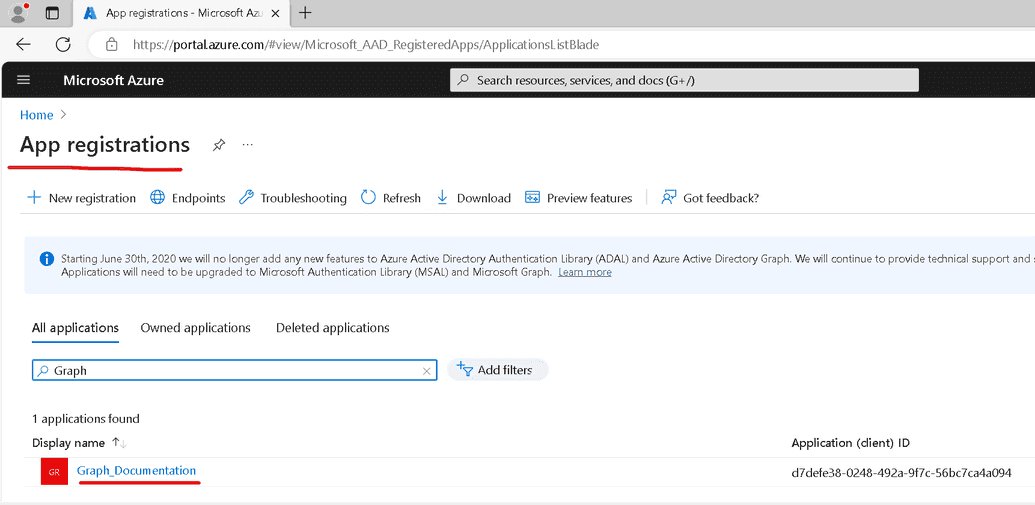
First, log into Azure portal and navigate to App registrations https://portal.azure.com/#view/Microsoft_AAD_RegisteredApps/ApplicationsListBlade
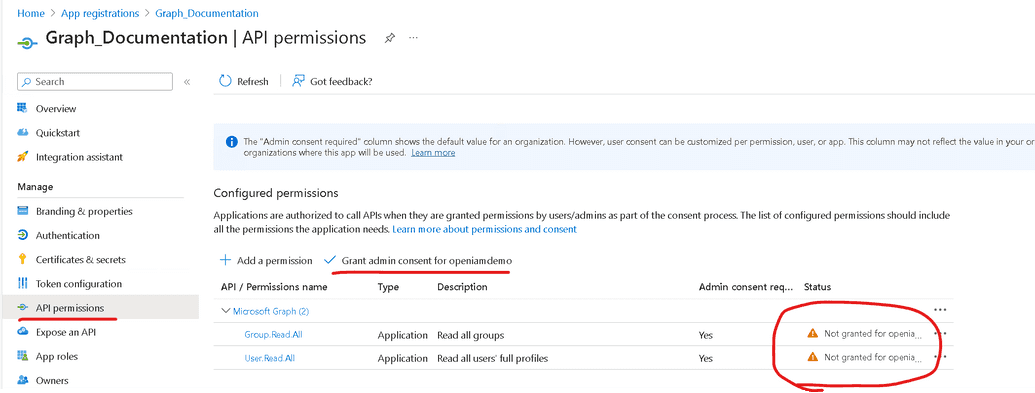
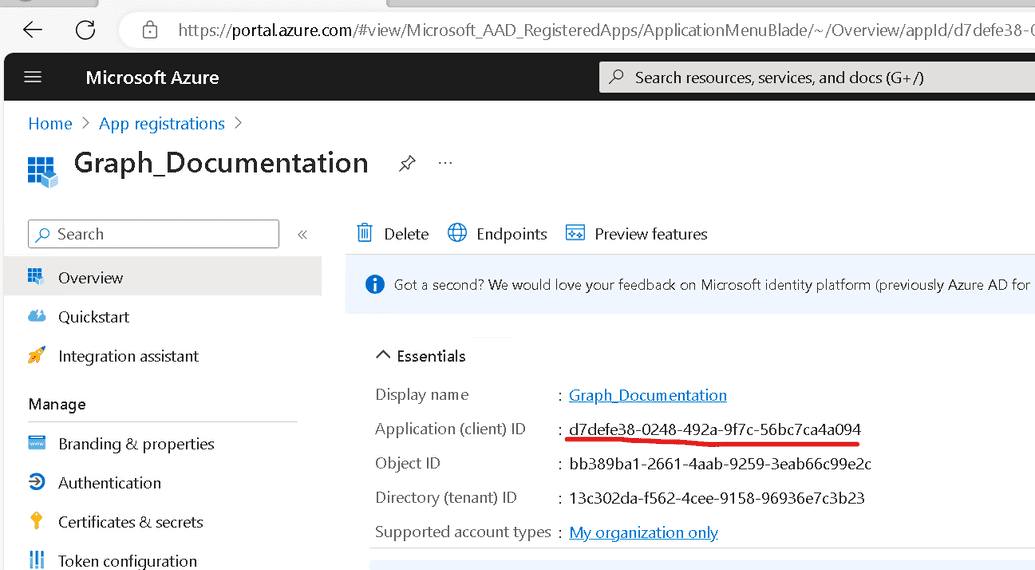
Here, you will be able to find the application that you have just created on the Step-3. In this case it has a name Graph_Documentation. You can go to the application page and select API Permissions.
As it can be seen from the above image, your application is not granted consent by default, so to make it operational you need to press on Grant admin consent for openiamdemo. Once you do it, your application (and connector) would be able to perform operations listed in API permissions.
4.2 Setting API permissions
By default (as you see on above screenshot) you get read permissions. If you need a connector only for reading data, for example loading objects to OpenIAM without following modification, that permission looks good. However, to be able to modify users you need to have different permissions like: User.ReadWrite.All
4.3 Setting other permissions
Unfortunately, not all permissions can be set directly through API permissions page. There is no way to grant permission for your application for resetting user password using that page. By default only applications that run in interactive mode can do that. However, there is a workaround. You can grant your application a User Administrator object role. If you would like to do this you can use Add-AzureADDirectoryRoleMember cmdlet from the AzureAD PowerShell module.
To use it make sure that AzureAD module is installed.
Get-Module “AzureAD” -ListAvailable
If no module is available you need to install it.
Install-Module “AzureAD”
When module is installed, run
Connect-AzureAD
After, you will see an authentication window and will need to log in using an account that has permissions to assign roles.
Get application (client) ID for the next command.
Get service principal object and store it inside a variable by running the following commands.
$principal = Get-AzureADServicePrincipal -All $true | ? AppId -eq 'd7defe38-0248-492a-9f7c-56bc7ca4a094'
And get a role object for User Administrator role.
$role = Get-AzureADDirectoryRole | ? DisplayName -eq 'User Administrator'
Having two variables above defined you can assign your application User Administrator role. To do this, run the following command.
Add-AzureADDirectoryRoleMember -ObjectId $role.ObjectId -RefObjectId $principal.ObjectID
Example of assignment is given below.
Having set this you will be able to reset user passwords.
Step-5: Getting parameters for OpenIAM Managed System configuration
The last step needed for completing a preparation is to collect some data for inputting into OpenIAM Managed System configuration page.
You will need the following data:
- Application (client) ID. It goes to the Login ID property on the OpenIAM configuration page.
- Directory (tenant) ID. It should be inserted into the Host URL property field.
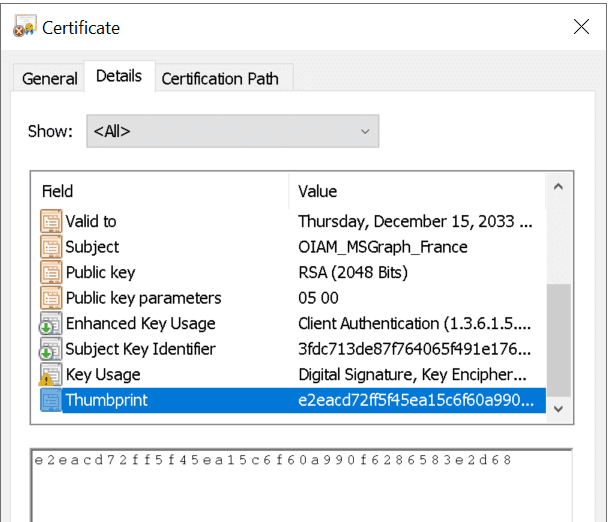
- Certificate Thumbprint, generated on step #3.1. It could be taken from MMC > Certificate Snap-in > Local Computer certificates > Personal > your certificate. This should go to the Password property
Attributes
As the out of the box connector covers most common functionality that OpenIAM can foresee in the majority of environments, below there is the list of basic attributes that are supported by default. However, connectors can be extended to support custom attributes or provide additional logic, as connector business logic is fully separated from a technical implementation and is stored in Connector.ps1 PowerShell file that is open sourced.
Mandatory attributes
Minimum set of attributes for a user account are
- DisplayName (string)
- PasswordProfile.Password (string)
- AccountEnabled (Boolean)
- MailNickName (string)
- UserPrincipalName (string)
- UserPrincipalName (string; Remark: is mandatory in case of a license assignment)
Regular attributes
In addition to the above mandatory attributes connector supports setting out of the box attributes as follows.
- AboutMe (string)
- AgeGroup (string)
- Licensing.Data (JSON attribute, see below chapter for the explanation)
- City (string)
- CompanyName (string)
- Country (string)
- Department (string)
- DeviceEnrollmentLimit (Int32)
- EmployeeType (string)
- ExternalUserState (string)
- FaxNumber (string)
- GivenName (string)
- Groups (multivalue) - can include identifiers of Azure groups along with operation codes to indicate if current user should be added to a group with given Id or removed from it.
- ImAddresses (string)
- JobTitle (string)
- Mail (string)
- MailNickname (string)
- MobilePhone (string)
- MySite (string)
- OfficeLocation (string)
- OnPremisesDistinguishedName (string)
- OnPremisesDomainName (string)
- OnPremisesImmutableId (string)
- OnPremisesSamAccountName (string)
- OnPremisesSecurityIdentifier (string)
- OnPremisesUserPrincipalName (string)
- PostalCode (string)
- PreferredDataLocation (string)
- PreferredLanguage (string)
- PreferredName (string)
- SecurityIdentifier (string)
- State (string)
- StreetAddress (string)
- Surname (string)
- UsageLocation (string)
- UserType (string)
Assigning license packages
License assignment is being controlled by the Licensing.Data attribute.
For all operations related to licenses you will need to get the name of the license that you are going to assign or remove. It is possible to get the list of all available licenses for your organization. To do this you can go to the connector machine (or any other machine where Microsoft PowerShell Graph module is available), open PowerShell console and run the following command.
Connect-MgGraph -Scope User.ReadWrite.All, Directory.ReadWrite.AllGet-MgSubscribedSku -All | Select-Object SkuPartNumber
The output will be similar to one given below.
Having the names of the licenses as shown above you can form your JSON payload in a basic way, for assigning the whole license package. However, a single license package consists of a set of nested services. Sometimes one may need to assign licenses and grant access to some particular list of services included inside this license package. If you need to do it, first of all you need to know the names of services that are a part of one particular license package.
Let's assume that we have the POWER_BI_STANDARD license package and we would like to get all services that are included in this license. Run the following
$availableLicenses = Get-MgSubscribedSku -All$curLicEntity = $availableLicenses | Where-Object SkuPartNumber -eq 'POWER_BI_STANDARD'$curLicEntity.ServicePlans
Now, you have all names needed to format JSON payload.
Let's assume that you need to assign a POWER_BI_STANDARD license package for a user excluding PURVIEW_DISCOVERY plan within and completely revoking FLOW_FREE from a user. In this case Licensing.Data should be set as multivalued containing 2 items, as follows.
{"LicenseName":"POWER_BI_STANDARD","DisabledPlans":["PURVIEW_DISCOVERY"]} => with operation code 'Add'{"LicenseName":"FLOW_FREE","DisabledPlans":[]} => with operation code 'Delete'
Information in Licensing.Data attribute could be presented either as names of licenses and plans or their identifiers, as shown below.
[{"LicenseName":"POWER_BI_STANDARD","DisabledPlans":["BI_AZURE_P0"]}]
Same example using identifiers.
[{"LicenseName":"a403ebcc-fae0-4ca2-8c8c-7a907fd6c235","DisabledPlans":["2049e525-b859-401b-b2a0-e0a31c4b1fe4"]}]
Synchronization
You need to take into account that you will get only the list of attributes that is listed in Property parameter. So you need to be very explicit in specifying all attributes that you need from identities that you are trying to sync. Otherwise, Microsoft Graph simply would skip them for optimization purposes.
Some examples of queries are:
Get-MgUser -UserId [UPN] -Property Id, Mail, UserPrincipalName, Name, DisplayName, AssignedLicenses, AuthenticationMethodsGet-MgUser -All -Property Id, Mail, UserPrincipalName, Name, DisplayName, AssignedLicenses, AuthenticationMethods
Keep in mind that request for AuthenticationMethods is a heavy operation, so should be used only when it is really needed, but it would not be a good idea to put it to our out-of-the box queries/attributes configuration on OpenIAM side.


