Managed system configuration
After the connector is up and running, the next step required is configuring managed system. To do it, follow the steps described below.
- Go to webconsole > Provisioning > Managed system.
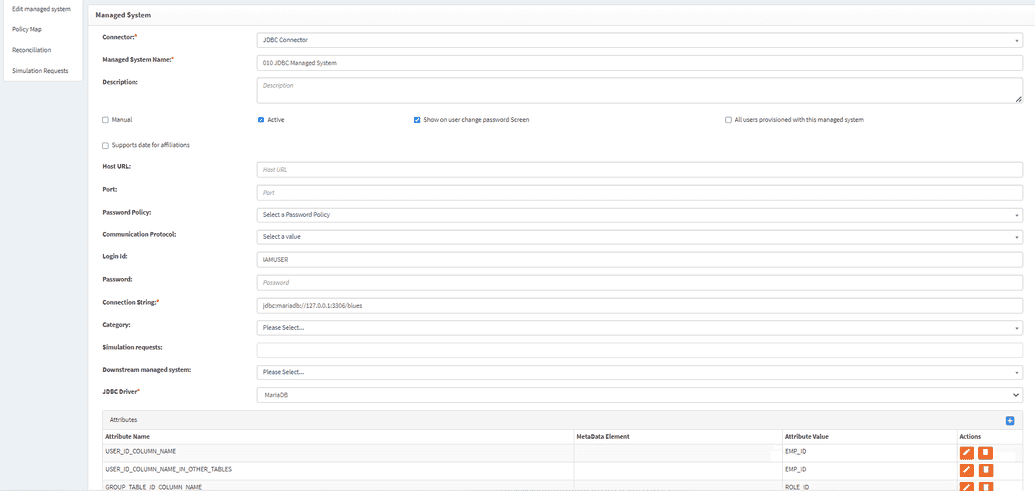
- In the window loaded, there is a list of existing out-of-the-box managed systems. Type the name required and click Edit to configure it (JDBC managed system is used as an example).
- Configure the selected system as required, considering the field described in the table below.
| Field | Description |
|---|---|
| Connector | The name of the connector used for automated provisioning. |
| Managed System Name | Name of the respective managed system. |
| Description | Description of the managed system (optional). |
| Manual | If the checkbox is set to 'true', it means that the managed system is 'manual'. Here, the assumption is that someone will manually have to fulfill the request. For this reason the system adds an extra approval step. This last step is not really an approver, it's the person or group who will fulfill the request. The place where the workflow gets the approver details is from the "admin" value on the resource configuration page. If it does not find a value, then it defaults to sysadmin (which is defined in the system configuration). If you can update your manual managed system to have an admin defined, then the system will send the notifications to the correct person or group for fulfillment. |
| Active | If checked, the checkbox means the managed system is active and used for provisioning. |
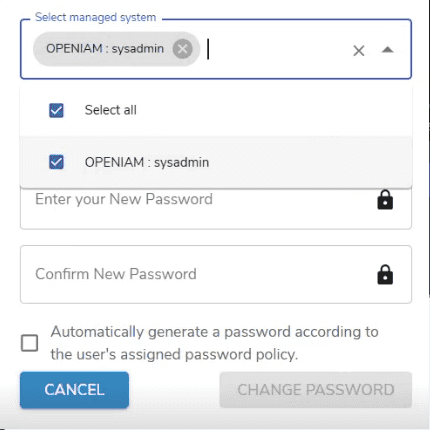
| Show on user change password Screen | If this field is set to 'true', then when changing the user at the login screen, the managed system will be available for change, as shown below. |
| Field | Description |
|---|---|
| All users provisioned with this managed system | When checked, this means that the managed system is only used for user provisioning. Managed system must be active. So, when active and all provision flags are ON then during user save (add or update), the managed system will be forcibly linked to a user directly without any entitlements involved. Same checkbox you can find in role and in group. |
| Host URL | An URL of the host to connect with. Can be left blank. |
| Port | In case there is a specific port for connection with this managed system, it is specified in this field. Can be left blank. |
| Password Policy | A specific password policy to be used with this managed system. You can choose a default one or create your own one using this document. Can be left blank. |
| Communication Protocol | A specific protocol, if required, to communicate with the managed system. Can be left blank. |
| Login Id | Can be gotten from service account credentials. |
| Password | Defines category (or subcategory) in service catalog. If left blank, this managed system won't appear in the catalog. |
| Simulation requests | Used for simulation mode, described in detail in the document by the link. |
| Downstream managed system | Defines order (sequence) of provisioning. For example, if an AD managed system Exchange is downstream, it means unless AD identity is saved with success IDM won't send provision events to Exchange. |
| Attribute | The list contains the out-of-the-box supported attributes, e.g. ON_DELETE helping to override operation delete and send another provision operation instead. Other possible values are |
UPDATE (sends save operation to connector), DISABLE (sends suspend operation to connector ) DELETE (default if attribute is not defined), PRE_PROCESS (defines path to managed systems's specific preprocessor groovy script and may be not defined), POST_PROCESS (defines path to mto managed systems's specific post processor groovy script and may be not defined). This section may vary from connector to connector since different sets of attributes are used in connectors. | |
| Authentication provider | In case authentication provider is linked to a managed system (as described here), it will be listed in this field. |
- Click Save.
Note: The steps above are used for out-of-the-box managed systems.
Creating a connector from scratch
In case the out-of-the-box connector is absent, there is a need to create a new one to connect it to a managed system.
- Go to webconsole > Connectors. In case the connector is on the list, skip the next step.
- If the connector is not on the list, click Create a new cnnector and fill in the respected fields.
| Field | Description |
|---|---|
| Connector Name | Name or short description that helps to identify the connector. |
| Metadata Grouping | The field has a default value of Connector type, so the metadata is grouped here by the type of a connector. |
| Metadata type name | Name or short description that helps to identify metadata. |
| Enable priority queue | If set to On, it means a new Q will be created for UI dependent and urgent (prioritized) requests like resetPassword, resync identity status, etc. As of now this is supported only in AD PowerShell connector |
- Click Save.
- A pop-up window will be displayed asking if you want to configure the connector. Click Yes, if you want/need to configure it. The next screen is responsible for configuring all the additional fields emerging in the managed system configuration screen. Hence, in case you need some field, tick it and assign a value to it while configuring a managed system.
- You can also define a custom field on the managed systems level here.
- Click Add on the screen shown above, define a name for the field, define it in any language you need, select if it's required, select the type of the field from the dropdown and click Save.
- Type in the name of the created field in Custom field nme field and select it from the list of found fields. Click Save and the field will emerge in the Managed system configuration screen.
- The system will then ask you if you want to define a policy map for this connector. Click Yes and define a policy map as described in the respective document.
- Afterwards, go to webconsole > Provisioning > Managed system > Select Create new managed system on the left and configure the managed system as described above for the out-of-the-box solutions.


