Managed system configuration
After the connector is up and running, the next step is to configure the managed system. To do this, follow the steps described below.
- Navigate to webconsole > Provisioning > Managed System.
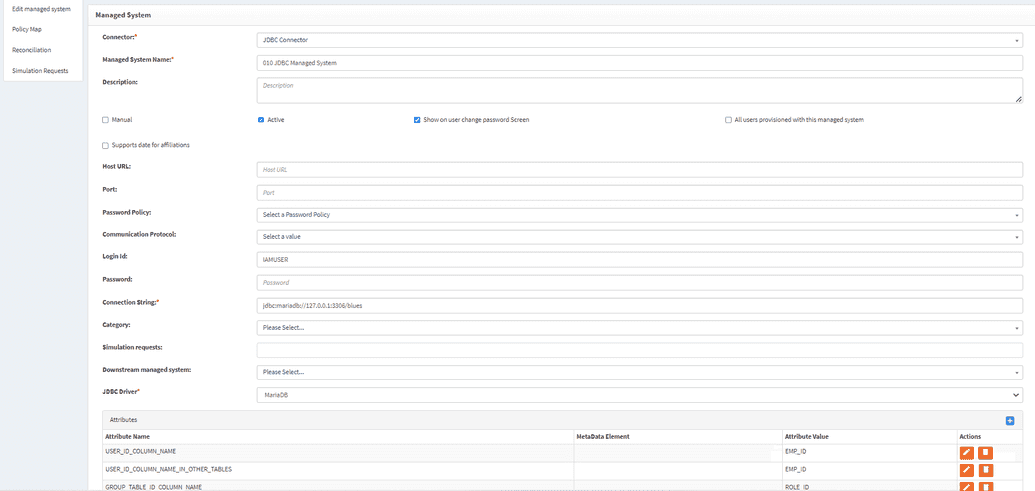
- In the loaded window, you’ll see a list of existing out-of-the-box managed systems. Enter the desired name and click Edit to configure it. (In this example, a JDBC managed system is used.)
- Configure the selected system as needed, referring to the table below for field descriptions.
| Field | Description |
|---|---|
| Connector | The name of the connector used for automated provisioning. |
| Managed System Name | Name of the respective managed system. |
| Description | Description of the managed system (optional). |
| Manual | If this checkbox is selected, the managed system is considered "manual". This means someone must manually fulfill the request. As a result, an additional approval step is added. This is not a traditional approver role, but rather the person or group responsible for fulfilling the request. The system determines who this is based on the "admin" value in the resource configuration. If no value is set, it defaults to "sysadmin" (as defined in the system configuration). Defining an admin ensures notifications are sent to the correct person or group. |
| Active | If checked, the managed system is active and used for provisioning. |
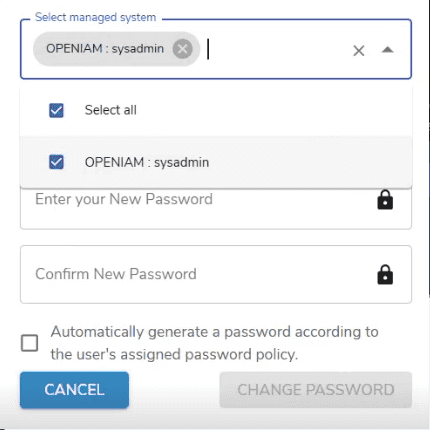
| Show on user change password screen | If set to true, the managed system will appear on the login screen when changing a user's password, as shown below. |
| Field | Description |
|---|---|
| All users provisioned with this managed system | If checked, this means the system is used only for user provisioning. The managed system must be active. When active, and if all provision flags are enabled, the system will forcibly link the managed system to a user during save (add or update), without using entitlements. This same checkbox is also available in roles and groups. |
| Host URL | The URL of the host to connect to. Can be left blank. |
| Port | Specifies a specific port for the connection, if needed. Can be left blank. |
| Password Policy | A specific password policy to apply to this managed system. You can use the default or create a custom policy using this guide. Can be left blank. |
| Communication Protocol | A specific protocol used for communication, if required. Can be left blank. |
| Login ID | Typically retrieved from service account credentials. |
| Password | Defines the category (or subcategory) in the service catalog. If left blank, this managed system will not appear in the catalog. |
| Simulation Requests | Used for simulation mode, as described in detail here. |
| Downstream Managed System | Defines the provisioning order. For example, if an Exchange system is downstream from an AD system, provisioning events will only be sent to Exchange after a successful AD identity save. |
| Attribute | Lists out-of-the-box supported attributes, such as ON_DELETE, which overrides the delete operation with another provisioning action. Other values include UPDATE (sends a save operation), DISABLE (suspends the identity), DELETE (default if not specified), PRE_PROCESS (path to a preprocessor Groovy script), and POST_PROCESS (path to a postprocessor script). Supported attributes may vary by connector. |
| Authentication Provider | If an authentication provider is linked to the managed system (as described here), it will appear in this field. |
- Click Save.
Creating a connector from scratch
If no out-of-the-box connector is available, you will need to create a new one and link it to a managed system. However, we caution that this is an extremely rare case and the existing out-of-the-box connector configurations will serve the overwhelming majority of business uses. In the event you still need to create a new connector configuration from scratch, follow the steps below.
- Go to webconsole > Connectors. If the connector already exists, skip the next step.
- If not listed, click Create a new connector and complete the required fields:
| Field | Description |
|---|---|
| Connector Name | A name or short description to identify the connector. |
| Metadata Grouping | Default is Connector type. Metadata is grouped by the connector type. |
| Metadata Type Name | A name or description that identifies the metadata. |
| Enable Priority Queue | If enabled, a new queue is created for UI-dependent and urgent requests (e.g., resetPassword, resync identity status). Currently supported only in the AD PowerShell connector. |
- Click Save.
- A pop-up will ask if you want to configure the connector. Click Yes if needed. The next screen allows you to configure additional fields that will appear in the managed system configuration screen. Tick the necessary fields and assign values.
- You can also define a custom field at the managed system level here.
- Click Add, enter a name for the field, provide a label (in any language), select whether it is required, choose a field type from the dropdown, and click Save.
- Enter the field name in the Custom field name field, select it from the list, and click Save. The field will now appear in the managed system configuration screen.
- The system will then prompt you to define a policy map for this connector. Click Yes and configure it as described in the respective documentation.
- Finally, navigate to webconsole > Provisioning > Managed System, select Create new managed system, and configure it as described above for out-of-the-box systems.
- After you have filled in the connection details and activated the managed system (but not marked it as manual), you can check the connection status on the managed system dashboard at Provisioning > Managed System.
If the connection is successful, the connection details will be displayed in green, as shown below:
If the connection fails, the details will appear in red, and an error message will pop up. To view more information about the error, simply click on the message.


