Salesforce.com connector
Salesforce.com Connector
The Salesforce.com connector enables provisioning and deprovisioning with Salesforce.com (SFDC).
This section describes how to deploy and configure the SFDC connector in your environment.
The connector integrates with SFDC using the REST interface and supports the following functionality:
| Feature | Supported |
|---|---|
| CRUD operations for user | Y |
| Password synchronization | Y |
| User lookup/search | Y |
| Bulk user import/synchronization | Y |
Prerequisites
Connector host
This connector requires a Linux host.
- Kubernetes: connectors are deployed automatically.
- Docker or RPM distribution: follow the installation steps below.
Service account privileges
The connector requires a service account with the following privileges:
| Privilege Name | Required |
|---|---|
| User with appropriate licenses | Y |
| Profile with API Enabled | Y |
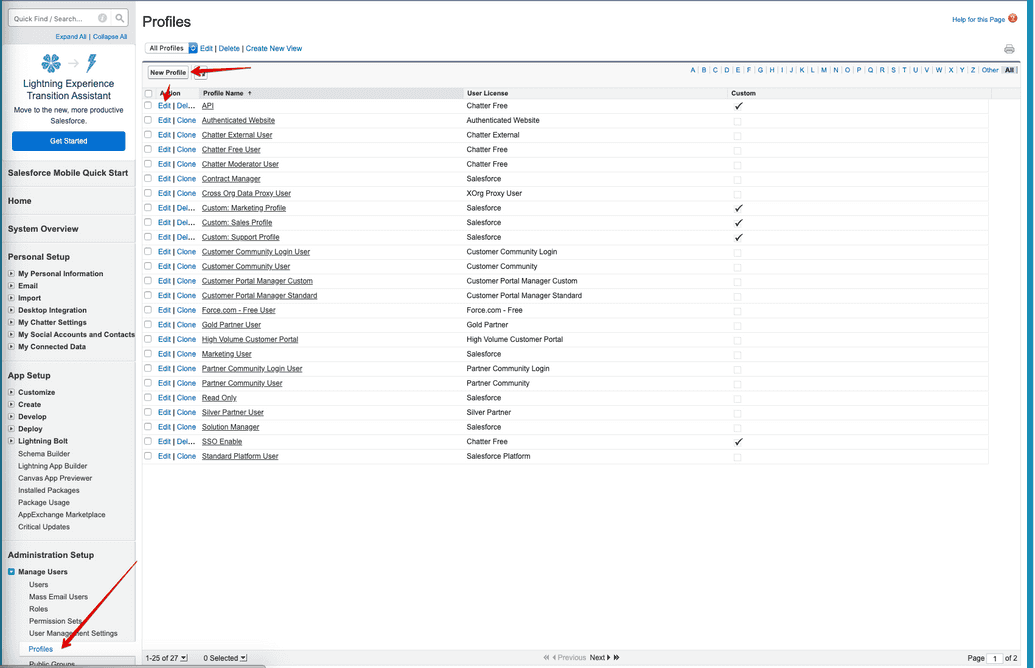
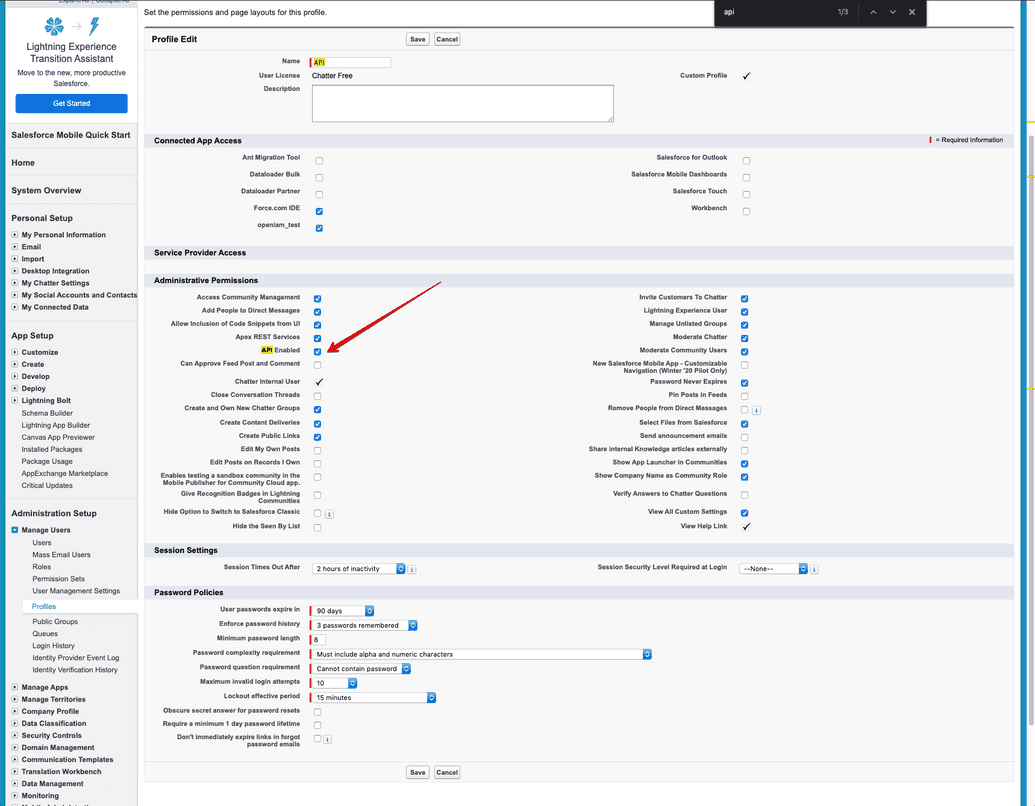
To enable API Enabled:
Log in to SFDC.
Go to Administration Setup → Managed Users.
Create a new profile or edit an existing one.
Under Administrative Permissions, select the API Enabled checkbox.
Installing the Connector
Docker Swarm
- Uncomment the following line in
setup.sh:
# docker pull "openiamdocker/salesforce-connector-rabbitmq:debian-${OPENIAM_VERSION_NUMBER}-${BUILD_ENVIRONMENT}"
- Uncomment the following line in
startup.shfile.
#docker stack deploy --compose-file connectors/salesforce/docker-compose.yaml --with-registry-auth salesforce-connector
Restart your OpenIAM containers and run the following commands.
./setup.sh./startup.sh
Kubernetes
In Kubernetes deployments, this connector is deployed automatically as part of OpenIAM. No additional steps are required.
RPM Install
To run the connector via RPM, you need to download the JAR file for this connector and run it using following command.
java -Dlogging.level.root=INFO -Dconfpath=/data/openiam/ -Dorg.openiam.connector.queue=SALESFORCE_Connector_1_Request -Dorg.openiam.connector.queueResponseName=SALESFORCE_Connector_1_Response -jar salesforce-connector-rabbitmq.jar>salesforce.out&
SALESFORCE_Connector_1 is a default queue. If you create another connector config please update your configuration accordingly.
Use the command below to see the connector logs.
tail -f salesforce.out
Registering Connector in OpenIAM
The connector must be registered within OpenIAM for it to be operational. This process defines the message queue used by the core OpenIAM services to communicate with the connector. To register the SFDC connector, log in to thewWebconsole and follow the steps below.
- Go to Provisioning > Connector.
- If the Salesforce.com connector entry does not exist, click Create new connector from the side menu.
- Complete the fields as shown in the table below.
| Connector configuration parameter | Description |
|---|---|
| Connector Name | A descriptive name to identify this connector (e.g., Salesforce.com). |
| Metadata Grouping | Select Connector type. |
| Metadata Type Name | Select Salesforce.com connector – identifies the connector type internally. |
| Connector Queue | Enter SALESFORCE_Connector_1. This is the queue name used for receiving messages. |
Security information required to establish a connection
Generating a security token
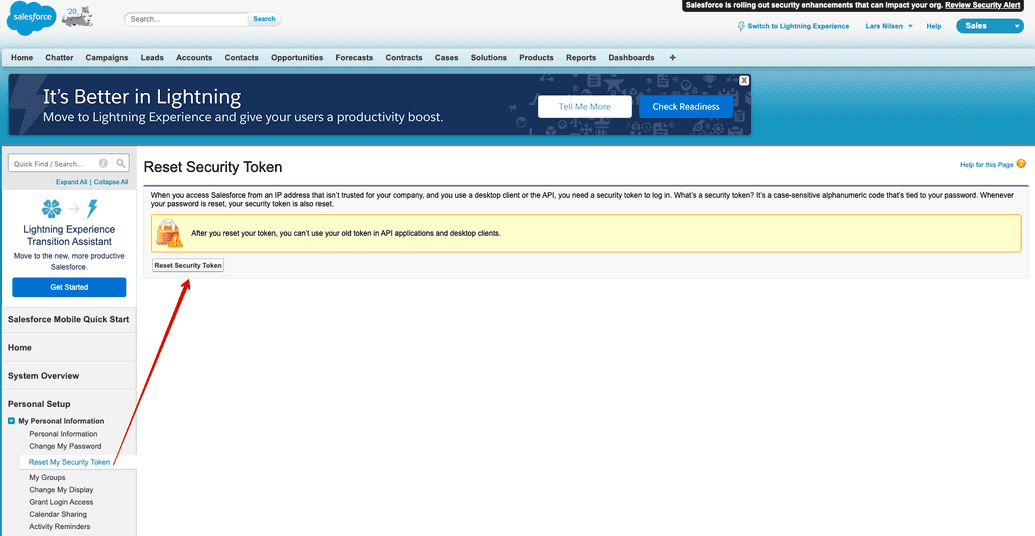
Before establishing a connection to SFDC using the connector, you must generate a security token, which is used in the password field. This must be done on the SFDC side.
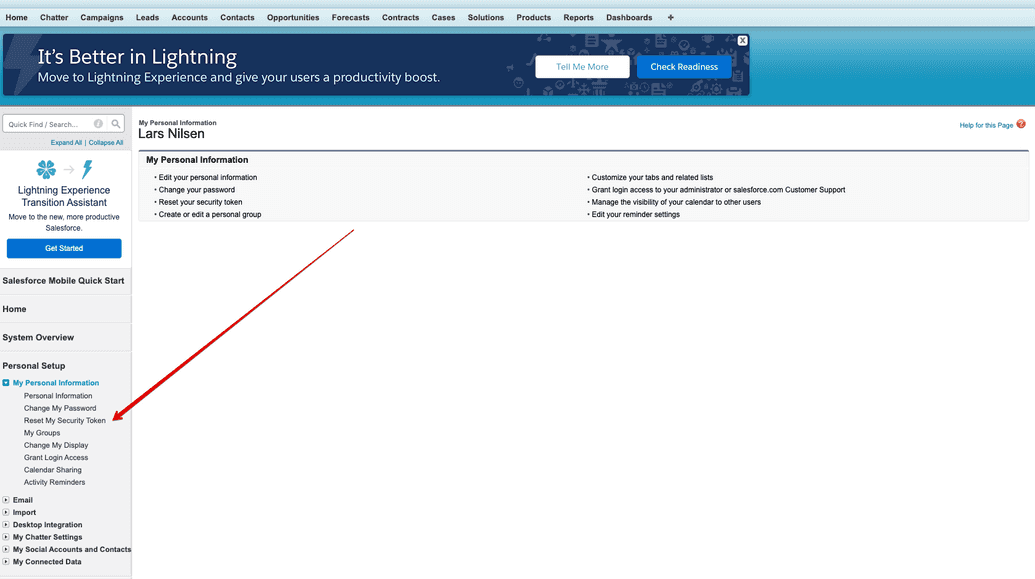
When you create an account, you will receive a security token. If you lose it, generate a new one by:
- Logging into your account.
- Navigating to Personal Setup > My Personal Information Reset My Security Token Reset Security Token.
For more information onSalesforce.com security token visit Salesforce help center.
Client ID and Secret
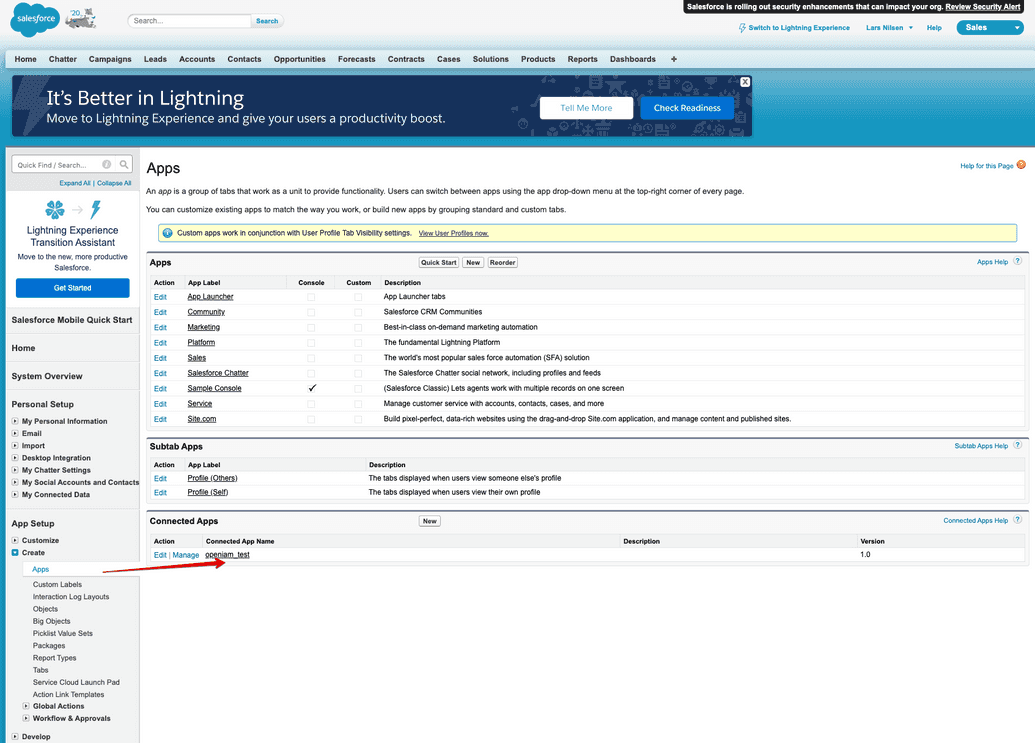
If using the REST interface, you must also obtain the Client ID and Client Secret from your tenant/account admin. Use the steps below.
- Login to SFDC.
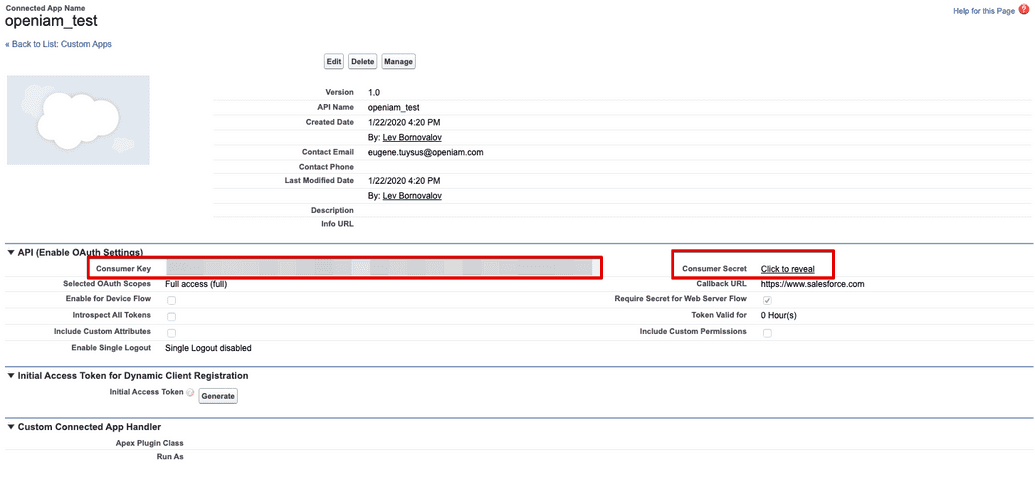
- Go to Create > Apps > Connected Apps → click the app name.
- Open the app to view the
Consumer Key(Client ID) andConsumer Secret(Client Secret).
Establishing a connection with SFDC tenant
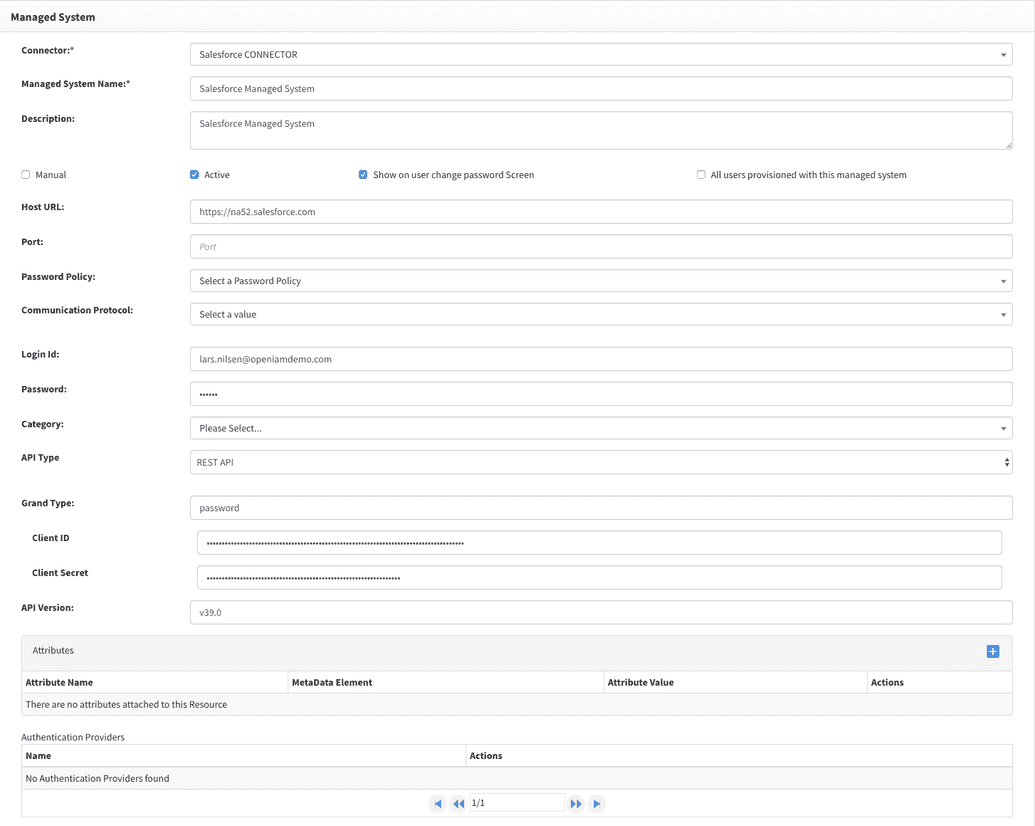
To establish a connection with SFDC, define a Managed System in the webconsole by navigating to Provisioning > Managed system.
The OpenIAM SFDC connector supports both REST and SOAP interfaces. Depending on your choice, configure it as follows.
OpenIAM Managed System configuration (REST):
| Managed System Field | Value |
|---|---|
| Host URL | https://[tenant].salesforce.com (e.g., https://mycorp.salesforce.com) |
| API type | REST API |
| Login Id | Username |
| Password | Password + security token (entered as one string) |
| Grant Type | password |
| Client ID | Client ID |
| Client Secret | Client Secret |
| API Version | v39.0 (REST API version) |
If the connection is successful, within a few minutes the connection health check will appear green. If it fails, it will be red, and you will need to troubleshoot further.
Example of a configured managed system is given in the screenshot below.
Defining the provisioning Policy Map
The final step is to define a policy map, which determines how the connector populates attributes for the User object.
- Go to Policy Map on the Managed System configuration created above.
- Click Add and select Provision user from the dropdown.
Reference table for attribute definitions:
| Field Name | Required | OOTB Groovy script | Value | |
|---|---|---|---|---|
| 1 | Alias | User alias. Requires custom field. Max 8 characters. | ||
| 2 | DefaultGroupNotificationFrequency | Set default via groovy or custom field (type: select). | ||
| 3 | DigestFrequency | Set default via groovy or custom field (type: select). | ||
| 4 | Maps to Primary email in OpenIAM. Must be unique. | |||
| 5 | EmailEncodingKey | Default: UTF-8. Requires groovy or custom field. | ||
| 6 | FirstName | N | User's first name. Required in OpenIAM but optional in Salesforce. | |
| 7 | IsActive | Determines active/disabled state in SFDC. Default scripts use OpenIAM Status. | ||
| 8 | LanguageLocaleKey | Default: en_US. Requires groovy or custom field. | ||
| 9 | LastName | User’s last name. | ||
| 10 | LocaleSidKey | Default: en_US. Requires groovy or custom field. | ||
| 11 | Password | Used only for reset. If inactive, password reset is still sent via link. If active, password updates directly. | ||
| 12 | ProfileId | Requires custom field. Contains Profile ID where user is added. | ||
| 13 | TimeZoneSidKey | Default: America/New_York. Requires groovy or custom field. | ||
| 14 | Username | Principal. Defaults to primary email. | ||
| 15 | UserPermissionsCallCenterAutoLogin | Default: false. Requires groovy or custom field. | ||
| 16 | UserPermissionsMarketingUser | Required in SFDC. Default value set via groovy or custom field. Default: false. | ||
| 17 | UserPermissionsOfflineUser | Required in SFDC. Default value set via groovy or custom field. Default: false. | ||
| 18 | UserPermissionsWirelessUser | Required in SFDC. Default value set via groovy or custom field. Default: false. |
All fields except FirstName, LastName, Email, Password, and IsActive must be created as custom fields in the user template. Most can have default values defined in Groovy scripts.
Connector troubleshooting tips
Important notes
When provisioning a new user, you cannot assign a password immediately because Salesforce APIs do not allow password provisioning during creation.
Workflow:
- Create the user without a password.
- Update the user to set the password (via the Password field in Policy Map).
- Wait ~5 minutes before login (delay is enforced by Salesforce).
Errors
After assigning a password, the first login via Salesforce UI will force the user to reset it.
If this reset is cancelled, setting a new password via API may throw an exception, but the password will still be applied.
[UnexpectedErrorFault [ApiFault exceptionCode='UNKNOWN_EXCEPTION' exceptionMessage='invalid repeated password' extendedErrorDetails='{[0]}']
