Exchange connector
The Exchange connector allows OpenIAM to manage Exchange mailboxes (create, modify, remove, lock, unlock). It supports Exchange Server 2010 and later.
Requirements
- The Exchange server must be accessible from the machine running the connector.
- A PowerShell session to the Exchange instance must be possible.
- Other general requirements for .NET/PowerShell connectors are described in the PowerShell connector usage document.
Installation and connection to OpenIAM
All PowerShell connectors, including the Exchange connector, are installed the same way. See PowerShell connector installation for details.
General usage
Usage is consistent across all PowerShell connectors. See PowerShell connector usage.
Service account
When configuring the Managed System in the OpenIAM Webconsole, specify the Login ID for the service account. Exchange uses an AD account to perform mailbox operations.
The service account must include the domain name, for example:
openiamtest\serviceAccount.
Connecting to your directory
In the Managed System configuration page, specify the service account with sufficient privileges for the intended Exchange mailbox operations.
Attribute provisioning rules
The Exchange connector works with both on-premises and Exchange Online.
By default, it operates in on-premises mode. To switch to Online, set the ConnectorModeSettings attribute.
This allows smooth migration if an organization moves from Exchange on-premises to the cloud, with minimal changes (except for environment-specific features).
The connector supports provisioning for:
- User mailboxes
- Resource mailboxes
- Distribution Groups
Connector mode settings
The ConnectorModeSettings attribute controls two parameters:
- Connector scope — On-premises or Online
- User creation behavior —
CreateorEnable
Connector scope determines whether the connector targets Exchange on-premises or Exchange Online.
User creation behavior determines whether Exchange should attach a mailbox to an existing AD user or create a new AD user with a mailbox.
The parameter must be provided as a JSON string, for example:
{"connectorScope":"premise","newUserBehavior":"create"}
If this attribute is not specified, the connector defaults to premise scope and enable behavior.
Important notes
In Create + Premise mode, you must set:
- Name
- Password
In Create + Online mode, you must set:
- DisplayName
- UsageLocation (two-letter code, e.g., US)
When working in Create + Online mode, the connector creates a cloud user, assigns a license, and activates Exchange Online features. However, mailbox provisioning by Microsoft can take up to 24 hours.
This means:
- A second provisioning request may be required for additional mailbox parameters.
- Initial requests may fail because the mailbox does not yet exist.
Mandatory parameters for creating a cloud user (Exchange Online ADD operation):
- UserPrincipalName
- DisplayName
- Password (can be left blank, but OpenIAM will not track it)
- UsageLocation (needed for license assignment)
User provisioning
Principal: UserPrincipalName
| Parameter | Description | Required | Values |
|---|---|---|---|
| ConnectorModeSettings | JSON defining connector scope and user behavior. Scope: - premise (default) - online User behavior: - enable (default) - create Example: {"connectorScope":"premise","newUserBehavior":"create"} | No | JSON |
| UserPrincipalName | Logon name in UPN format (username@domain). Required only in on-premises Exchange and not needed in Enable mode. | Yes (Principal) | String |
| Name | Unique mailbox name (max 64 chars). | Yes (Premise + Create) | String |
| Password | Required for Create + Premise mode. Sets the AD user password. Not required for linked, resource, or shared mailboxes. | No | String |
| MailboxType | Defines mailbox type during creation (ignored for existing mailboxes). Values: Room, Equipment, Shared. | No | String |
| Alias | Exchange alias (mail nickname). One value only. | No | String |
| OrganizationalUnit | Used only in Premise + Create mode to specify AD location. Example: exchangeserver.com/Users | No | String |
| ActiveSyncMailboxPolicy | Used only in Premise + Create mode. Defines mobile device mailbox policy. Defaults to the system policy if not set. | No | String |
| AddressBookPolicy | On-premises only. Specifies an address book policy by Name, DN, or GUID. | No | String |
| ArbitrationMailbox | On-premises only. Defines arbitration mailbox for moderation. Accepts Name, DisplayName, Alias, DN, UPN, etc. | No | String |
| IsArchive | On-premises only. If True, creates an archive mailbox. | No | Boolean |
| ArchiveDatabase | On-premises only. Defines archive mailbox database. | No | String |
| Database | On-premises only. Defines mailbox database. | No | String |
| DisplayName | Display name for the mailbox. Required in Online mode. | Yes (Online) | String |
| FirstName | Used only in Create mode for new users. | No | String |
| ImmutableId | Used for GALSync and SAML federation scenarios. Must match AD FS settings if federation is used. | No | String |
| Initials | Used only in Premise + Create mode. Max 6 chars. | No | String |
| LastName | Used only in Premise + Create mode. | No | String |
| ManagedFolderMailboxPolicy | Exchange 2010 only. Assigns managed folder policy. | No | String |
| ManagedFolderMailboxPolicyAllowed | Exchange 2010 only. Bypasses MRM warnings for older Outlook clients. | No | Boolean |
| ModeratedBy | Defines one or more moderators for message approval. Accepts Name, Alias, DN, GUID, etc. | No | String |
| PrimarySmtpAddress | On-premises only. Defines primary email. Disables EmailAddressPolicyEnabled when set. | No | String |
| ResetPasswordOnNextLogon | Used only in Premise + Create mode. Requires password reset at next logon. Default: false. | No | Boolean |
| RetentionPolicy | On-premises only. Defines mailbox retention policy. Defaults to Default MRM Policy. | No | String |
| RoleAssignmentPolicy | Defines role assignment policy. Defaults differ for Online vs. On-premises. | No | String |
| SamAccountName | On-premises only. Pre-Windows 2000 logon name (max 20 chars). | No | String |
| SendModerationNotifications | Defines moderation notification behavior: Always (default), Internal, Never. | No | String |
| SharingPolicy | On-premises only. Defines sharing policy. Defaults to Default Sharing Policy. | No | String |
| ThrottlingPolicy | On-premises only. Defines throttling policy. Defaults to none. | No | String |
| AccountDisabled | On-premises only. Creates mailbox with disabled account. | No | Boolean |
Assigning a license
When creating a cloud user, the connector must assign a license containing Exchange Online. The user mailbox is created automatically when the license is applied.
The LicensesToAssignJson parameter is mandatory for this step.
Example:
[{"LicenseName":"openiamdemocloud:ENTERPRISEPACK","DisabledPlans":["SWAY","FLOW_O365_P2"]},{"LicenseName":"openiamdemocloud:POWER_BI_STANDARD","DisabledPlans":["BI_AZURE_P0"]}]
In this example, we set the E3 license with SWAY and FLOW_O365_P2 disabled, and the PowerBI license with BI_AZURE_P0 disabled.
- To keep the entire package enabled, set
DisabledPlansas an empty array ([]). - To change disabled plans, set
DisabledPlansto the final list of plans that should remain disabled. Any plans not listed will be enabled.
By default, the connector stops after creating a user in Office 365 and assigning a license. This is because newly created users may take time to receive an Exchange mailbox. During this delay, mailbox settings cannot be applied, and the connector may throw an exception if further actions are attempted.
Synchronization
Reconciliation and synchronization are described in a separate section.
For synchronization, in addition to groovy transformation/validation scripts, set a search string in the SQL Query / Directory Filter field on the synchronization page (webconsole > Provisioning > Synchronization > Edit your profile). This string defines what the connector queries from Exchange.
Common examples:
Get-Mailbox– returns all user mailboxes with basic details (Name, Alias, ServerName, ProhibitSendQuota).Get-Mailbox | Select-Object– returns all user mailboxes with full details.
Application authentication in the Exchange connector
From version 5.30.1.0, the Exchange Online connector supports authentication as an Azure application.
To configure:
- Create a certificate on the connector machine using PowerShell. Be sure to set your own CN.
New-SelfSignedCertificate -Subject "CN=$certname" -CertStoreLocation "Cert:\LocalMachine\My" -KeySpec Signature -KeyLength 2048 -KeyAlgorithm RSA -HashAlgorithm SHA256 -NotAfter (Get-Date).AddYears(10)
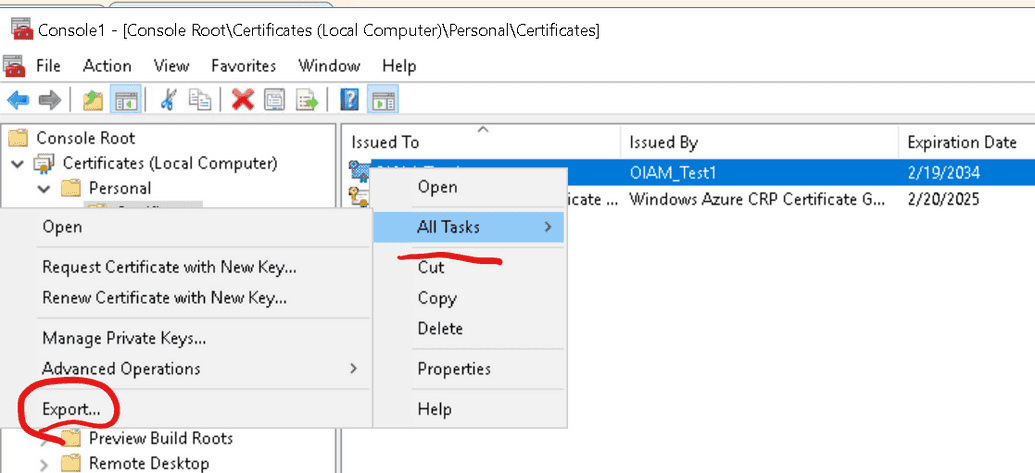
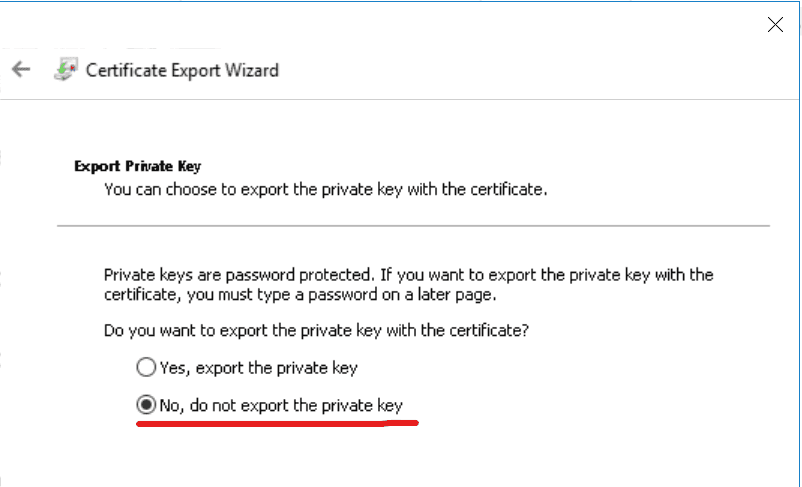
- Export the newly created certificate (no need to export the private key).
Create an application in Azure. Follow the Register the application in Microsoft Entra ID steps in the Microsoft document: https://learn.microsoft.com/en-us/powershell/exchange/app-only-auth-powershell-v2?view=exchange-ps#assign-microsoft-entra-roles-to-the-application
Upload the exported certificate to the Azure application.
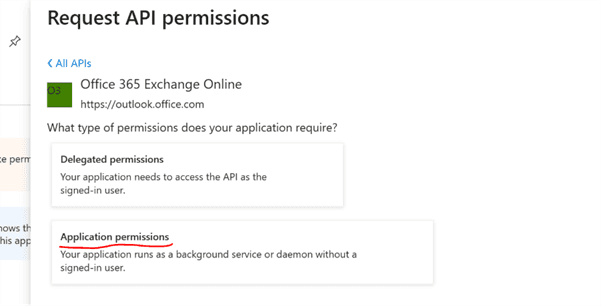
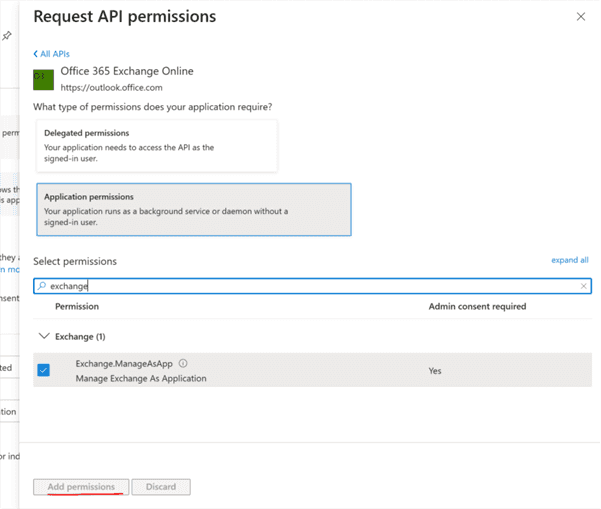
Assign permissions to the Azure application:
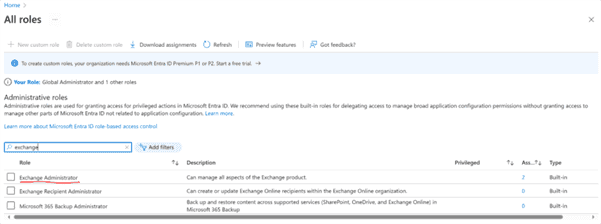
Assign the Exchange Administrator role to the application:
Open Microsoft Entra Roles and administrators (search roles).

In the search field, enter the name of the application you created, select the application, and click Add.
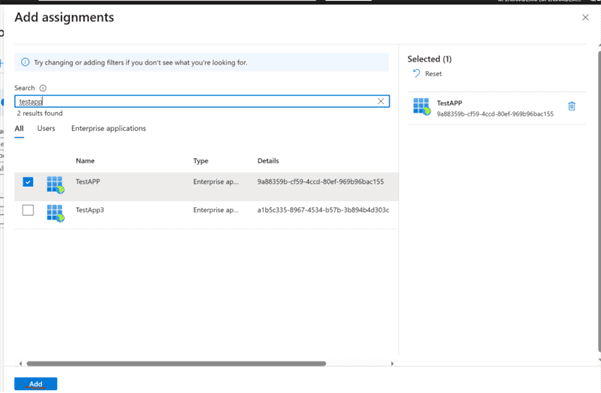
After assignment you should see the application listed under the Exchange Administrator role.

Configure the OpenIAM Managed System:
- Set attribute AppAuth =
True(managed system level). - Add attribute Organization (e.g.,
contosoelectronics.onmicrosoft.com). - In the Login field use the Azure Application (client) ID.
- Create attribute CertificateThumbprint on the managed system and set its value to the certificate thumbprint.
- Set attribute AppAuth =
Ensure the
ExchangeOnlineManagementPowerShell module is installed on the connector host. Installation instructions are here: https://learn.microsoft.com/en-us/powershell/exchange/exchange-online-powershell-v2?view=exchange-ps#install-the-exchange-online-powershell-module
Connector troubleshooting and tips
Connector troubleshooting is covered in the PowerShell connectors usage document: PowerShell connector usage. The steps there apply to all .NET/PowerShell connectors. The table below contains Exchange-specific notes.
| Error | Description |
|---|---|
| The operation couldn't be performed because object 'x' couldn't be found on 'y'. | This can occur when setting a distribution group that exists in AD but is not visible to Exchange. Check the Exchange admin area to confirm the group exists. Distribution groups created via Exchange cmdlets (e.g., Get-DistributionGroupMember) typically work; groups created directly in AD may not be visible to Exchange and can cause this error. |

