Azure SSO
This documents describes 2 basic scenarios:
- Azure is IDP and OpenIAM is SP.
- Azure is SP and OpenIAM is IDP.
In the first case when a user is trying to reach OpenIAM and this user is not authenticated - user is being redirected to Azure and is asked to log in to Azure. After the user logs in, it redirects back to OpenIAM where it gets access to all OpenIAM resources that are available for this user.
When Azure is SP (Service Provider) and the user tries to log in to Azure not being authenticated - it is being redirected to OpenIAM and should log in using OpenIAM credentials. When this is done the user is redirected back to Azure and can access own account.
Azure is IDP and OpenIAM is SP
This tutorial is split into 2 parts - configuring Azure side and configuring OpenIAM side.
Configuring Azure
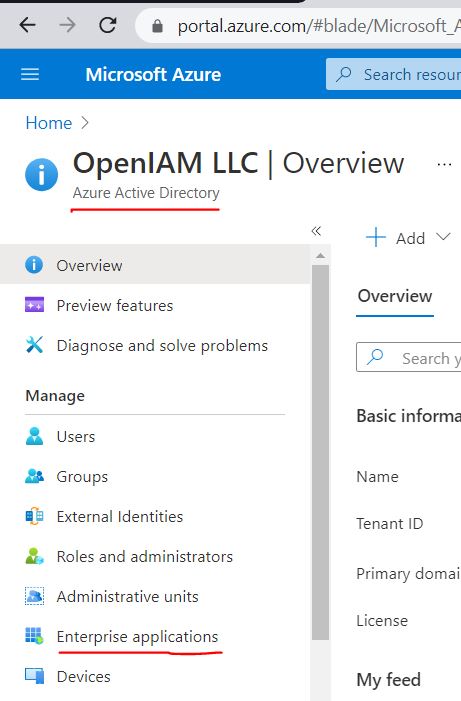
Firstly, go to Azure Active Directory and select Enterprise Applications menu item.
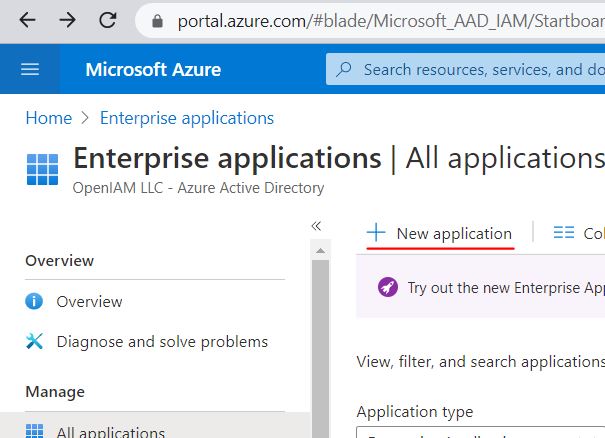
There, select New Application:
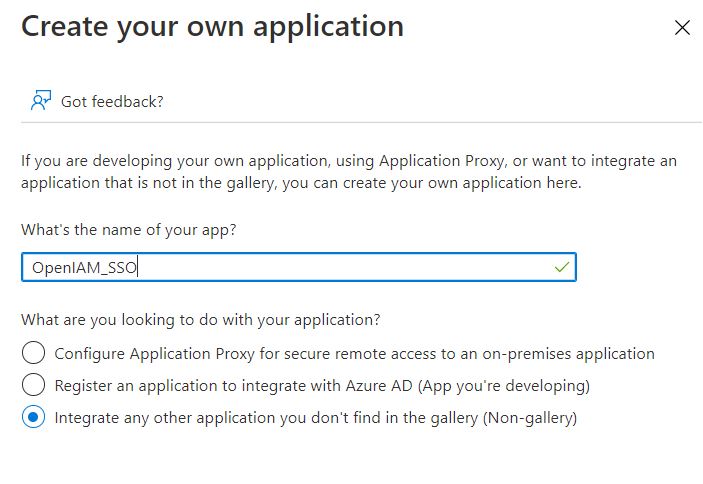
There you will see Create your own application. Having selected this, give your application some name. This could be any name that makes sense for you. After, select the radio button saying that this will be a custom application.
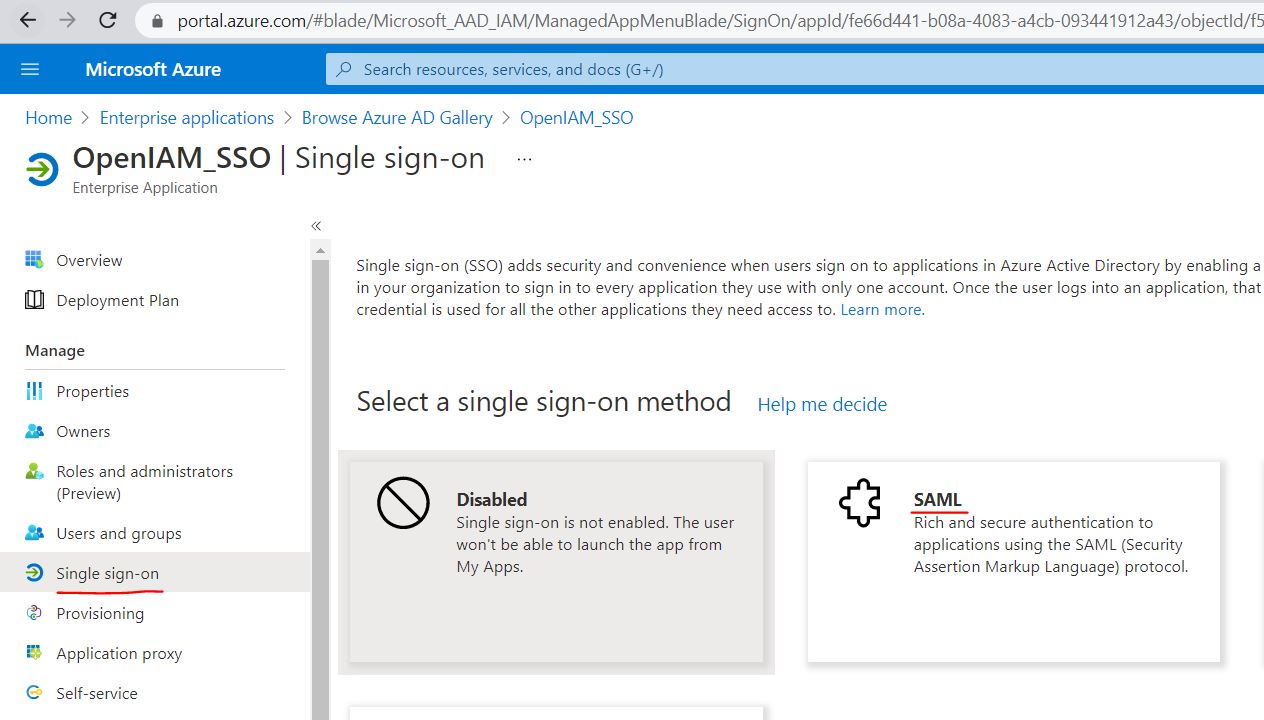
After application is created, you would need to go to Single sign-on menu item and press SAML:
There you need to define basic SAML settings similarly to below. Please note, below values are just examples and you will need to put your values. Explanation of values will be given below.
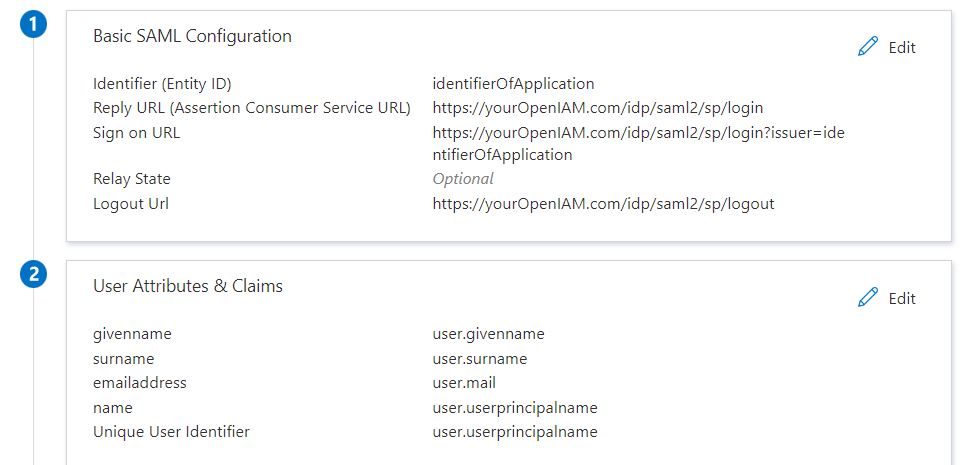
- Identifier (Entity ID) - should be some value that uniquely identifies your application (this will become SAML Issuer Name in OpenIAM configuration)
- Reply URL (Assertion Consumer Service URL) - should follow pattern https://{OpenIAMAddress}/idp/saml2/sp/login
- Sign on URL - should be the same as above, but include issuer parameter that should be equal to identifier. Example: https://{OpenIAMAddress}/idp/saml2/sp/login?issuer=identifierOfApplication
- Logout Url - should follow pattern https://{OpenIAMAddress}/idp/saml2/sp/logout
You can leave the rest of the parameters by default. You will also need parameters from section 4 of this page for configuring the OpenIAM part.
Configuring OpenIAM
To create an authentication provider, use Add OpenIAM as service provider to your IDP option.


Create a role (or group) in OpenIAM and in its entitlements link it with the resource of the authentication provider. Assign the test user the role (or group) to a test user.
Validating configuration
To validate configuration, go to your Enterprise application in Azure > Single sign-on > SAML and select Test in configuration section 5, as indicated below

Additional information
By default, Azure users should be explicitly assigned to your application to be able to sign in using SAML. You can add new users or groups using your Enterprise application in Azure > Users and Groups. Or if you want to allow anyone to access this application inside your organization (without setting users explicitly), go to your Enterprise application in Azure > Properties > set Assignment required? to No.
If you would like to redirect users from login page of OpenIAM automatically to Azure login page you should add redirection URL for pattern idp/login in needed content provider like:
https://demo.openiam.com/idp/saml2/sp/login?issuer=my_issuer
Azure is SP and OpenIAM is IDP
Configure OpenIAM Authentication provider
To create an authentication provider, use Add service to OpenIAM(IDP) option.


Save and download signing public key, share it with Azure. If you want to add Azure as an application in SelfService on the Application page you have to specify Application URL attributes.
It consists of https://{OpenIAMAddress}/idp/saml2/idp/initiate/{authentication provider ID}.
ID can be taken from the URL in the browser, as in the screenshot below.

Example of Application URL: https://demo.openiamdemo.com/idp/saml2/idp/initiate/8a80839077ed7cff0177edeefbb2004a
Create a role (or group) in OpenIAM and in its entitlements link it with the resource of the authentication provider. Assign the test user the role (or group) to a test user. Now in the SelfService the test user will have icon O365 and when they click it SSO will be launched.
Configuring Azure
You will need to run a PowerShell session to make configurations below. Start the PowerShell console.
Firstly, try to load MSOnline module:
PowerShellImport-Module MSOnline
If you see errors after running command above - install this module:
Install-Module MSOnline
Take certificate that was issued on OpenIAM side on the previous steps and load it to a PowerShell variable:
PowerShell[string]$cer = Get-Content 'CERTIFICATE_DOWNLOADED_FROM_OpenIAM'
Than save credentials for your admin account that has permissions to make changes to domain configuration inside Office365:
$credentials = Get-Credential
Run commands similar to below. Please pay attention that you would need to set your own values. In commands below we have used following just as examples:
- openiamdemo.com - this is a domain name that is added to your Office365 and is verified domain. You can check it by going to https://portal.office.com > Admin > Settings > Domains. We will be switching this domain to federated one.
- https://demo.openiamdemo.com/ - please replace this value with your OpenIAM instance address.
- IssuerUri parameter should include identifier that should be given from OpenIAM side.
- $cer - is the certificate that was loaded above.
Please also pay attention that OpenIAM addresses should work using https protocol. This is a requirement of Microsoft. Otherwise you will not see errors, but you will not get a solution working.
PowerShellConnect-MsolService -Credential $credentialsSet-MsolDomainAuthentication -Debug -DomainName openiamdemo.com -Authentication Federated -ActiveLogOnUri https://demo.openiamdemo.com/idp/saml2/idp/login -SigningCertificate $cer -PassiveLogOnUri https://demo.openiamdemo.com/idp/saml2/idp/login -IssuerUri https://demo.openiamdemo.com/idp/saml2/idp/login/8a8086e467c60f7f0167e067e4d5029f-LogOffUri https://demo.openiamdemo.com/idp/saml2/idp/logout -PreferredAuthenticationProtocol Samlp
It takes around a minute for configuration to be applied. After this you can test your setup by trying to log in to Azure/O365 services using username at your domain that was just configured as federated.
Additional information
Verifying domain authentication settings
To check current settings you can use following PowerShell command:
PowerShellGet-MsolDomainFederationSettings -DomainName openiamdemo.com | Select-Object ActiveLogOnUri, IssuerUri, LogOffUri, PassiveLogOnUri, SigningCertificate
Changing authentication settings
If you would need to change any of the settings that were set using command above, you would need to switch domain back to managed and re-run command above, but with changed parameters. The reason is that for now, running Set-MsolDomainAuthentication cannot change existing settings. In future this will probably be changed.
To switch domain back to federated you can run following command:
PowerShellSet-MsolDomainAuthentication -DomainName openiamdemo.com -Authentication Managed -Debug
Handling errors and misconfiguration
- Make sure that you run OpenIAM using HTTPS.
- If you see the
Set-MsolDomainAuthentication: Invalid value for parameter. Parameter Name: federationSettings.error. This could be caused by wrong certificate formatting. Please make sure that it does not have any additional whitespaces or chars.
Just-In-Time provisioning
Just-In-Time (JIT) provisioning in the context of Security Assertion Markup Language (SAML) refers to the process of creating a user account in an application or system at the moment of user authentication if the account does not already exist. Instead of pre-provisioning user accounts in every service or application, the service can automatically create an account based on the information provided in the SAML assertion when the user logs in for the first time. This can simplify the onboarding process for new users and reduce administrative overhead.
Here's how JIT provisioning generally works in the context of SAML:
- Initial Login: A user tries to access a service provider (SP), but they don't have an account there.
- SAML Authentication: The service provider redirects the user to the identity provider (IdP) to authenticate. The user logs in to the IdP.
- SAML Assertion: Upon successful authentication, the IdP sends a SAML assertion back to the service provider. This assertion contains the user's attributes, like their name, email, roles, or any other necessary information.
- Account Creation: The service provider checks if there's an existing account for the user. If not, it uses the information from the SAML assertion to automatically create a new user account.
- Access Granted: The user gains access to the service, either using their pre-existing account or the newly created one.
Benefits of JIT provisioning include:
- Reduced Administrative Overhead: No need to manually create accounts for each user in advance.
- Seamless User Experience: New users can get immediate access to services without waiting for accounts to be set up.
- Reduced Orphaned Accounts: Since accounts are created when needed, there's a lower chance of having unused accounts that can be a security risk.
However, it's worth noting that JIT provisioning can also introduce challenges, such as:
- Attribute Mapping: Ensuring that attributes provided by the IdP match what's expected by the SP.
- De-provisioning: While JIT handles automatic account creation, it doesn't address the removal of accounts when users leave an organization or change roles.
- Role Management: The SAML assertion should provide enough information to assign the correct roles or permissions, which might require coordination between the SP and IdP.
When implementing JIT provisioning with SAML, it's essential to plan out the provisioning process, handle potential edge cases, and ensure that the security implications of automatic account creation are fully understood and addressed.
The JIT provisioning can be configured by inserting a respective groovy script in the service provider editing window, as indicated below.

The example of a respective groovy script is given below.
import org.apache.commons.lang.StringUtilsimport org.openiam.base.response.list.GroupListResponseimport org.openiam.base.response.list.RoleListResponseimport org.openiam.base.ws.MatchTypeimport org.openiam.base.ws.SearchParamimport org.openiam.idm.searchbeans.GroupSearchBeanimport org.openiam.idm.searchbeans.RoleSearchBeanimport org.openiam.idm.srvc.role.dto.Roleimport org.openiam.idm.srvc.user.dto.UserStatusEnumimport org.openiam.srvc.am.GroupDataWebServiceimport org.openiam.srvc.am.RoleDataWebServiceimport org.springframework.context.ApplicationContextimport javax.annotation.Resourceimport java.util.List;import org.openiam.idm.srvc.meta.dto.MetadataType;import org.openiam.idm.srvc.user.dto.User;import org.openiam.ui.groovy.saml.AbstractJustInTimeSAMLAuthenticator;import org.opensaml.saml2.core.Attribute;import org.opensaml.xml.schema.XSString;import org.opensaml.xml.schema.XSInteger;import org.apache.commons.collections4.CollectionUtils;import org.apache.commons.lang3.RandomStringUtils;import org.opensaml.xml.schema.impl.XSAnyImpl;class TestJustInTimeSAMLAuthenticator extends AbstractJustInTimeSAMLAuthenticator {final private String userTypeId = "DEFAULT_USER"; // user typefinal private String accessRoleId = ""; // role id to link user with auth providerfinal private String managedSysId = ""; // managed sys id of your groups in OpenIAM@Resource(name = "roleServiceClient")protected RoleDataWebService roleServiceClient;@Resource(name = "groupServiceClient")protected GroupDataWebService groupServiceClient;@Overrideprotected MetadataType getEmailType(final List<MetadataType> types) {return types.get(0);}@Overrideprotected String getFirstName() {if (CollectionUtils.isNotEmpty(response.getAssertions()) && CollectionUtils.isNotEmpty(response.getAssertions().get(0).getAttributeStatements())) {for (final Attribute attribute : response.getAssertions().get(0).getAttributeStatements().get(0).getAttributes()) {if ("http://schemas.xmlsoap.org/ws/2005/05/identity/claims/givenname".equalsIgnoreCase(attribute.getName()))return ((XSAnyImpl) attribute.getAttributeValues().get(0)).getTextContent();}}return RandomStringUtils.randomAlphanumeric(5);}@Overrideprotected String getLastName() {if (CollectionUtils.isNotEmpty(response.getAssertions()) && CollectionUtils.isNotEmpty(response.getAssertions().get(0).getAttributeStatements())) {for (final Attribute attribute : response.getAssertions().get(0).getAttributeStatements().get(0).getAttributes()) {if ("http://schemas.xmlsoap.org/ws/2005/05/identity/claims/surname".equalsIgnoreCase(attribute.getName()))return ((XSAnyImpl) attribute.getAttributeValues().get(0)).getTextContent();}}return RandomStringUtils.randomAlphanumeric(5);}@Overrideprotected String getEmail() {if (CollectionUtils.isNotEmpty(response.getAssertions()) && CollectionUtils.isNotEmpty(response.getAssertions().get(0).getAttributeStatements())) {for (final Attribute attribute : response.getAssertions().get(0).getAttributeStatements().get(0).getAttributes()) {if ("http://schemas.xmlsoap.org/ws/2005/05/identity/claims/emailaddress".equalsIgnoreCase(attribute.getName()))return ((XSAnyImpl) attribute.getAttributeValues().get(0)).getTextContent();}}return null;}protected void populate(final User user) {user.setStatus(UserStatusEnum.ACTIVE);user.mdTypeId = userTypeId;user.addRole(accessRoleId);final List<String> groupIds = this.getGroupsFromResponse();if (CollectionUtils.isNotEmpty(groupIds)) {groupIds.forEach {user.addGroup(this.getGroupIdByName(it, managedSysId))}}}private String getGroupIdByName(String name, String mngSysId) {if (StringUtils.isNotBlank(name)) {final GroupSearchBean groupSearchBean = new GroupSearchBean();groupSearchBean.setNameToken(new SearchParam(name, MatchType.EXACT));groupSearchBean.setManagedSysId(mngSysId)final GroupListResponse response = groupServiceClient.findBeans(groupSearchBean, null, 0, 1);if (response != null && CollectionUtils.isNotEmpty(response.getList())) {return response.getList().get(0).getId();}}return null;}private List<String> getGroupsFromResponse() {final List<String> roleNames = new ArrayList<>();if (CollectionUtils.isNotEmpty(response.getAssertions()) && CollectionUtils.isNotEmpty(response.getAssertions().get(0).getAttributeStatements())) {for (final Attribute attribute : response.getAssertions().get(0).getAttributeStatements().get(0).getAttributes()) {if ("attr_here".equalsIgnoreCase(attribute.getName())) {attribute.getAttributeValues().forEach {roleNames.add(((XSAnyImpl) it).getTextContent());}}}}return roleNames;}private String getRoleIdByName(String name, String mngSysId) {if (StringUtils.isNotBlank(name)) {final RoleSearchBean roleSearchBean = new RoleSearchBean();roleSearchBean.setNameToken(new SearchParam(name, MatchType.EXACT));roleSearchBean.setManagedSysId(mngSysId);final RoleListResponse response = roleServiceClient.findBeans(roleSearchBean, null, 0, 1);if (response != null && CollectionUtils.isNotEmpty(response.getList())) {return response.getList().get(0).getId();}}return null;}private String getRoleFromResponse() {if (CollectionUtils.isNotEmpty(response.getAssertions()) && CollectionUtils.isNotEmpty(response.getAssertions().get(0).getAttributeStatements())) {for (final Attribute attribute : response.getAssertions().get(0).getAttributeStatements().get(0).getAttributes()) {if ("attr_here".equalsIgnoreCase(attribute.getName()))return ((XSAnyImpl) attribute.getAttributeValues().get(0)).getTextContent();}}return null;}}