Self Registration
OpenIAM provides a possibility to configure Self Registration forms for users. This document is to lead users through general procedure of configuring self registration form via Webconsole.
Go to Administration -> Self Registration Configuration. In this section, there is a list of all Self Registration templates, since one can create self registration form for every content provider, e.g. in a way that external user have one self registration form, and internal users - another.
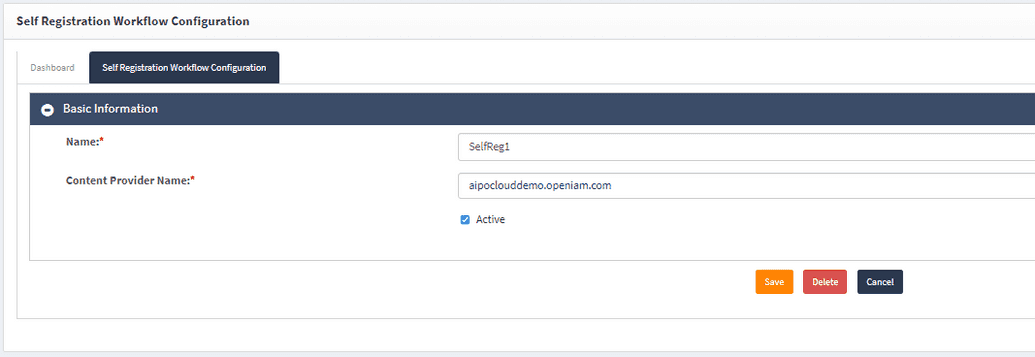
To create new Self Registration page, click Create in the left-hand menu. In the emerging page, type in the name for page and select a content provider for it from the drop down. Make sure the Active field is checked, as shown below.
Click Save.
Afterwards, Self Registration steps page is opened. The description of the fields required is in the table below.
| Field | Description |
|---|---|
| Self Registration Workflow Steps | By default, the system creates the first step for the workflow automatically. A user can add other steps manually further. |
| Name | The name of the registration form, chosen by the user. |
| Description | Here, user may type in any related description to the page, if needed. |
| Page Template | Is created automatically for this form. |
| Custom Validation Groovy Script | This Groovy script allows customizing validation of some fields. |
| Custom Java Script | The same Java Script used in Page Template section, but specifically for self-registration form. It allows adding additional elements to page templates, e.g. fields description, etc. |
| Selected Tempate Fields | The fields that the user will see while making self registration. It is a drop down menu and user can choose field as needed. The drop down contains all the fields specified in Page Templates -> Template Fields. The table below this field allows amending the field, e.g. change labels, add action, etc. |
| What's next? | Allows adding a condition to satisfy after clicking Submit icon at Self Registration, when Check condition and apply actions based on it is checked. In case Apply action is checked, the system simply performs the action set as the next step of self registration. |
| Next Action | Allows choosing the next step. |
"Transition to next steps" means going to the next registration step, form the drop down. In case there is no premade template - user can create next step manually by clicking Add new Self Registration Workflow Step. In the new window, select a name, description and a page template. If there is no page template as required, check Create New Page Template field. Afterwards, a blue Open in New Tab <step_name> button appears. Clicking it opens exact same page, but for the next registration step. User can fill the fields in as required. | |
| "Save user" allows saving a new user into the system. | |
"Initiate New Hire Workflow" creates a new self registration request to 'Self Registration' resoure approvers. This resource can be configured by going to Access Control -> Resources -> Self Registration as needed to set Approver Association and select the approver for new users. |
Click Save.
After creating the form, make sure to refresh the page and check for all the fields to be filled in. You can also go to Dashboard tab and check whether the workflow is created correctly.
Note that in 'Seleted Template Fields' field, one of the oprions is Supervisor. Here, it is not a drop dow, but a text field. This field requires entering an e-mail of a users being a sponsor account. OpenIAM allows validating the user by means a Groovy script called 'SponsorValidator.groovy'. Thу script is ran after the newcommer clicks Submit with Superviser field filled in and checks whether the indicated user can be a sponsir account for the new user. This provide an additional security and the script can be customized to have a logic as required. The example of the result is shown below.
In case validation for this field is not needed, use the default Groovy script that does not include in validation conditions found at /selfservice/selfregistration/SponsorValidator.groovy.

