Installation with Internet Access
This section builds on the initial installation steps described in the RPM install section. Please ensure that you have completed the steps in that section before proceeding.
Installation with Internet access.
This type of installation is suitable for environments where the servers running the OpenIAM software will have internet access and can reach the OpenIAM download server. You can validate this by running the command below.
curl https://openiam.com/; echo $?
You should see 0 as a result. If you see non-zero result, its means that you CANNOT reach the OpenIAM web site from your deployment server. Please resolve the internet access before proceeding. Alternatively, use the offline installation instructions.
During the installation you will be prompted to install MariaDB RDBMS. The use of MariaDB is acceptable for Demo / POC environment or small deployments. If you already have a database infrastructure that you would like to use, then you should answer 'N' at the prompt. The steps below describe how to install OpenIAM.
Download Installer RPM with command
curl https://download.openiam.com/release/community/4.2.1.2/rpm/openiam-4.2.1.2.noarch.x86_64.rpm --output openiam-4.2.X.noarch.x86_64.rpmInstall from the RPM with the following command:
sudo rpm -i openiam-4.2.X.noarch.x86_64.rpm
You should see output similar to:
openiam/openiam/OpenIAM-Base-Local.repoopeniam/connectors/openiam/connectors/shutdown.shopeniam/connectors/start.shopeniam/env.confopeniam/services/openiam/services/shutdown.shopeniam/services/start.shopeniam/source-adapters/openiam/source-adapters/shutdown.shopeniam/source-adapters/start.shopeniam/utils/openiam/utils/autodb.shopeniam/utils/autoinit.shopeniam/utils/elasticsearch/openiam/utils/elasticsearch/default.policy.diffopeniam/utils/elasticsearch/elasticsearchopeniam/utils/elasticsearch/elasticsearch.serviceopeniam/utils/elasticsearch/init.shopeniam/utils/elasticsearch/jvm.optionsopeniam/utils/flyway/openiam/utils/flyway/V0.0.0.0.000__initialization.sql.mssql.m4openiam/utils/flyway/V0.0.0.0.000__initialization.sql.mysq.m4openiam/utils/flyway/V0.0.0.0.000__initialization.sql.mysql.m4openiam/utils/flyway/V0.0.0.0.000__initialization.sql.postgres.m4openiam/utils/flyway/autoinit.shopeniam/utils/flyway/init.shopeniam/utils/flyway/mssql.properties.m4openiam/utils/flyway/mysql.properties.m4openiam/utils/flyway/oracle.service.properties.m4...openiam/janusgraph/javadocs/allclasses-frame.htmlopeniam/janusgraph/javadocs/allclasses-noframe.htmlopeniam/janusgraph/javadocs/stylesheet.cssopeniam/janusgraph/javadocs/overview-summary.html/var/tmp/rpm-tmp.4KS9zh: line 9: openiam: Is a directoryNo, user openiam does not exist. creatinguseradd: warning: the home directory already exists.Not copying any file from skel directory into it.
- Start the initialization process which will download files required for installation from OpenIAM server. After the required file have been downloaded, the installer will prompt you for additional information. Please follow the instructions on the screen.
sudo openiam-cli init
System will download additional files, extract them locally, update yum repository and install some base packages. You will see output similar to the snippet below.
Initialize openiamDownload file openiamrepo.tar.gz from OpenIAM websiteDownload file backend.tar.gz from OpenIAM websiteDownload file frontend.tar.gz from OpenIAM websiteworkflow.jarsynchronization.jarreconciliation.jaropeniam-esb.jaridm.jargroovy-manager.jaremail-manager.jardevice-manager.jarauth-manager.jarbusiness-rule-manager.jaridp.waropeniam-ui-static.warselfservice-ext.warselfservice.warwebconsole.warreportviewer.waropeniamrepo/openiamrepo/etcd-3.2.21-2.el8.x86_64.rpmopeniamrepo/redis-6.2.7-1.el8.remi.x86_64.rpmopeniamrepo/cassandra-4.0.1-1.noarch.rpmopeniamrepo/cassandra-tools-4.0.1-1.noarch.rpmopeniamrepo/abattis-cantarell-fonts-0.0.25-6.el8.noarch.rpmopeniamrepo/adwaita-cursor-theme-3.28.0-3.el8.noarch.rpmopeniamrepo/adwaita-icon-theme-3.28.0-3.el8.noarch.rpm...Transaction test succeeded.Running transactionPreparing : 1/1Installing : oniguruma-6.8.2-2.el8.x86_64 1/4Running scriptlet: oniguruma-6.8.2-2.el8.x86_64 1/4Installing : jq-1.6-5.el8.x86_64 2/4Installing : m4-1.4.18-7.el8.x86_64 3/4Running scriptlet: m4-1.4.18-7.el8.x86_64 3/4Installing : telnet-1:0.17-76.el8.x86_64 4/4Running scriptlet: telnet-1:0.17-76.el8.x86_64 4/4Verifying : jq-1.6-5.el8.x86_64 1/4Verifying : oniguruma-6.8.2-2.el8.x86_64 2/4Verifying : telnet-1:0.17-76.el8.x86_64 3/4Verifying : m4-1.4.18-7.el8.x86_64 4/4Installed:jq-1.6-5.el8.x86_64 m4-1.4.18-7.el8.x86_64 oniguruma-6.8.2-2.el8.x86_64 telnet-1:0.17-76.el8.x86_64Complete!
- You will be asked if you want to install MariaDB as the default database.
Would you like to install MariaDB RDBMS locally? [y/n]:
Please answer Y if you would like to use the local MariaDB RDBMS as a database server. MariaDB is a good choice for quick and simple installations such as demos, POCs or small deployments of less than 500 active users. To use another database, please enter N. This question enables the installation of MariaDB so that it can be used later in the installation process.
4.1. If you answered Y for MariaDB installer will prepare the files needed to install and configure MariaDB. Once this process is complete, you will be asked the questions below. Answer them and proceed to the next step.
Enter current password for root (enter for none):-> Press:Enterbutton since a password has yet to be defined.Set root password? [Y/n]-> Pressybutton and afterEnterNew password:-> Type password for the root user. You will need it later during the installation.Re-enter new password:-> Type the password for the root user as on the previousRemove anonymous users? [Y/n]-> Pressybutton and after pressEnter.Disallow root login remotely? [Y/n]-> Pressybutton and after pressEnter.Remove test database and access to it? [Y/n]-> Pressybutton and after pressEnter.Reload privilege tables now? [Y/n]-> Pressybutton and after pressEnter.
The snippet below provides a view of what you can expect to see in this part of the installation. Note, that for suссessful installation it is requires to default OpenIAM password for root user in MariaDB as passwd00. So, when the system asks you to set a new password, type 'passwd00'.
In order to log into MariaDB to secure it, we'll need the currentpassword for the root user. If you've just installed MariaDB, andyou haven't set the root password yet, the password will be blank,so you should just press enter here.Enter current password for root (enter for none):OK, successfully used password, moving on...Setting the root password ensures that nobody can log into the MariaDBroot user without the proper authorisation.Set root password? [Y/n] yNew password:Re-enter new password:Password updated successfully!Reloading privilege tables..... Success!By default, a MariaDB installation has an anonymous user, allowing anyoneto log into MariaDB without having to have a user account created forthem. This is intended only for testing, and to make the installationgo a bit smoother. You should remove them before moving into aproduction environment.Remove anonymous users? [Y/n] y... Success!Normally, root should only be allowed to connect from 'localhost'. Thisensures that someone cannot guess at the root password from the network.Disallow root login remotely? [Y/n] y... Success!By default, MariaDB comes with a database named 'test' that anyone canaccess. This is also intended only for testing, and should be removedbefore moving into a production environment.Remove test database and access to it? [Y/n] y- Dropping test database...... Success!- Removing privileges on test database...... Success!Reloading the privilege tables will ensure that all changes made so farwill take effect immediately.Reload privilege tables now? [Y/n] y... Success!Cleaning up...All done! If you've completed all of the above steps, your MariaDBinstallation should now be secure.Thanks for using MariaDB!
- After MariaDB has been installed, the installer will move forward to a variety infrastructure services including Etcd, Vault, Redis, RabbitMQ and Cassandra, which is the storage for the graph database used in OpenIAM. This process will take 4-5 min. You will see output similar to the example below:
2022-05-12T16:23:21.987Z [INFO] core: usage gauge collection is disabled2022-05-12T16:23:21.988Z [INFO] core: post-unseal setup complete2022-05-12T16:23:21.988Z [INFO] core: vault is unsealed2022-05-12T16:23:22.137Z [INFO] core: successful mount: namespace="\"\"" path=secret/ type=kv2022-05-12T16:23:22.430Z [INFO] core: enabled credential backend: path=cert/ type=certWait vault service to wakeupVault already initialized....Vault already unsealed...% Total % Received % Xferd Average Speed Time Time Time CurrentDload Upload Total Spent Left Speed100 260 100 260 0 0 12380 0 --:--:-- --:--:-- --:--:-- 12380Generate OpenIAM encryption secrets
- The installer will ask a number to questions during the initialization process. For most questions, a default value has been provided to simplify the effort for users new to OpenIAM. For production deployments, we recommend changing these values to provide a higher level of security
- The section which requires input from the installer is marked with the following message in the console:
- =============== CRITICAL SECTION ===============
Define database and infrastructure components credentials
OpenIAM has two schemas which are created by default: openiam and activiti. The openiam schema is the primary schema used by the platform and it stores a variety of information ranging from policies to user profile information and more. activiti is used by store information about workflows and their execution. The first set of questions raised by the installer are related to the creation of database user for each schema. Each question and it intent are listed below.
| Question raised by the installer | Explanation |
|---|---|
Set OpenIAM username for openiam schema, default: idmuser | This is DB user name that will be used to manage the openiam OpenIAM schema. This is the primary schema in the solution data related to OpenIAM are stored. User will be used by the OpenIAM application to communicate with database. The default value is idmuser. |
| Set OpenIAM password for 'openiam' schema, default: idmuser | This is the password that will be used for username which was provided in the previous step. The default value is: idmuser |
Set OpenIAM username for 'activiti' schema. For MySQL it will be the same as for openiam, default: idmuser | This is DB user name that will be used to manage the activiti schema. User will be used by OpenIAM application to communicate with the database. Default value is idmuser. |
Set OpenIAM password for activiti schema. For MySQL it will be the same as for openiam, default: idmuser | This is the password that for the user associated with the activiti schema. The default value is idmuser |
DatabaseSet OpenIAM username for schema 'openiam' , default: idmuserSet OpenIAM password for schema 'openiam' , default: idmuser : passwd00Set OpenIAM username for schema 'activiti'., default: activitiSet OpenIAM password for schema 'activiti'., default: activiti: passwd00
Message broker (RabbitMQ) password
OpenIAM uses RabbitMQ as the message broker. RabbitMQ is the primary transport service used within the OpenIAM application. Services are loosely coupled and they communicate with each other through the message broker. Cross service communication is encrypted.
The next question raised by the installer is to define a password for RabbitMQ. As seen in the above questions, a default password value is provided for simplicity. For production use, please use a strong password.
Set OpenIAM password for RabbitMQ message broker, default: passwd00
Memory (Redis) cache password
Redis is an in-memory distributed cache that is used by OpenIAM to improve system performance. A variety of objects are temporarily stored in Redis including:
- End user web session
- Database object cache
- High level application cache.
As with other components, access to the cache is secured and the next question ask for a password which should be used for Redis.
Set OpenIAM password for Redis., default: passwd00
Elasticsearch credentials
Elasticsearch search is used by OpenIAM to enable fast searching of frequently used data. As with the components above, access to Elasticsearch is secured through its own set set of credentials. You be prompted for this information as shown below.
User to Access ElasticSearch. If you don't change it on the ES server side, leave it as elastic, default: elasticPassword for elastic to access ElasticSearch, default: zwH5QUgDrciHCCKgpOcVecDZE2Z8KuVm
The information requested above is critical for the installation process. Mistakes in these steps can disrupt the installation process. To minimize such issues, you will be asked to review the above answers. If you agree with the information, select
Y. If you need to fix some information, selectNand the installer will walk you through this process again.
Cassandra
After processing the above information, the installer will then install Cassandra. Cassandra is the storage engine for Janus Graph DB. Cassandra can take a little bit of time to start. During time, you may see messages like the one below. Give it a little time and once Cassandra is alive, the process is proceed.
Starting cassandra (via systemctl): [ OK ]0nodetool: Failed to connect to '127.0.0.1:7199' - ConnectException: 'Connection refused (Connection refused)'.Waiting for cassandra1error: No nodes present in the cluster. Has this node finished starting up?-- StackTrace --java.lang.RuntimeException: No nodes present in the cluster. Has this node finished starting up?at org.apache.cassandra.dht.Murmur3Partitioner.describeOwnership(Murmur3Partitioner.java:284)at org.apache.cassandra.service.StorageService.getOwnershipWithPort(StorageService.java:5166)at sun.reflect.NativeMethodAccessorImpl.invoke0(Native Method)at sun.reflect.NativeMethodAccessorImpl.invoke(NativeMethodAccessorImpl.java:62)at sun.reflect.DelegatingMethodAccessorImpl.invoke(DelegatingMethodAccessorImpl.java:43)at java.lang.reflect.Method.invoke(Method.java:498)at sun.reflect.misc.Trampoline.invoke(MethodUtil.java:72)at sun.reflect.GeneratedMethodAccessor3.invoke(Unknown Source)at sun.reflect.DelegatingMethodAccessorImpl.invoke(DelegatingMethodAccessorImpl.java:43)at java.lang.reflect.Method.invoke(Method.java:498)at sun.reflect.misc.MethodUtil.invoke(MethodUtil.java:276)at com.sun.jmx.mbeanserver.StandardMBeanIntrospector.invokeM2(StandardMBeanIntrospector.java:112)at com.sun.jmx.mbeanserver.StandardMBeanIntrospector.invokeM2(StandardMBeanIntrospector.java:46)at com.sun.jmx.mbeanserver.MBeanIntrospector.invokeM(MBeanIntrospector.java:237)at com.sun.jmx.mbeanserver.PerInterface.getAttribute(PerInterface.java:83)at com.sun.jmx.mbeanserver.MBeanSupport.getAttribute(MBeanSupport.java:206)at com.sun.jmx.interceptor.DefaultMBeanServerInterceptor.getAttribute(DefaultMBeanServerInterceptor.java:647)at com.sun.jmx.mbeanserver.JmxMBeanServer.getAttribute(JmxMBeanServer.java:678)at javax.management.remote.rmi.RMIConnectionImpl.doOperation(RMIConnectionImpl.java:1445)at javax.management.remote.rmi.RMIConnectionImpl.access$300(RMIConnectionImpl.java:76)at javax.management.remote.rmi.RMIConnectionImpl$PrivilegedOperation.run(RMIConnectionImpl.java:1309)at javax.management.remote.rmi.RMIConnectionImpl.doPrivilegedOperation(RMIConnectionImpl.java:1401)at javax.management.remote.rmi.RMIConnectionImpl.getAttribute(RMIConnectionImpl.java:639)at sun.reflect.NativeMethodAccessorImpl.invoke0(Native Method)at sun.reflect.NativeMethodAccessorImpl.invoke(NativeMethodAccessorImpl.java:62)at sun.reflect.DelegatingMethodAccessorImpl.invoke(DelegatingMethodAccessorImpl.java:43)at java.lang.reflect.Method.invoke(Method.java:498)at sun.rmi.server.UnicastServerRef.dispatch(UnicastServerRef.java:357)at sun.rmi.transport.Transport$1.run(Transport.java:200)at sun.rmi.transport.Transport$1.run(Transport.java:197)at java.security.AccessController.doPrivileged(Native Method)at sun.rmi.transport.Transport.serviceCall(Transport.java:196)at sun.rmi.transport.tcp.TCPTransport.handleMessages(TCPTransport.java:573)at sun.rmi.transport.tcp.TCPTransport$ConnectionHandler.run0(TCPTransport.java:834)at sun.rmi.transport.tcp.TCPTransport$ConnectionHandler.lambda$run$0(TCPTransport.java:688)at java.security.AccessController.doPrivileged(Native Method)at sun.rmi.transport.tcp.TCPTransport$ConnectionHandler.run(TCPTransport.java:687)at java.util.concurrent.ThreadPoolExecutor.runWorker(ThreadPoolExecutor.java:1149)at java.util.concurrent.ThreadPoolExecutor$Worker.run(ThreadPoolExecutor.java:624)at java.lang.Thread.run(Thread.java:750)Waiting for cassandra2Datacenter: datacenter1=======================Status=Up/Down|/ State=Normal/Leaving/Joining/Moving-- Address Load Tokens Owns (effective) Host ID RackUN 127.0.0.1 73.49 KiB 256 100.0% 181be86c-d02e-4200-8b04-418257297669 rack1Cassandra alive
At this point the installer has enough information to complete the installation of: ElasticSearch, Redis, and RabbitMQ. You see output similar to the example below.
...Running transactionPreparing : 1/1Running scriptlet: elasticsearch-7.17.3-1.x86_64 1/1Creating elasticsearch group... OKCreating elasticsearch user... OKInstalling : elasticsearch-7.17.3-1.x86_64 1/1Running scriptlet: elasticsearch-7.17.3-1.x86_64 1/1### NOT starting on installation, please execute the following statements to configure elasticsearch service to start automatically using systemdsudo systemctl daemon-reloadsudo systemctl enable elasticsearch.service### You can start elasticsearch service by executingsudo systemctl start elasticsearch.servicewarning: usage of JAVA_HOME is deprecated, use ES_JAVA_HOMECreated elasticsearch keystore in /etc/elasticsearch/elasticsearch.keystore[/usr/lib/tmpfiles.d/elasticsearch.conf:1] Line references path below legacy directory /var/run/, updating /var/run/elasticsearch → /run/elasticsearch; please update the tmpfiles.d/ drop-in file accordingly.Verifying : elasticsearch-7.17.3-1.x86_64 1/1Installed:elasticsearch-7.17.3-1.x86_64Complete!Implementing changes for ES...Synchronizing state of elasticsearch.service with SysV service script with /usr/lib/systemd/systemd-sysv-install.Executing: /usr/lib/systemd/systemd-sysv-install enable elasticsearchCreated symlink /etc/systemd/system/multi-user.target.wants/elasticsearch.service → /usr/lib/systemd/system/elasticsearch.service.Waiting for enabling....Setup password for ESwarning: usage of JAVA_HOME is deprecated, use ES_JAVA_HOME{}Starting elasticsearch...Synchronizing state of elasticsearch.service with SysV service script with /usr/lib/systemd/systemd-sysv-install.Executing: /usr/lib/systemd/systemd-sysv-install enable elasticsearch% Total % Received % Xferd Average Speed Time Time Time CurrentDload Upload Total Spent Left Speed100 260 100 260 0 0 23636 0 --:--:-- --:--:-- --:--:-- 23636% Total % Received % Xferd Average Speed Time Time Time CurrentDload Upload Total Spent Left Speed100 577 100 562 100 15 37466 1000 --:--:-- --:--:-- --:--:-- 38466% Total % Received % Xferd Average Speed Time Time Time CurrentDload Upload Total Spent Left Speed100 184 100 184 0 0 18400 0 --:--:-- --:--:-- --:--:-- 18400Last metadata expiration check: 0:08:18 ago on Sat 10 Dec 2022 10:05:38 PM UTC.Dependencies resolved.=========================================================================================================================Package Architecture Version Repository Size=========================================================================================================================Installing:erlang x86_64 24.3.4-1.el8 openiam-local 20 Mrabbitmq-server noarch 3.9.21-1.el8 openiam-local 14 MTransaction Summary=========================================================================================================================Install 2 PackagesTotal size: 34 MInstalled size: 55 MDownloading Packages:Running transaction checkTransaction check succeeded.Running transaction testTransaction test succeeded.Running transactionPreparing : 1/1Installing : erlang-24.3.4-1.el8.x86_64 1/2Running scriptlet: rabbitmq-server-3.9.21-1.el8.noarch 2/2Installing : rabbitmq-server-3.9.21-1.el8.noarch 2/2Running scriptlet: rabbitmq-server-3.9.21-1.el8.noarch 2/2[/usr/lib/tmpfiles.d/elasticsearch.conf:1] Line references path below legacy directory /var/run/, updating /var/run/elasticsearch → /run/elasticsearch; please update the tmpfiles.d/ drop-in file accordingly.[/usr/lib/tmpfiles.d/rabbitmq-server.conf:1] Line references path below legacy directory /var/run/, updating /var/run/rabbitmq → /run/rabbitmq; please update the tmpfiles.d/ drop-in file accordingly.Verifying : erlang-24.3.4-1.el8.x86_64 1/2Verifying : rabbitmq-server-3.9.21-1.el8.noarch 2/2Installed:erlang-24.3.4-1.el8.x86_64 rabbitmq-server-3.9.21-1.el8.noarchComplete!Created symlink /etc/systemd/system/multi-user.target.wants/rabbitmq-server.service → /usr/lib/systemd/system/rabbitmq-server.service.Starting RabbitMQ...Enabling plugins on node rabbit@50-116-62-96:rabbitmq_delayed_message_exchangeThe following plugins have been configured:rabbitmq_delayed_message_exchangeApplying plugin configuration to rabbit@50-116-62-96...The following plugins have been enabled:rabbitmq_delayed_message_exchangestarted 1 plugins.Enabling plugins on node rabbit@50-116-62-96:rabbitmq_managementThe following plugins have been configured:rabbitmq_delayed_message_exchangerabbitmq_managementrabbitmq_management_agentrabbitmq_web_dispatchApplying plugin configuration to rabbit@50-116-62-96...The following plugins have been enabled:rabbitmq_managementrabbitmq_management_agentrabbitmq_web_dispatchstarted 3 plugins.Adding vhost "openiam_am" ...Adding vhost "openiam_idm" ...Adding vhost "openiam_audit" ...Adding vhost "openiam_common" ...Adding vhost "openiam_connector" ...Adding vhost "openiam_activiti" ...Adding vhost "openiam_user" ...Adding vhost "openiam_groovy_manager" ...Adding vhost "openiam_synchronization" ...Adding vhost "openiam_ext_log" ...Adding vhost "openiam_bulk_synchronization" ...Adding vhost "openiam_reconciliation" ...Adding vhost "openiam_bulk_reconciliation" ...Adding vhost "openiam_business_rule" ...Adding vhost "openiam_machine_learning" ...Adding user "openiam" ...Done. Don't forget to grant the user permissions to some virtual hosts! See 'rabbitmqctl help set_permissions' to learn more.Setting tags for user "openiam" to [administrator] ...Setting permissions for user "openiam" in vhost "openiam_am" ...Setting permissions for user "openiam" in vhost "openiam_idm" ...Setting permissions for user "openiam" in vhost "openiam_audit" ...Setting permissions for user "openiam" in vhost "openiam_common" ...Setting permissions for user "openiam" in vhost "openiam_connector" ...Setting permissions for user "openiam" in vhost "openiam_activiti" ...Setting permissions for user "openiam" in vhost "openiam_user" ...Setting permissions for user "openiam" in vhost "openiam_groovy_manager" ...Setting permissions for user "openiam" in vhost "openiam_synchronization" ...Setting permissions for user "openiam" in vhost "openiam_ext_log" ...Setting permissions for user "openiam" in vhost "openiam_bulk_synchronization" ...Setting permissions for user "openiam" in vhost "openiam_reconciliation" ...Setting permissions for user "openiam" in vhost "openiam_bulk_reconciliation" ...Setting permissions for user "openiam" in vhost "openiam_business_rule" ...Setting permissions for user "openiam" in vhost "openiam_machine_learning" ...Last metadata expiration check: 0:08:54 ago on Sat 10 Dec 2022 10:05:38 PM UTC.Dependencies resolved....
Initialize Database Schema
| Question raised by the installer | Explanation |
|---|---|
| Use default value if this is new installation. If you are doing update, specify your current (before update) version here, like 4.1.11.0, default: 0.0.0.0 | If this install is an upgrade from an existing deployment, then the current version is important as it will determine which scripts need to be applied to upgrade the schema to the current version. If this is a new deployment, you can leave this blank. |
This is the name of the OpenIAM core database. If using MariaDB, this is most likely openiam, default: openiam | This question provides the option to choose the primary database schema. You should leave this blank and let it default to openiam. This value should only be changed if the scripts have been altered by the customer. |
This is the name of the openiam Activiti database. If using MariaDB, this is most likely activiti, default: activiti | This question provides the option to choose the database schema used by the workflow engine. You should leave this blank and let it default to activiti. This value should only be changed if the scripts have been altered by the customer. |
| Possible values: MySQL, PostgreSQL, MSSQL, Oracle. Type of the database that you are going to use with OpenIAM. The RDBMS have to be already installed, default:mysql | Select the type of database that you will be using as the OpenIAM product repository. You can leave this blank if you will be using either MariaDB or MySQL. If you are using either PostgreSQL, Oracle or Microsoft SQL server, enter one the following values based on your database type: postgres, oracle, mssql |
| Do you want to initialize OpenIAM Schema and Users? Select this if you are not created schema and users in RDBMS yet. Super user (root) password will required [y/n] | If 'Y' then installer will create schemas in database and corresponded RDBMS users as well. For Oracle/MSSQL it will generate an SQL script that must be performed manually |
| Enter username for Super user (for mysql this is root), default: root | The installer needs a super user account or equivalent which has the privileges to create new schema, users, tables, etc. |
| Enter password for super user (sa or root, depend on the db type), default: | Enter the password for account provided in the last step |
| This is the hostname of where the OpenIAM core database is., default: localhost | Enter the host or DNS name of the server where the primary OpenIAM database will be deployed. |
This is the port of where the OpenIAM core database is. If using MariaDB, this is most likely 3306, default: 3306 | Enter the port number used by the database server hosting the primary OpenIAM database |
| This is the hostname of where the activiti database is., default: localhost | Enter the host or DNS name of the server where the workflow database will be deployed. |
This is the port of where the activiti database is. If using MariaDB, this is most likely 3306, default: 3306 | Enter the port number used by the database server hosting the workflow database |
Once the questions have been answered, the installer will provide a summary of the questions and answers. Please review before proceeding. An example of this is shown below:
Please validate information below---------------------------------FLYWAY_BASELINE_VERSION=0.0.0.0FLYWAY_OPENIAM_DATABASE_NAME=openiamFLYWAY_ACTIVITI_DATABASE_NAME=activitiFLYWAY_OPENIAM_HOST=localhostFLYWAY_OPENIAM_PORT=3306FLYWAY_ACTIVITI_HOST=localhostFLYWAY_ACTIVITI_PORT=3306FLYWAY_DATABASE_TYPE=mysqlDatabase will be initialized=YRoot (Db admin) user name=rootRoot (Db admin) user password=passwd00---------------------------------Please validate your input above, if your are OK with that enter 'y'. To repeat an information collecting procedure enter 'n' :y
If you need to correct an answer, please enter n.
Once you select y, the installer will generate the database schema. Internally, this step is handled by a component called Flyway. Flyway is a database schema management and versioning utility. It's used to generate the schema as well as upgrade from one version to another.
Install reverse proxy
Next, the installer will ask you if you want to install the reverse proxy. The reverse proxy is an Apache web server plugin which has been purpose built for use with the OpenIAM stack and address specific use cases. In virtually all cases, you will want to install the rProxy. If you are new to OpenIAM then Enter 'Y'.. The only time that will not want to install the default version of the rProxy is if you have distributed architecture. The rProxy can co-exist with other infrastructure components such as an F5.
Enter y for the question below
Do you want to install OpenIAM reverse proxy module? [y/n]:
The OpenIAM RPM installer will continue with initialization and apply the SQL scripts which are required for successful startup. The OpenIAM services will automatically run the application stack after successful initialization and will show you the current stack status. Usually startup takes near 6-10 minutes. You can view the status of the system as its coming up using the command line tools described below in OpenIAM components and Status.
Check the startup process
The containers may take 8 to 15 minutes (depending your environment) to startup completely. You can watch the start up process using the command below. Note, that the UI container will take sometime and be among the last to start up as it has dependencies on other components being up first.
Monitor the startup process
To check if the services have started, you can use the openiam-cli utility as shown in the example below:
openiam-cli status
You will see output similar to the example below:
Openiam Status report Wed Nov 9 03:49:10 UTC 2022[OK] - openiam-esb - Service working. Application status: [ UP ][OK] - workflow - Service working. Application status: [ UP ][OK] - groovy-manager - Service working. Application status: [ UP ][OK] - idm - Service working. Application status: [ UP ][OK] - reconciliation - Service working. Application status: [ UP ][OK] - email-manager - Service working. Application status: [ UP ][OK] - auth-manager - Service working. Application status: [ UP ][OK] - business-rule-manager - Service working. Application status: [ UP ][OK] - device-manager - Service working. Application status: [ UP ][OK] - synchronization - Service working. Application status: [ UP ][OK] - openiam-ui - Service working. Application status: [ UP ]
Validate the startup
curl -k -I -L http://127.0.0.1/idp/login
You should see output similar to the example below
HTTP/1.1 200Date: Wed, 09 Nov 2022 03:49:52 GMTServer: Apache/2.4.37 (centos) OpenSSL/1.1.1kReport-To: { "group": "csp-endpoint", "max_age": 10886400, "endpoints": [ { "url": "http://127.0.0.1/selfservice/csp/report" } ] }Content-Security-Policy: default-src 'self' blob: 'unsafe-inline' 'unsafe-eval'; script-src 'self' 'unsafe-inline' 'unsafe-eval' apis.google.com; style-src 'self' 'unsafe-inline' 'unsafe-eval' *; form-action 'self' 'unsafe-inline' 'unsafe-eval' *; img-src 'self' *; font-src 'self' *; report-uri /selfservice/csp/report; report-to csp-endpointAccess-Control-Allow-Origin: *X-Frame-Options: sameoriginX-Content-Type-Options: nosniffX-XSS-Protection: 1; mode=blockCache-Control: no-cachePragma: no-cacheExpires: Wed, 31 Dec 1969 23:59:59 GMTX-UA-Compatible: IE=EmulateIE10x-openiam-force-auth: falsex-openiam-login-uri: /idp/loginContent-Type: text/html;charset=UTF-8Content-Language: en-USContent-Length: 4833Set-Cookie: SESSION=ZDdlNTIyYzItZmU0YS00NjE5LWJiYTQtYzM1Nzc4MjdkYmVl; Path=/; HttpOnly; SameSite=LaxVary: Accept-Encoding
First time login
The final validation of our deployment is to be able to login to the OpenIAM web applications. To do this, you must first find the IP address of our VM.
Next open your browser (preferably Chrome or Firefox), and hit:
http://[ip address of your installation ]/webconsole
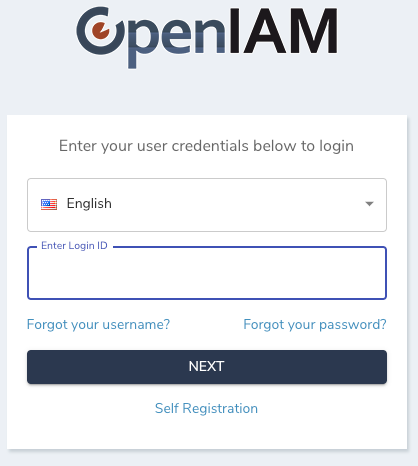
Use the following credentials for the first-time login:
Username: sysadminPassword: passwd00
Enter the username on the field shown below and click on Next
 .
.
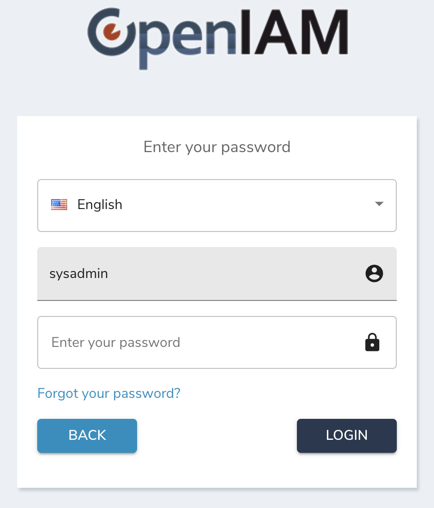
The authentication process is spread over two screens. You will be asked to enter the password on the screen below.
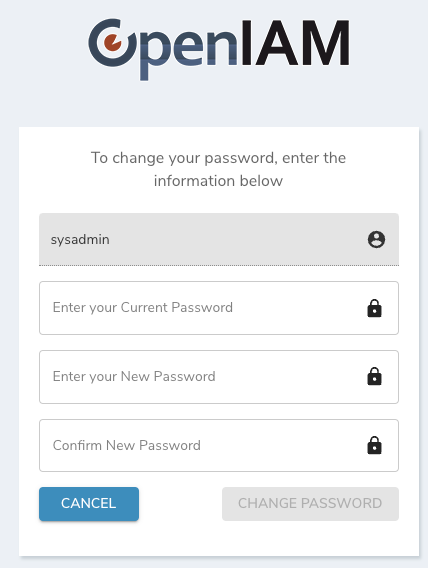
The next screen will ask you to change the default password. As you enter your new password, you will see the password policy on the side. You password must align with this policy. You will be able to change both the password and the policy later.
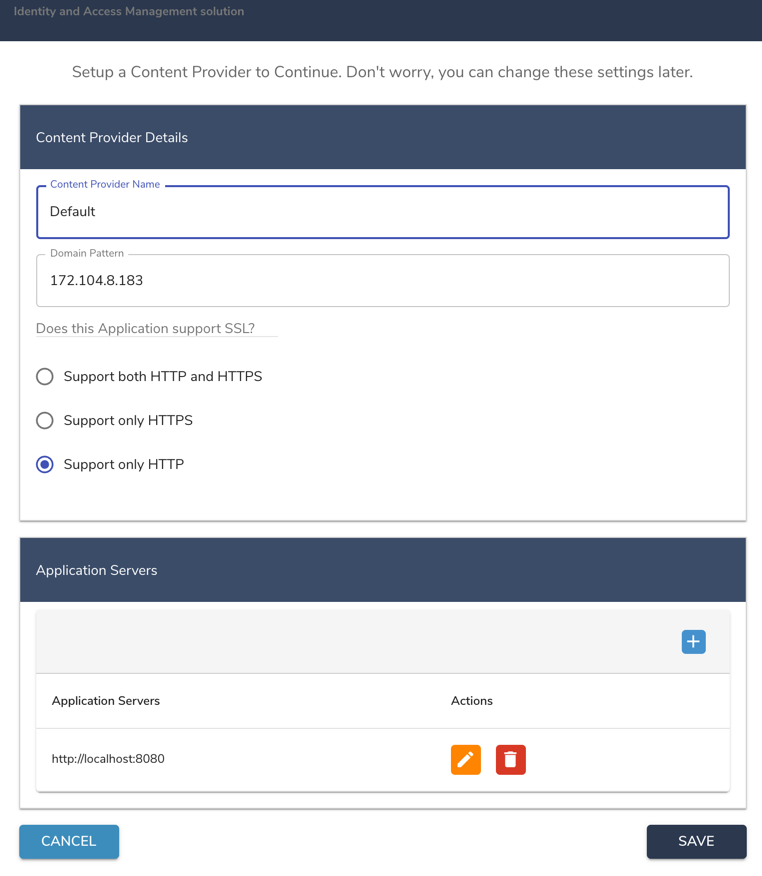
The next step is to define a content provider using the screen shown below. A Content provider is an alias which represents a domain. Associated with the content provider can be UI themes, authentication policies, etc. The table below describes the fields on this screen.
| Name | Description |
|---|---|
| Content Provider Name | You can think of a content provider an “alias” which represents a domain. This is described in more detail in the OpenIAM documentation. For this setup, please enter a value such as : Default CP |
| Domain Pattern | This value is defaulted in. It should be the IP address or host DNS name of the instance where OpenIAM has been installed |
| Application supports SSL? | This configuration determines if the OpenIAM application will be accessed over HTTP or HTTPS. Unless, you have already configured the certificate, select Support on HTTP. You will be able to update this configuration later. |
| Application servers | This is the location of the OpenIAM service layer which the UI and rProxy need to communicate with. In most cases, the default value will be correct since each of these components will be deployed on the same host. However, this configuration provides the flexibility to have the UI and service layer on separate hosts. |
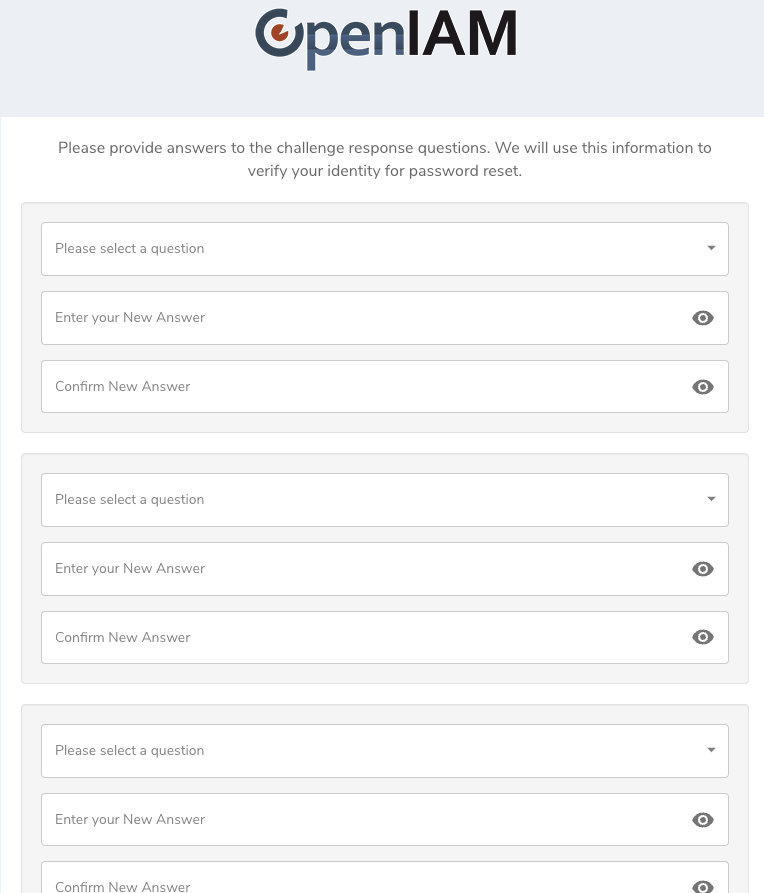
After setting the content provider, you will be taken to the challenge questions page. These questions will be used to reset your admin account incase you have locked yourself out. Please make a note of your answers.
After completing the above steps, you will be taken the admin console landing page shown below. Allow the system about 5 min to refresh the internal cache and then you can proceed to configure your solution.
Post installation information
Using the OpenIAM Command line utility
OpenIAM provides a command line utility to help you view the status of all components as well as perform common operations such as view logs, start, stop, etc. The command is openiam-cli.
Just running the command by itself, as shown below, will display the list of all options.
openiam-cli
Output
Usage: /usr/bin/openiam-cli {start|stop|status|init|log|log <service_name>|list-connectors|list-source-adapters}
Check status
To check the status of the components or the confirm that the system is up, please use the following command:
openiam-cli status
Check service logs
To check current logs of any service you can use the following command. You can get the services using the following command: openiam-cli log <service_name> .
For example, to check the logs of the openiam-esb module use the following command.
openiam-cli log openiam-esb
Start and stop
You can start and stop OpenIAM using the command line as well. To stop OpenIAM using the following command:
openiam-cli stop
You can check that the services have stopped by using the status command shown above.
You can start the application using the following command:
openiam-cli start
OpenIAM core services
| Name | Description | Default Memory (RAM) |
|---|---|---|
| openiam-esb | The service that provides Web Service API and to the bigger part of functionality | 2048m |
| workflow | The service that provides Business Workflow functionality | 768m |
| groovy-manager | The service that provides Groovy extension functionality | 256m |
| idm | The service that provides provisioning to target systems functionality | 512m |
| reconciliation | The service that provides reconciliation against target systems functionality | 512m |
| email-manager | The service that provides Sending and Receiving emails functionality | 256m |
| auth-manager | The service that provides End user Authorization functionality | 1024m |
| device-manager | The service that provides Device management functionality (IOS and Android) | 256m |
| business-rule-manager | The service that provides Business Rules functionality | 512m |
| openiam-ui | This is web server (tomcat) that provides Graphical interface | 2048m |