Import entitlements
This section is aimed at describing how to import entitlements from an external system using a connector or a CSV file.
Importing entitlements with a connector
In case there exist a connector with OpenIAM, importing entitlement is made using Synchronization Service. As an example, AD with the PowerShell connector will be used.
As any other importing, importing of entitlements with a connector is performed using a Synchronization Service. To start, go to Provisioning -> Synchronization. Here, there exist a special configuration used for synchronizing data with an external source. For AD PowerShell it is AD PowerShell GROUP example configuration template.
By entering the template, one can see a number of fields to be completed for a synchronization to be successful and fot data from target system to be uploaded to OpenIAM.
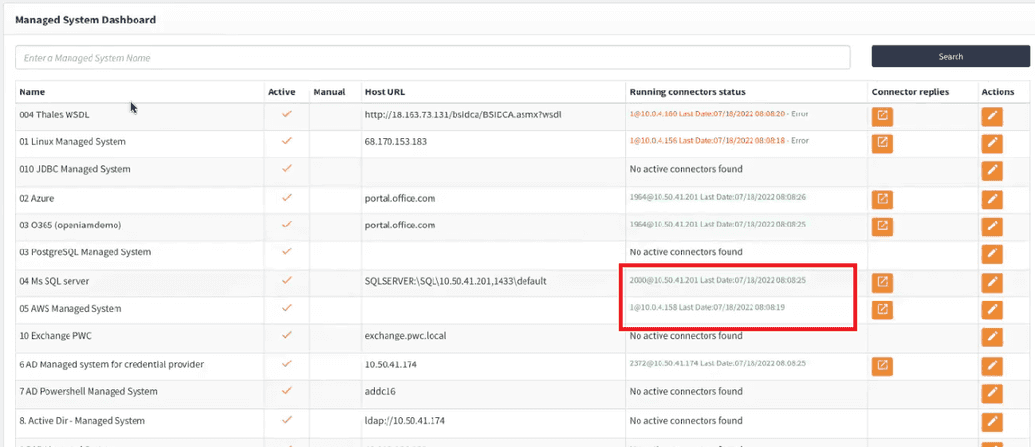
For the synchronization process to be successful, make sure the Managed system and Connector shall be running. To check it, go to Provisioning -> Managed Systems and in the search box find the required managed system. The code for the needed managed system in the Running connector status field shall be of green color as shown below.
For more information on connectors, see Connection details. The synchronization screen is described in the table below.
| Field name | Description | Example Value |
|---|---|---|
| Name | Descriptive value to identify this configuration. | Entitlement synch - OpenLDAP |
| Number of Threads | Set this value to 1, which is the default. This controls how many threads will be created to process data coming from the connector or CSV file. This is a performance optimization for processing large datasets. However, creating too many threads can take away resources from other operations and thereby have a negative impact. | 1 |
| Is active? | Flag which determines if the synchronization configuration can be executed. Making a configuration Inactive is a way to disable the task. | True |
| Detect orphan | Orphan management should not be enabled for processing data from a source system. Orphan management is used to detect records in a target system which are not in source. Since we are importing entitlements, and source system has not been loaded, there are no orphans to detect | False |
| Provision to target systems | This flag enables down stream provisioning to target system. Once you have configured you synchronization and managed systems, you MUST enable this checkbox to allow for downstream provisioning. Since we are importing entitlements, there is nothing provision. | False |
| Synchronization source | This is the source of your data. In this case, if we using LDAP, then our source should be the connector. Since the 4.2.1.2 version, the Users shall renew the connector for its value to as in the next column. | Connector (since 4.2.1.2) |
| Managed System | Name of the managed system configuration which will be used by the connector | Test - AD Powershell Managed System |
| Synchronization object | Defines the type of object that will be imported. In this case, its the type of entitlement that we are importing. | Group |
| Synch type | Allows you to define if this should be an incremental or complete synchronization. Since we are loading data, it should be complete synchronization. In case the valu of this field is saved as Incremental, the system will synchroniza only the data from | Complete |
| Synch Frequency | Describes how often the synchronization process should run. If you are an implementation mode, then you can leave this feel blank. In production, if there is a need to actively synch from the selected application, then you can define a cron expression to control the frequency: Example, if you want it to running automatically. The frequency is expressed as a CRON expression. | |
| Example Cron expressions: Every day at 23:00 | 0 0 23 * *? | |
| Example Cron expressions: Every 1 hour: | 0 0 * * * ? | |
| Example Cron expressions: Every 15 minutes: | 0 /15 * * ? | |
| Pre-processor script | Pre-processor script runs before synchronization starts. | Leave blank |
| Post-processor script | Post-processor script runs after synchronization has been completed. | Leave blank |
| Validation Rule | Groovy script to validate the incoming data from the file. For AD powershell it has been already filled in. | |
| Transformation Implementation | This can be a transformation scripts (aka. Groovy script) | Transformation Scripts |
| Transformation rule | Select the Groovy script which will be responsible for mapping data from the CSV file to objects which OpenIAM understands. A bulk of the work that is performed during synchronization stems from this script. | Pre-selected for AD Powrshell Managegd System |
| OpenIAM field Name | Field which uniquely identifies a user in OpenIAM. | NAME (for non-user objects only) |
| Source Attribute Name | Attribute name form your source (via connector) which uniquely identifies a user. This attribute shall be spelled exactly as in all of the scripts used in the configuration. Otherwise, the script will not work. | Name |
| Custom Rule for Matching | In cases where its not possible to match on a single field, you can create a Custom match rule, using Groovy script, which will allow for more complex matching algorithms. | Please select, since the algorithm is set |
| SQL Query / Directory filter | Query used for a particular Managed System connector | Get-ADGroup 'Purchasing" for AD PowerShell |
| Source attribute names | When getting data from Connectors, the Attribute name lookup is a simple script which define the list of attributes from the source system which should be made available to the Transformation script. For example, if you are working with LDAP or Active Directory, you will only be able to map attributes in the transformation script which have first been defined in the Attribute names lookup script. | Pre-selected for AD PowerShell |
| Last execution time | Last time synchronization was ran. | Date |
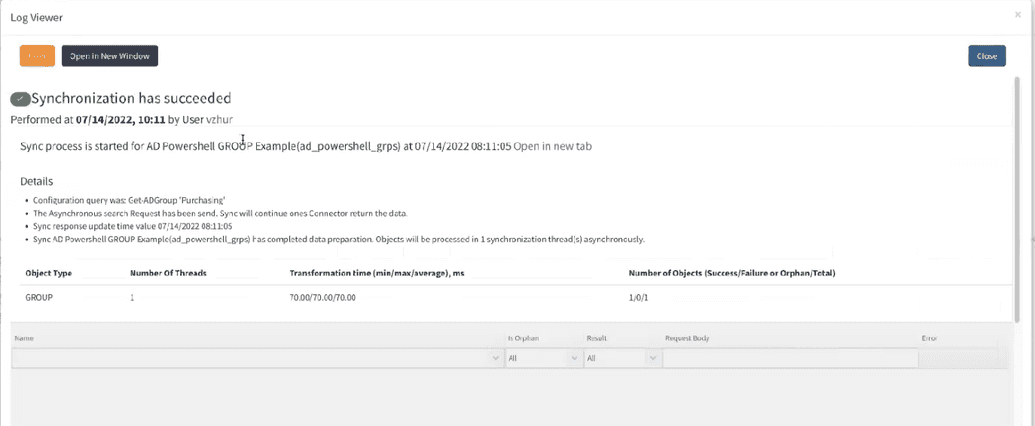
To check whether the synchronization was successful, synchronization audit is used. To access it go to Administration -> Log Viewer and type Synchronization in the search box. Here, one can see all synchronizations made using the connector. Synchronization audit log is the first place to search whenever a synchronization error occurs.
When opening the log, one can the details about this synchronization session, as shown below.
Synchronization results are displayed in Name section and this link is clickable and it show the details about an individual string that has been imported. The detailed screen is shown below.
The Target Group string is also clickable. After clicking it, you will be sent to Group editing template.
Importing entitlements with a CSV file
User entitlements can also be uploaded via a CSV file.
To import organization structure from an external system, go to Provisioning -> Synchronization. Here, one can see a list of synchronization options available.
To import roles, search and select a CSV USER Entitlements Sync Example template. The importing process is controlled via built-in script set in a Transformation rule field.
The mentioned Transformation script is meant to import user entitlements to OpenIAM by filling in the correspondent fields. Here, it is important for a CSV file has same structure, as in the transformation script.
The required structure of CSV file is described in the table below.
| Column name | Description |
|---|---|
| APPLICATION | Stands for the type of application user wants to import |
| TYPE | Metadata type to be imported |
| ENTITLEMENT_NAME | Entitlement the user wants to upload |
| GROUP | Group to be imported |
| ROLE | Role to be imported |
Every entitlement type can be uploaded separately also by means of a CSV file via Synchronization. The detailed process of Roles synchronization is given in Importing roles section. Other entitlements are imported separately using the correspondent Synchronization template.

