Using PowerShell connectors
This page covers common use cases, and they are applicable to all OpenIAM PowerShell connectors.
Working with the connector configuration
Sometimes there is a need to change the connector configuration. These changes can include connection parameters, enabling debug mode, etc. Starting with v5 of the OpenIAM .NET connectors, the configuration file is stored inside the connector folder.
If you are using v4 of the connectors, then the configuration file can be found in *%programdata%/OpenIAM/* where the
config file name is based on the connector name that was given to the connector during the installation process.
Note: This document will describe how to work with the config file with connector version 5.
The config file, which is called Connector.config, is stored in a JSON format. The file is monitored by the connector
service which detects changes that were done. So when you change the config file no connector restart is required and
changes are applied on-the-fly.
Connector configuration format
This is a sample configuration file:
{"ConnectorName": "MsPSGraphConnector","LogLevel": 0,"IsSaveRequestEnabled": true,"IsRabbitMQEnabled": true,"IsStatusLogEnabled": false,"RabbitMQHost": "aipoclouddemo.openiam.com","RabbitMQUsername": "enc:AQAAANCMnd8BFdERjHoAwE/Cl+sBAAAAaauU57pNqUql2K8z7cfMEAQAAAACAAAAAAAQZgAAAAEAACAAAAD9Vt21IK2wvWTNM47GAyXaTQ2epJvUyzFWJj0SHYwGoQAAAAAOgAAAAAIAACAAAAAzFAXpoqQi6bT8qlkQhJduv3yIOJCH8q6gshY7jvIyTxAAAABmxTNXwdqiRgIk8CfFsEVkQAAAAAFcf6YJhkhN+in+t0kiNqQMK24bSF7fdTv+GCCBQ+c1gBEuoS2cIFMVpNcOtB5jkXpAGuN8/ernPSga2ZXx1Xs=","RabbitMQPassword": "enc:AQAAANCMnd8BFdERjHoAwE/Cl+sBAAAAaauU57pNqUql2K8z7cfMEAQAAAACAAAAAAAQZgAAAAEAACAAAAANvSMNp7vGCEve7PUlcR3A7XtlHeeXi+xhUWuo0CDLcQAAAAAOgAAAAAIAACAAAADaM2r+2bJVtxmdtaXd1aMQDOvto/TBM4ZtTvpCLOekPiAAAACCtZ5Hfs6s5OMRBbGkadX9H998RMTrB92Nhpjoq3lHsEAAAAB6fGgR/4YnW92Mv0svbT4F1Q/QZDBNokFq9BDN47nvtedK4jko8uZ9eSofLcUA2VCvuuscYi+TSvxPVMGn1xYa","RabbitMQPort": 5672,"RabbitMQVhost": "enc:AQAAANCMnd8BFdERjHoAwE/Cl+sBAAAAaauU57pNqUql2K8z7cfMEAQAAAACAAAAAAAQZgAAAAEAACAAAACKXn/U4uKm5rBVRww7sZF0HuOzChLwx+h8GVHd/+DbKwAAAAAOgAAAAAIAACAAAAAcz3RieV3WnaVq1FdZ45XGsbpRKzDIkg2rk1b32Yk/6zAAAAAhxXUSv2Wvq1QU41EYXlrwdzcZFMD+mvgG/guXIM9vnCgdnwHs1Ztp33pOXHRxOzJAAAAATTnhbX/FFQWIkXFexqwfW+EKiENLofI2EEb3tS6R1T1NwMoOuqEWcU8ILiLwHiAE4PVLRNrdBCrnpJIU8aCNmg==","RabbitMQQueues": [{"RabbitMQReceiveQueue": "RemoteConnector_ 402_Request","RabbitMQResponseQueue": "RemoteConnector_ 402_Response","Concurrency": 1,"QueueType": "quorum"}],"ExecutionTimeoutMin": 60,"IsTLSEnabled": false,"LogSize": 256,"PreloadRunnerPoolSize": 2,"RequestRunnerPath": "\\Runners\\PSClassic\\ConnectorRequestRunner.exe","SearchResponseBatchSize": 1000000,"LogSearchResponses": false,"RequestMetricsEnabled": true,"IsCleanupTaskActive": false,"FlushTimer": 3,"LogDBType": "SQLite","LogDBConnectionString": "Data Source=C:\\Connectors\\MsPSGraphConnector\\Log.db","DisableManSysHealthcheckRequests": false,"IsProductionInstance": false}
The table below describes each configuration option.
Note: You will need to have administrator privileges to be able to save this configuration after changes are made.
| Parameter name | Description |
|---|---|
| ConnectorName | Name that was given to this connector during the installation. This name could be found inside the log database and the Windows System Event Viewer. The name of the connector can be used to distinguish what connector originated records, because there could be multiple connectors of different types installed on each server. |
| LogLevel | If set to 0, the connector will log all possible records. This is also called 'Debug' mode. You can set it to 0 when you are trying to figure out what the connector does with each request step-by-step, but it is verbose and may consume significant disk space if utilized for a long period of time. Adjust log level according to your needs. |
| IsSaveRequestEnabled | Enables or disables the saving of request data to the simulation folder (Simulation mode will be described in detail later in this document) |
| IsRabbitMQEnabled | Setting this to false will disconnect the connector from the OpenIAM service bus. It's equivalent to putting the connector on hold without stopping it as a service. |
| RabbitMQHost | The hostname or IP address where the RabbitMQ message bus is located. Usually, this should be the same as the IP address or hostname of the OpenIAM service. |
| RabbitMQUsername | Username for connecting to RabbitMQ. By default, this value is encrypted. However, it can also be used un-encrypted. Changing this setting in an encrypted format will be described later in this document. |
| RabbitMQPassword | Password for connecting to RabbitMQ. By default, this value is encrypted. However, it can also be used un-encrypted. Changing this setting in an encrypted format will be described later in this document. |
| RabbitMQPort | Port for connecting to RabbitMQ. 5672 is used by default. |
| RabbitMQVhost | Virtual host for connecting to RabbitMQ. It's encrypted by default. Changing this setting will be described later in this document. |
| RabbitMQQueues | Currently, the connector can connect only to a single queue of an OpenIAM instance. Now connector can connect to multiple queues and each of them can have RabbitMQReceiveQueue, RabbitMQResponseQueue, Concurrency and QueueType. RabbitMQReceiveQueue is used by the connector to receive requests from OpenIAM. This value can be taken from the OpenIAM connector configuration page in the webconsole > Request. RabbitMQResponseQueue is used by the connector to send responses back to OpenIAM. This value can be taken from the OpenIAM connector configuration page in the webconsole > Response. Concurrency sets a number of requests from OpenIAM that could be processed at a time. Each request is being handled by a separate worker process that is disposed of after the request has been completed. The number which is set in this parameter represents the number of worker processes that can run at a time. Queue type can be either ‘quorum’ or ‘classic’. In 4.2.1.11 version it will be always ‘quorum’, classic versions are used for 4.2.1.9 versions and below. |
| ExecutionTimeoutMin | Maximum time in minutes existing for a worker process. If this amount of time is reached but the worker process is still processing the request it will be killed. |
| IsTLSEnabled | Defines if connection from connector to the RabbitMQ needs to be secured by TLS. Default value is false, but if you are going to enable it then RabbitMQ (OpenIAM) side should be configured as well. Please read https://docs.openiam.com/docs-4.2.1.10/installation/1-rpm-installation/9-rabbitssl for more information |
| LogSize | Size of Log.db file in megabytes before connector service makes rotation. Default value is 256. |
| PreloadRunnerPoolSize | Number of request runner processes the connector keeps started and pre-warmed, waiting for requests to arrive. Default value is 2 after connector installation. Setting it to 0 disables the warm pool entirely and returns the connector to starting a runner per request. See Warm runner pools below. |
| RequestRunnerPath | Connector supports 2 types or runners: classic PowerShell and PowerShell core. Runners are located in the Runners folder of the connector. You can switch to another runner in case you need PowerShell Core features for your connector. |
| SearchResponseBatchSize | If you manage a large set of identities in your managed system and you need to synchronize them, the connector can split response batches to offload itself and the OpenIAM side. However, you need to take into account that not all OpenIAM versions support this feature, so this parameter is set to 1000000 for better compatibility. |
| LogSearchResponses | While working in a Debug mode connector saves all requests and responses to a log. However, some responses can be very 'heavy', for example, search responses that can be hundreds of megabytes in size. So, by default this setting is disabled. It is recommended that you turn it on only for short term debugging. |
| RequestMetricsEnabled | When set to true, the connector records a per-phase timing breakdown for every request — engine start-up, module import, request parsing, connecting to the managed system and executing the connector logic — together with the runner mode the request used. These metrics are what let you confirm whether a request was served warm or cold. |
| IsCleanupTaskActive | If enabled, the connector will remove all content from the 'Simulation' folder and rotated Log.db files once per day. |
| FlushTimer | Value in seconds how often connector log service would save logs to destination. By default this happens every 3 seconds. |
| LogDBType | At the moment supports ‘SQLite’ and ‘JSONFile’. |
| LogDBConnectionString | If ‘SQLite LogDBType is used should contain connection string to SQLite database (like in sample configuration). If ‘JSONFile’ is used it should contain the full path to the JSON file (please keep in mind escape symbols to keeping JSON file format valid). |
| DisableManSysHealthcheckRequests | If set to ‘false’ – connector will validate end-to-end connection between OpenIAM and target managed system by trying to run test requests once per minute. If ‘true’ connector only validates connection between OpenIAM and connector. Not all connectors support end-to-end validation yet. |
| IsProductionInstance | Declares whether this connector is a production instance. When true, the connector checks its own configuration against the production policies on startup and on every configuration reload, and refuses to run if they are not met. This parameter is mandatory: the connector will not start if it is absent from the file, whichever value you intend. See Production instance hardening below. |
Working with encrypted parameters
The OpenIAM connector server should be well-secured and access should be restricted to a limited number of users. To ensure security, critical OpenIAM configuration parameters in the config file are encrypted using the machine key. This means that this string could be decrypted only on the same connector machine.
When the OpenIAM connector installer performs the installation, it encrypts sensitive data like username, password and vhost by default. If you would like to get a new encrypted value to replace an existing one you should open the PowerShell console on the same machine where the connector has been installed and run the following commands:
Set-Location 'Your connector folder address'Import-Module .\CryptCmdlet.dllConvertTo-EncryptedString -StringToEnctypt 'SomeValue' | clip
Those commands will encrypt the SomeValue string and copy the output to your clipboard (if you just want to display
it, remove | clip from the end of the last line). Subsequently, if you would like to encrypt username, you should
replace some value with the username. Next, you will need to replace it inside the connector configuration file.
Please pay attention to ensure that the connector configuration file format is maintained. It uses a JSON format and you
must ensure that starting and terminating quotes (") are in the right place.
Warm runner pools
Every request the connector receives is executed by a separate ConnectorRequestRunner process. The connector passes
the request to that process, waits for the result, and the process is disposed of once the job is done, so requests stay
fully isolated from one another.
The drawback of that model is that a runner has to be started before it can do anything, and starting it is not free: the process has to launch, open a PowerShell runspace, and import the connector modules before the first line of connector logic runs. That cost is paid on every request.
Newer versions of the .NET PowerShell connectors keep a warm pool of runners to avoid paying it. The connector starts a number of runner processes up front and warms them — the runspace is opened and the connector modules are imported while the runners sit idle, waiting. When a request arrives, the connector takes a runner that is already warm, passes the request straight to it and waits for results. Idle warm runners are only waiting on a pipe, so they consume very little in the way of resources.
Configuring the pool
The pool is controlled by a single parameter in Connector.config:
"PreloadRunnerPoolSize": 2,
After connector installation this is set to 2, meaning two runner processes are always started and ready. You can
confirm this on the connector host — the Task Manager shows the connector process plus that many
ConnectorRequestRunner processes.
Setting the value to 0 disables the warm pool completely, and the connector goes back to starting a runner for
each request as it arrives.
Note: The connector monitors Connector.config, so a change to this value is applied on-the-fly without restarting
the connector service. When you lower the value or disable the pool, the connector recycles the idle warm runners it no
longer needs.
Runner lifetime and recycling
Warm runners are not meant to live indefinitely. Each one is given a randomly generated idle lifetime — in practice in the region of 10 to 15 minutes — after which it is disposed of and replaced. The lifetime is randomized per runner deliberately, so that the whole pool does not expire and restart at the same moment.
The pool is also self-healing. If a warm runner is lost — killed manually, or gone after an execution failure — the connector notices and starts a replacement with a new identifier. No intervention is needed, and requests arriving in the meantime are unaffected.
When the pool is empty, and behavior under load
The pool never blocks a request. If no warm runner is available, the connector falls back to cold mode and starts a runner the original way, exactly as it would with the pool disabled. The request is served either way; it is only slower.
Under load the pool refills continuously: as soon as a warm runner is handed a request, the connector begins warming a fresh one to take its place, so a steady stream of requests keeps finding a warm runner ready.
Choosing a pool size
The default of 2 suits a connector handling requests one at a time. If you run at higher concurrency, raise
PreloadRunnerPoolSize to roughly the same value as the Concurrency set on the connector's queue — otherwise
concurrent requests beyond the pool size fall back to cold mode and lose the benefit.
Confirming whether a request ran warm or cold
Set RequestMetricsEnabled to true and the connector records, for every request, which runner mode it used and how
long each phase took. Comparing a warm request with a cold one shows where the saving comes from: the start-up and
module-import phases shrink dramatically, while connecting to the managed system and executing the connector logic are
unaffected — those depend on the target system, not on how the runner was started.
The connector log also carries the pool's own events, recorded against the WarmRunnerPool event source. Filtering the
log on that event source is the quickest way to see what the pool has been doing. The messages look like this:
Warm-up completed: runspace opened and connector modules imported.Warm runner <runner-id> ready; it took 00:00:00.68 to warm up (process start -> pipe open).[ready=1 warning=0 dispatched=0 target=2 circuit=closed (healthy)]Warm runner ready; randomly generated idle lifetime = 13 min 9 secWarm runner <runner-id> died: execution failure (was Ready).[ready=1 warning=0 dispatched=0 target=2 circuit=closed (healthy)]
Read together, these tell you the pool is healthy: each runner reports how long it took to warm up, the idle lifetime it
drew, and — in the counters — how many runners are currently ready, how many have been dispatched to requests, and
the target size the pool is working towards. A runner that dies is logged with the state it was in, and is followed by
a replacement starting up with a new identifier.
Note: How much time the pool actually saves depends heavily on the connector host. On modest or heavily loaded hardware the start-up cost is far larger, so the pool helps more there than it does on a fast, idle machine. Measure it on your own environment rather than assuming a figure — the phase timings above are exactly what you need for that.
Production instance hardening
A connector is often configured for convenience while it is being evaluated — most commonly with an unencrypted
connection to RabbitMQ, because TLS is one more thing to set up for a test that is going to be thrown away. The
problem is what happens next: that connector gets promoted to production, and nobody goes back to change it. The
same applies to sizing. A host with 8 GB of RAM handles a test directory perfectly well, then throws
OutOfMemoryException the first time it is pointed at a real one with hundreds of thousands of objects.
IsProductionInstance exists to stop that happening silently. Set it to true and the connector validates its own
configuration against a set of production policies, and refuses to run if they are not met.
What is enforced
| Policy | Requirement |
|---|---|
| Encrypted transport | Every RabbitMQ connection the connector uses must have TLS enabled. The error names the queue that fails, so on a multi-queue connector you are told which one to fix. |
| Memory | The host must report at least 16 GB of physical memory. |
| The declaration itself | IsProductionInstance must be present in Connector.config, set to true or false. An absent parameter is a violation in its own right — see below. |
The flag can be set during installation, and afterwards in Connector.config.
When the check runs
Validation runs at two moments: at service startup, and on every configuration reload. Since the connector watches its configuration file and applies changes on the fly, a configuration edit that breaks a policy stops the connector as soon as the file is saved — you do not have to restart it to find out.
When a policy is violated the connector stops rather than running in a state it has been told is unacceptable. It
terminates with ExitCode=0 and no service-manager auto-restart, so the service goes to Stopped and stays
there instead of restart-looping.
Upgrading a connector: the trap worth knowing about
This is the failure that costs people the most time.
IsProductionInstance is a new parameter. A configuration file written before it existed does not contain it.
When you upgrade a connector and restore a previous configuration file — which is a natural thing to do, because
the old file holds the RabbitMQ credentials, queue names and encrypted values you would otherwise have to gather
again — the connector refuses to start:
Running production instance policy validation (phase: startup)Validation completed (phase: startup): IsValid=FalseProduction instance policy violation at startup — initiating graceful service stop (no auto-restart).Required configuration parameter 'IsProductionInstance' is missing. Add "IsProductionInstance": true or falseto the configuration. Service will not start.
Because the configuration is watched, dropping the old file into place switches the connector to Stopped immediately, which can look like the upgrade itself broke it.
The fix is to start from the configuration file that the new connector installed and carry your settings into it, rather than replacing it with the old file wholesale. The newly installed file also contains other parameters added since the old one was written, so restoring the old file loses more than this one flag.
The other two violations
With the parameter present but a policy unmet, the messages name the policy directly:
Terminating service with ExitCode=0 (no SCM auto-restart). Reason: config reload: Production instance requiresevery RabbitMQ connection to use TLS, but the following queue is configured without TLS:RemoteConnector_1_Request. Service will not start.
Terminating service with ExitCode=0 (no SCM auto-restart). Reason: startup: Production instance requires atleast 16 GB of physical memory, but the OS reports 8.00 GB. Service will not start.
Where to look when the service will not start
The validation messages are written to both the connector log database and the Windows Event Viewer, under the
Application log with the connector's name as the source. Either will tell you which policy failed; the connector
log is the fuller record, and carries the surrounding sequence — the validation phase, the IsValid=False result,
the policy that failed and the shutdown that followed — against the ConnectorService.ValidateProductionPolicy
event source.
If a connector has gone to Stopped after an upgrade or a configuration change and the reason is not obvious, that sequence is the first place to look. See Working with logs below.
Working with logs
Each request that is sent from OpenIAM contains the parentAuditLogId parameter which allows OpenIAM to track the
request result and show it in the OpenIAM audit logs. All errors returned from connectors are seen in OpenIAM audit
logs.
However, there may be situations where viewing it is not possible, such as when the connector loses connection with OpenIAM. In such cases it is very useful to check the connector logs to determine what went wrong.
These local connector logs can be very helpful for troubleshooting and understanding how the connector works.
Log format
The connector log file is located inside the connector folder and is called Log.db.
- PowerShell connectors version 4.x use SQL CE 3.5 database log format.
- PowerShell connectors version 5.0.0.0 – 5.31.0.0 use SQL CE 4.0 format.
- PowerShell connectors version 5.32.0.0 and later use SQLite log database by default.
It's important to use a compatible database viewer.
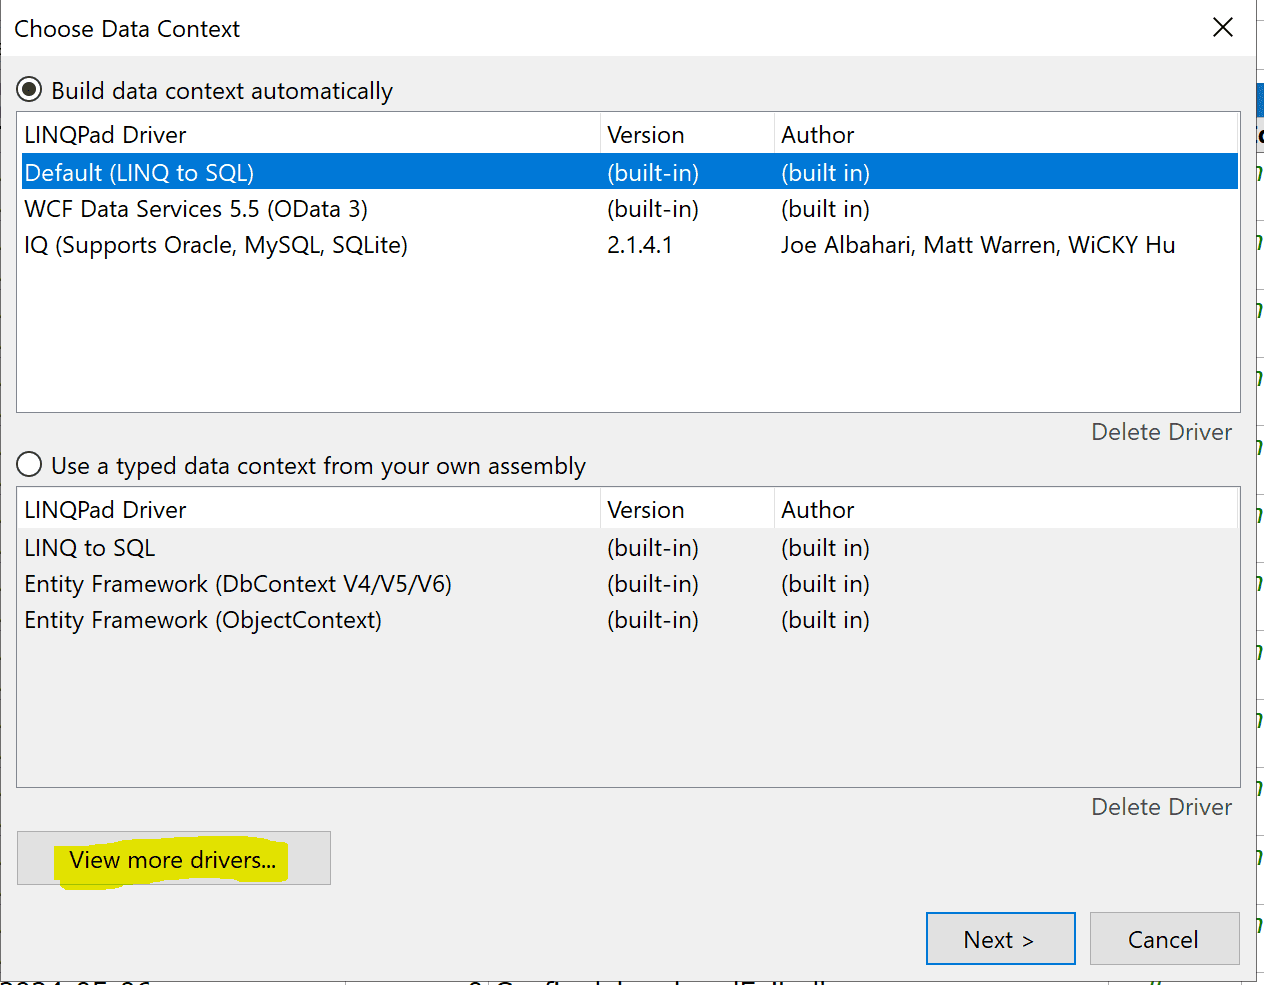
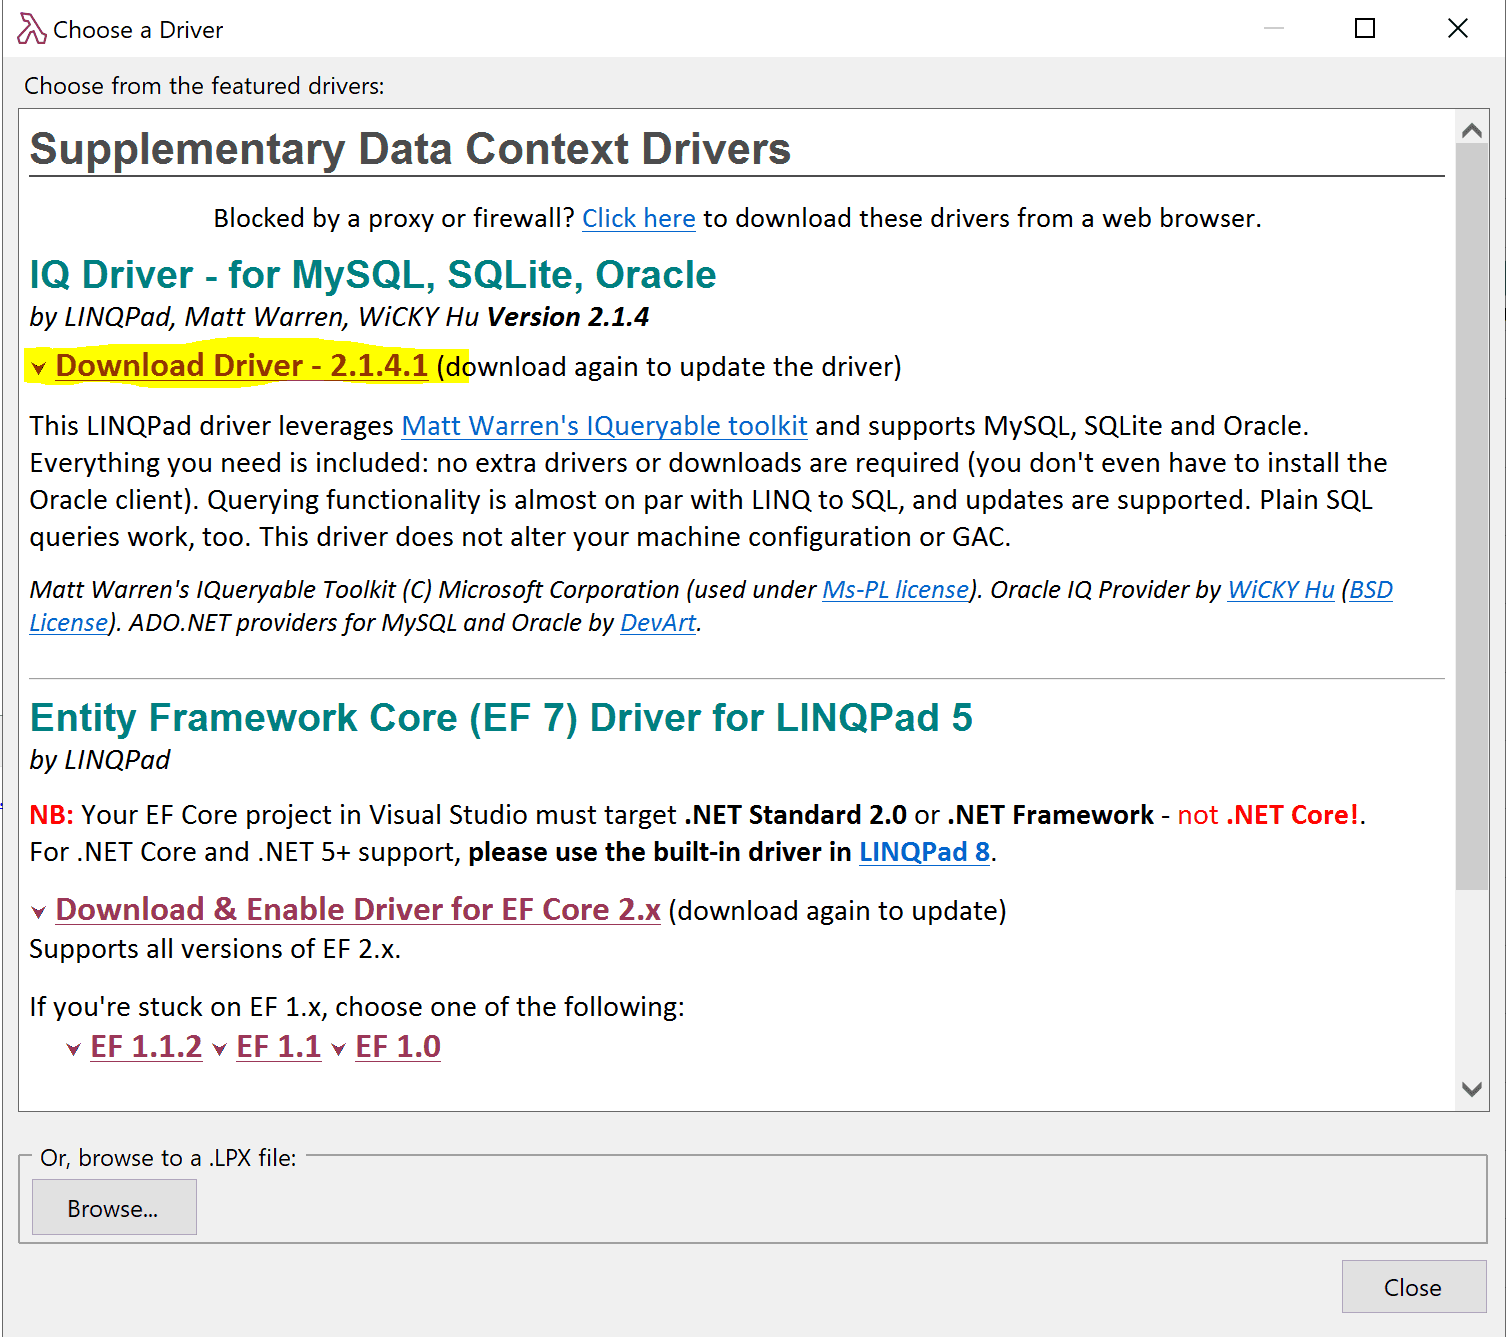
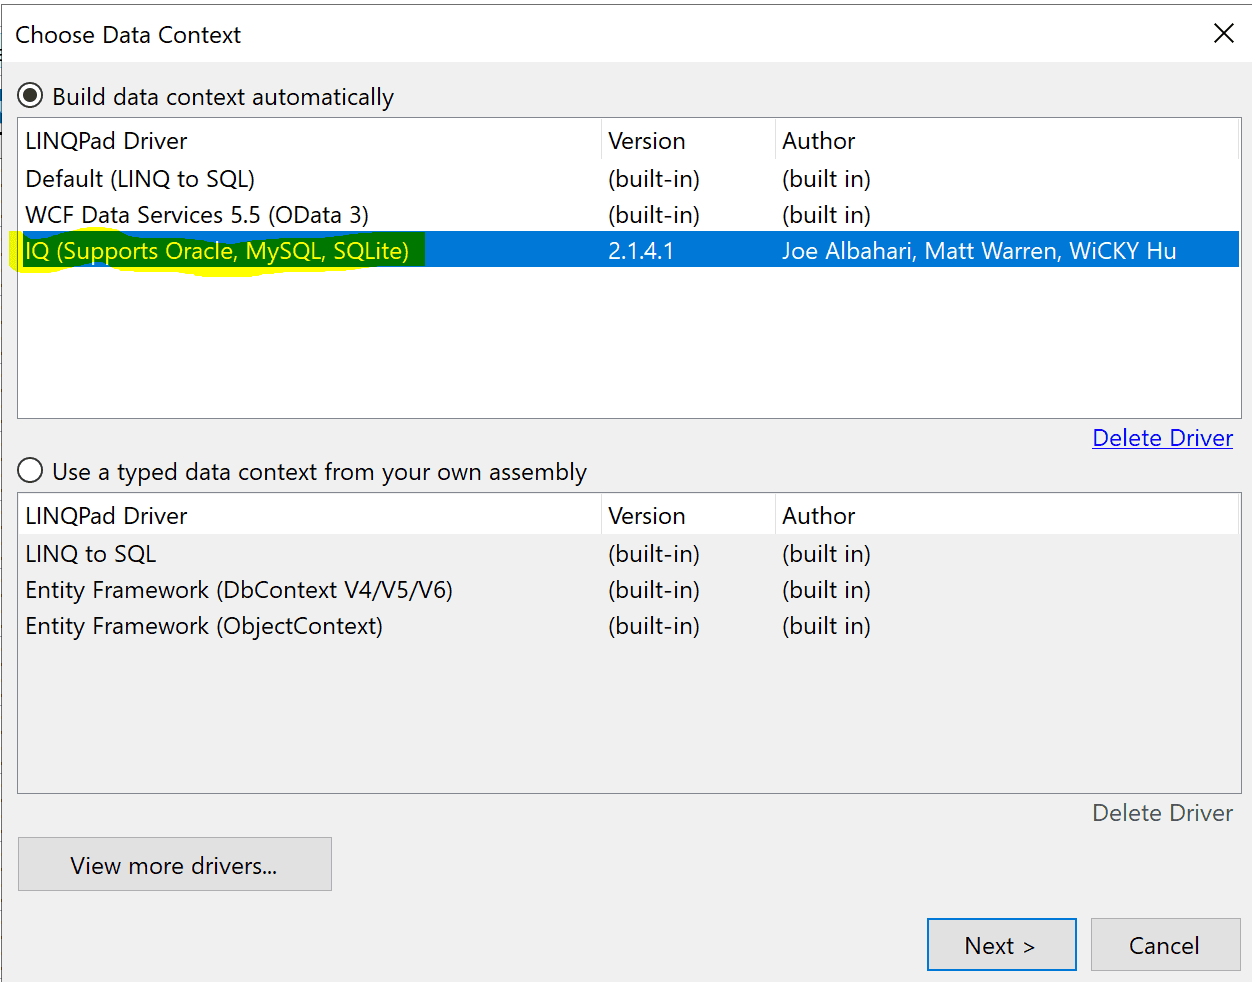
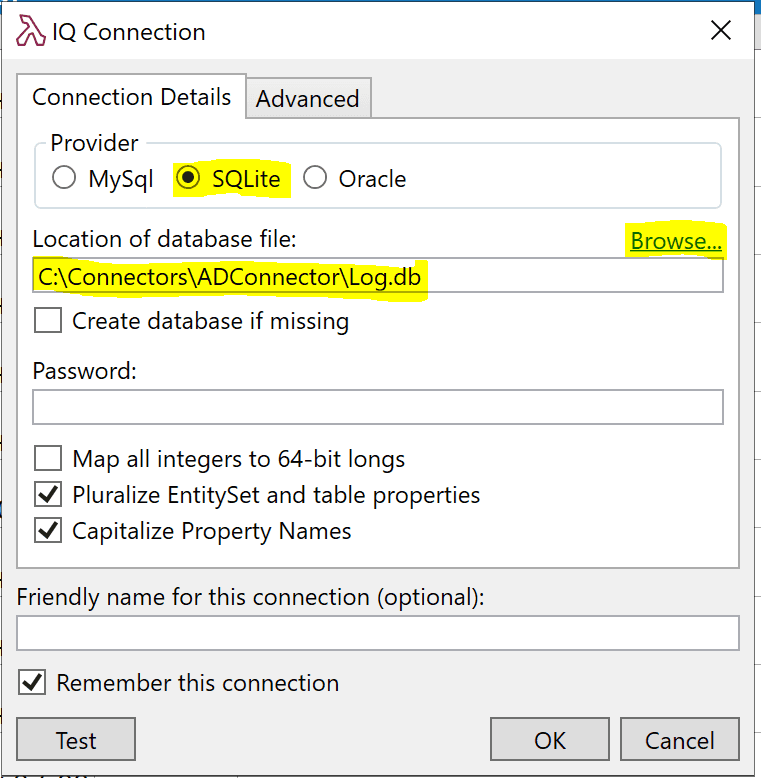
Important note: Starting from the 5.32.0.0 version we stopped supporting SQL Compact Edition and moved to SQLite database by default. You can continue using LinqPad for browsing logs, but you have to add a driver to support SQLite databases. The steps to do it are shown in the screenshots below.
Viewing log database
By default, all .NET/PowerShell connectors save logs in SQLite database, so any compatible viewer could be used to open and view log database. Example of using one of the viewers was given in a section above. Below, there are few example of queries that could be used for finding and viewing logs:
- Query logs for provisioning some user
SELECT *FROM LogsWHERE IdentityValue = 'SomeUserIdentity'ORDER BY ID DESC
- Query logs for certain request ID
SELECT *FROM LogsWHERE RequestID = '5583cf9a-abdd-42cb-aa50-b433458c4cfb'ORDER BY ID DESC
Windows Event Viewer
Important messages may also be sent by the connector to the Windows Event Viewer. It may include various situations like
problems with starting the service itself. In this situation the Log.db will not be very useful, because the service was
not able to start normally. However, you will be able to see messages in the Windows Event Viewer. Messages can be found
in Windows Logs -> Application. Messages can be found by source OpenIAM Connector Service and the ConnectorName
that was provided for the connector during installation. Below is an example of how a connector restart looks in the
Windows Event Viewer.

Simulation mode
PowerShell connectors support a Simulation mode which is a powerful tool that can help troubleshoot and re-run certain requests.
By default, when you turn debug mode on and you have the IsSaveRequestEnabled config parameter enabled, the
connector creates a JSON file for each request that is sent from OpenIAM to the AD connector. That JSON file contains
request parameters that represent requests. Having this file, you can trigger the connector to process the request that
was recorded in the file without listening to OpenIAM.
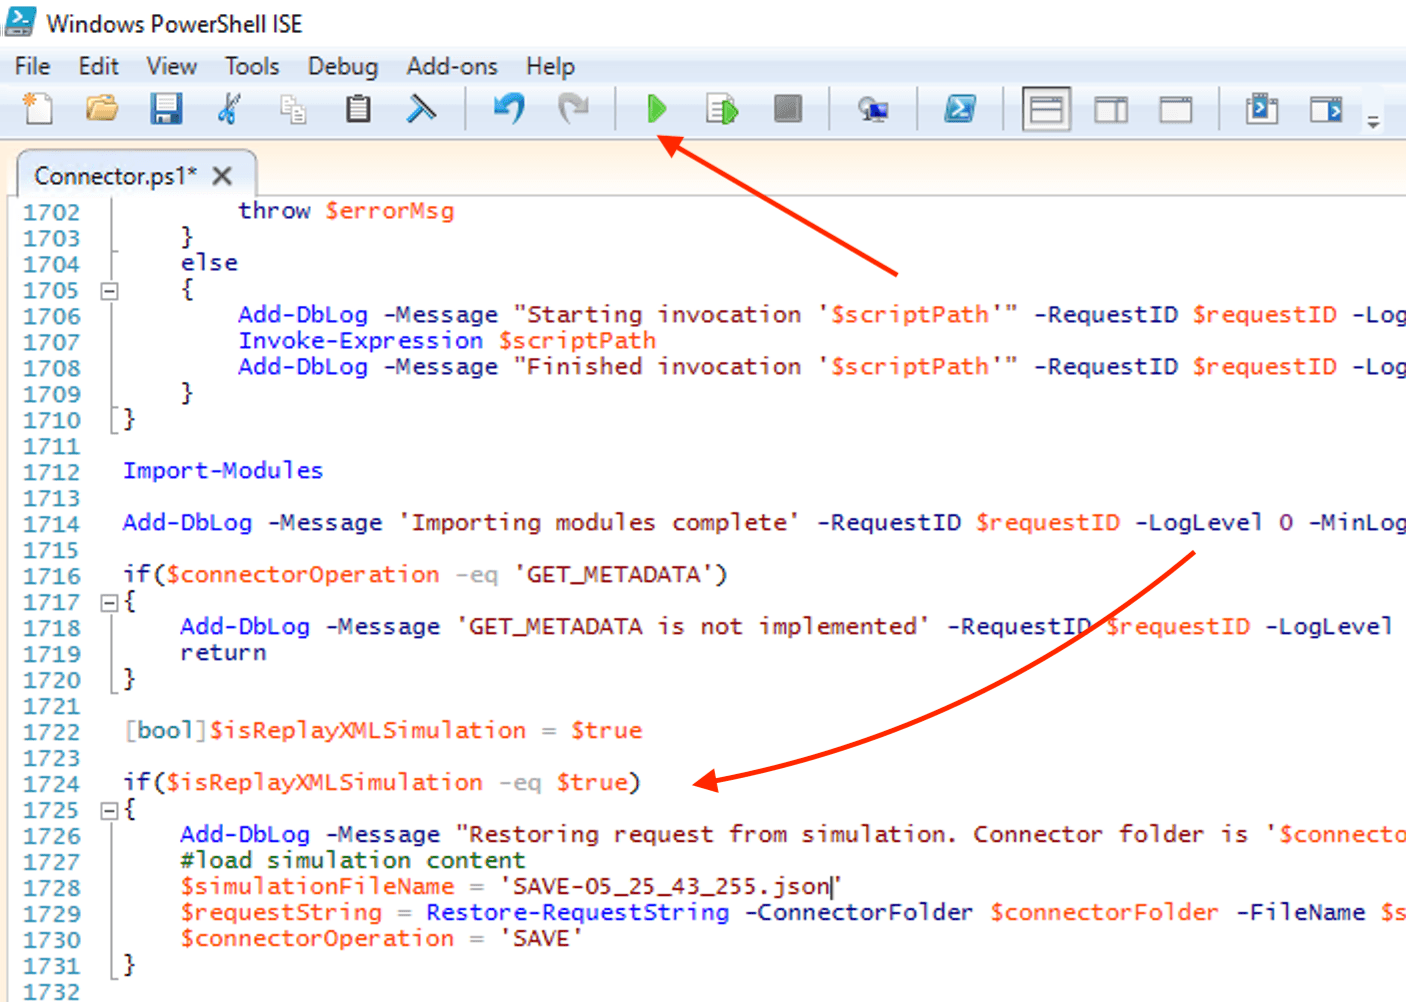
When you have done the above, to trigger the request again you should open Connector.ps1, which is located inside your connector folder and edit the lines. We recommend to use the PowerShell ISE native Windows tool for editing the PowerShell files.
Below is the initial code snippet that we will modify.
[bool]$isReplayXMLSimulation = $falseif($isReplayXMLSimulation -eq $true){Add-DbLog -Message "Restoring request from simulation. Connector folder is '$connectorFolder'" -RequestID $requestID -LogLevel 0 -MinLogLevel $minLogLevel#load simulation content$simulationFileName = 'filename.json'$requestString = Restore-RequestString -ConnectorFolder $connectorFolder -FileName $simulationFileName$connectorOperation = 'SAVE'}
- Change
$isReplayXMLSimulationto $true - Set
simulationFileNameequal to your file name inside the Simulation folder (just filename needed, not the full path) - Set
connectorOperationtype to the connectorOperation variable. Valid options include:SAVE,SEARCH,DELETE,RESET_PASSWORD,LOGIN,SUSPEND,RESUME,TEST
The newly modified version could look like:
[bool]$isReplayXMLSimulation = $trueif($isReplayXMLSimulation -eq $true){Add-DbLog -Message "Restoring request from simulation. Connector folder is '$connectorFolder'" -RequestID $requestID -LogLevel 0 -MinLogLevel $minLogLevel#load simulation content$simulationFileName = 'SAVE-05_25_43_255.json'$requestString = Restore-RequestString -ConnectorFolder $connectorFolder -FileName $simulationFileName$connectorOperation = 'SAVE'}
When you apply your changes, you can run and debug the PowerShell script using PowerShell ISE or any appropriate tool.
Checking the connector version
It is recommended to use the latest version of the connector. All of .NET/PS connectors are backwards compatible, so there won't be any issue with using the latest connector version with OpenIAM 4.2.0.
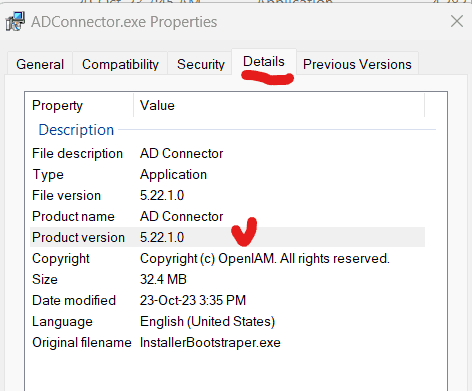
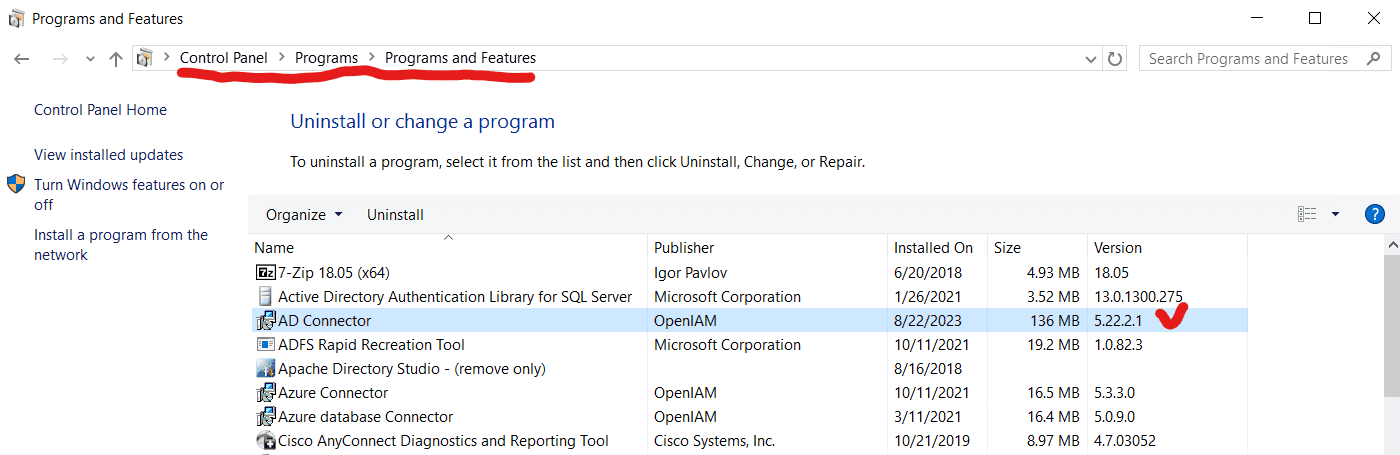
For checking your current .NET/PS connector version.
If connector in not installed:
- Right click the installer file and select Properties.
- In the window opened, find Details section, as shown below.
If connector is installed:
- Go to Control panel > Programs > Programs and Features
- Find AD Connector and in the list on the right there will be a version of the connector installed, as shown below.
TLS connection to the RabbitMQ
If you want to establish a TLS connection to the RabbitMQ that is configured to use a self-signed certificate it could be put to Trusted people.
The connector requires a trusted certificate to establish connection to RabbitMQ. It is possible to create a connection without TLS, but in case you choose to use it, connector will require a trusted certificate. Sometimes, users choose to use a self-signed certificate and to make it work, it is needed to import this certificate to trusted people on an operating system level and then it will work. The instruction on how to do it is given in the video below.
It is also worth mentioning that when you work with TLS and establish a TLS connection to any host, you should use the DNS name that is listed inside the certificate. So, when putting an IP address instead of the host name that is used in the same target address the connection will fail with "Certificate is invalid" error. When verifying the certificate, make sure to check the name of host the certificate is issued to.