Policy map
One of the major steps of configuring the provisioning process is creating a policy map. Without a policy map, provisioning cannot occur since the system doesn't know which attributes to calculate and send to the connector. It also defines rules determining the way each attribute is calculated.
Policy map is a part of Managed system configuration, which is used to define the list of attributes you want to manage in the target application. Furthermore, it contains rules that determine how each value can be calculated.
In simpler words, a policy map allows mapping the fields for users or groups between a target system and OpenIAM. It is a vital part for proper user provisioning.
Policy map can be configured using several approaches:
- from scratch;
- by cloning;
- from a connector.
Each of the ways will be discussed below. As an example, an Active Directory managed system will be used.
Configuring a policy map from scratch
Creating your own policy map allows selecting those fields and attributes that you need for your business purposes.
To create one, perform the following steps:
- In webconsole, go to Provisioning -> Managed System. Select the needed managed system or create a new one, if required.
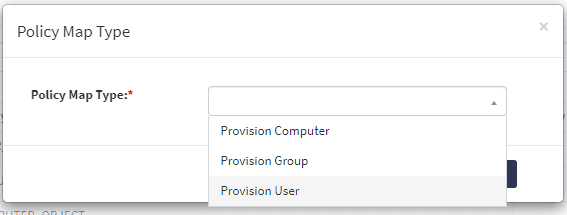
- In the menu on the left, select Policy Map and click Add on the right. Policy map type window will pop up.
- Select the type of Policy Map.
Note: Computer policy map type is a legacy type and is no longer used.
OpenIAM can provision two types of objects - Groups or Users. That is why two policy map types are available for selection.
Note: Group here stands as an object. A relationship between a user and a group is provisioned from a User policy map type. Group provisioning type is used in case you want to create a group in OpenIAM and provision it to a target system.
Further, User policy map will be used as the example.
- Start filling in the fields in the Edit Policy Map for your Managed system.
Type in the name for your policy map. Then, start adding the attributes you need to map between OpenIAM and a target system. Click add (a blue plus icon in Actions column) to add a new row. Note, that two fields are necessary to include in case the target system if Active Directory - PRINCIPAL and PASSWORD. All other fields are of the USER object type.
Note: Mark this policy map as primary flag is a legacy. As a rule, you will need only one policy map of a particular type (one for user and one for group), so this flag is not applicable.
| Field | Description |
|---|---|
| Object type | PRINCIPAL and PASSWORD as obligatory ones and USER for other types. |
| Attribute name | Attribute name as in the target system. |
| Type | The source from which the attribute will be read in OpenIAM. It can be a groovy script, IDM value and Static. Groovy script means that in the Attribute value section you have to identify the groovy script location for a respective system. IDM value means that the value to be copied into a target system from an OpenIAM attribute. Static type requires typing the value manually. |
| Attribute Value | Stands for the value of an attribute to be copied to the target system. |
| Status | Shows if the field is active or inactive in the policy map. |
Note: In case you need dynamic password attribute value to be copied into the target system, a groovy script can only do it. The respective code for random password generation is given below.
package org.openiamimport org.apache.commons.logging.Logimport org.apache.commons.logging.LogFactoryimport org.openiam.api.connector.groovy.AbstractIPolicyMapGroovyimport org.openiam.api.connector.model.ConnectorAttributeimport org.openiam.api.connector.model.StringOperationalConnectorValueimport org.openiam.base.AttributeOperationEnumimport org.openiam.base.response.list.PolicyListResponseimport org.openiam.common.beans.mq.PolicyRabbitMQServiceimport org.openiam.idm.provisioning.diff.model.user.ProvisionUserObjectDiffimport org.openiam.idm.searchbeans.PolicySearchBeanimport org.openiam.idm.srvc.pswd.service.PasswordGeneratorimport org.springframework.beans.factory.annotation.Autowired/*** Script generates random password using password policy*/class UserPassword extends AbstractIPolicyMapGroovy<ProvisionUserObjectDiff> {private static final String DEFAULT_POLICY_ID = "4000"@Autowiredprivate PolicyRabbitMQService policyRabbitMQService@Overrideboolean isPerform(ProvisionUserObjectDiff diffObject) {return AttributeOperationEnum.ADD.equals(diffObject.getStatus())}@Overridevoid perform(ConnectorAttribute attribute, ProvisionUserObjectDiff diffObject) {PolicySearchBean psb = new PolicySearchBean()psb.addKey(DEFAULT_POLICY_ID)PolicyListResponse response = policyRabbitMQService.findBeans(psb, 0, 1)String password = PasswordGenerator.generatePassword(response.getList().get(0))attribute.addValue(new StringOperationalConnectorValue(password, diffObject.getStatus()))}}
In case attribute value is a user attribute, make sure that this attribute is added as a custom field and added to a page template. You will not be able to add an attribute in case the field is not added to a page template as a custom field.
- Add as many fields for attributes as required and click Save. Policy map for the managed system is ready.
Cloning a policy map
Another option of creating a policy map is cloning it from a default system. It is a preferred method as compared to creating it from scratch since it includes all the required attributes for a target system by default.
To clone a policy map:
- Go to Provisioning -> Managed System and find a managed system you want to create policy for (AD PowerShell is used as an example). Click Edit.
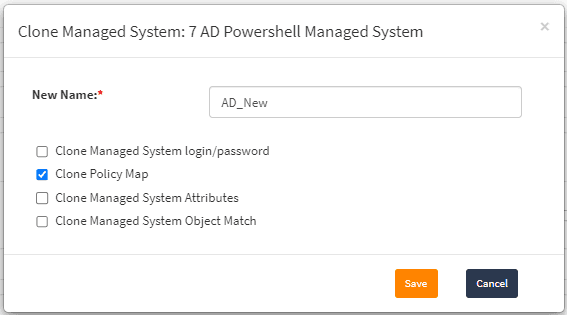
- At the bottom of a window, click Clone Managed System.
- Select what you want to clone and type in a new name.
Here, you get a default policy map copied from AD PowerShell managed system.
When opening the cloned policy map, one can see that the Type field is selected as groovy by default. The cloned policy map can be adjusted as needed.
Creating a policy map from a connector policy template
This option is useful in case a user needs to create many managed systems. In order to avoid creating a policy map for every new managed system, you can either clone managed systems, as it was described above, or create a policy map when configuring a connector. To create a template:
- Go to Provisioning -> Connectors and find your connector.
- Click Edit.
- In the menu on the left, select Policy Map Template.
- Create a custom policy map, as it was described above.
Now, as you have a policy map template in the connector, every time you use this connector for a new managed system, the policy map will be automatically copied to a new managed system.


