Create role
Create a new role
The steps below describe how to create a new role using the Webconsole (admin interface). You can also upload new roles using the synchronization feature (CSV file) or through the OpenIAM Rest API.
To create a new role:
- Login to the Webconsole and go to
Access Control -> Role - Go to
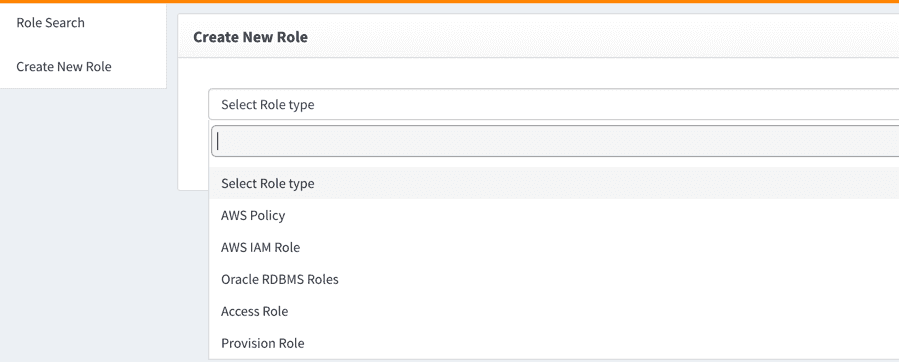
Create new rolefrom the side menu. You will see the screen below.
- From the screen shown above, select the role type from the drown down. By default, OpenIAM provides two values: Access Role and Provision Role. These two values are simply used for classification and do not impact the behavior of the role in anyway. The dropdown also shows all role types created by the user. If you are creating a role that will impact user provisioning, then select
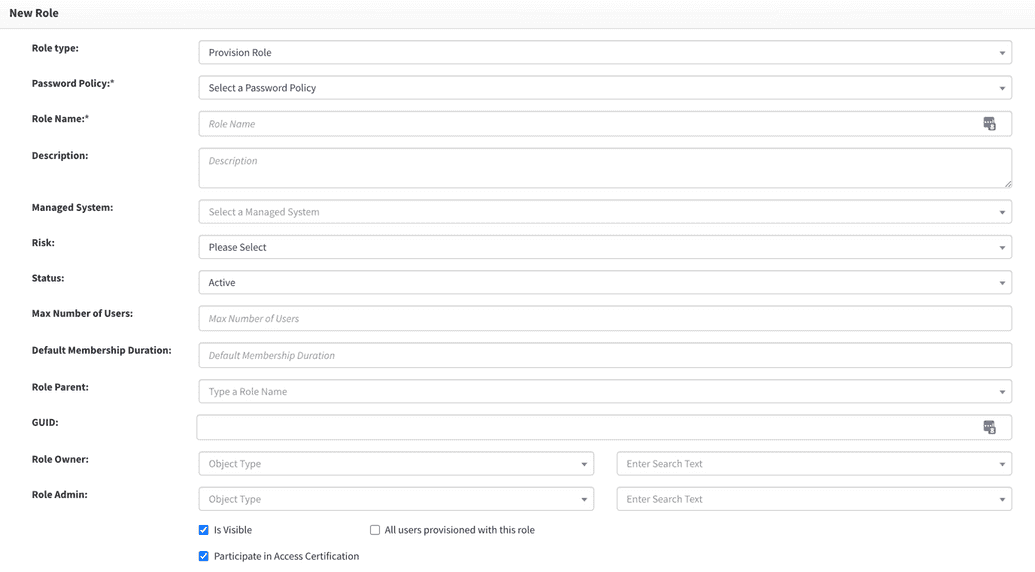
Provision role. You can useAccess Roleif you are focused on just SSO and authorization operations. - Complete the role creation screen as described in the table below.
| Field Name | Description |
|---|---|
| Password policy | Select the password policy that should be effective for the systems to be associated with this role. In most cases it is a Default Password Policy. |
| Role Name | Unique name to identify this role. |
| Description | Details describing this role. The description should be a meaningful and clear statement to assist end-users, access reviewers and others as they use the OpenIAM application. |
| Managed System | If this role will be used for provisioning, then the Managed System field value should be the system that account will be created in. If you need to manage more than one Managed System with this role, use Role entitlements screen to add other values. |
| Risk | Value of the risk field can be low or high. By default, this value does not impact behavior. Rules can be introduced to leverage this flag, which is often needed for access certification campaigns. |
| Status | Values are Active or Inactive. They can prevent a role from being used by making it Inactive. |
| Max. number of users | Maximum number of users that can be members of this role. |
| Default membership duration | Default period, when a user can be a member of this role. After this period, the user will be removed from this role. |
| Role parent | Roles support inheritance. The Role parent is the immediate role from which entitlements should be inherited. |
| GUID | GUID which may relate to this role in another application. This is not an OpenIAM generated value. |
| Role owner | User or group of people who own this role. This value is often used in request / approval and access certification tasks. |
| Role admin | User or group of people who administer this role. This value is often used in request / approval and access certification tasks. |
| Is Visible | Flag is used to hide objects from some groups of administrators who have access to the webconsole and selfservice portals. Here, the object becomes available for super security administrators only. |
| Participate in access certification | Flag is used to determine if this role should be excluded from access certification requests. |
| All users provisioned to this role | Flag which determines if this role should be granted by default to all users regardless of other criteria. |
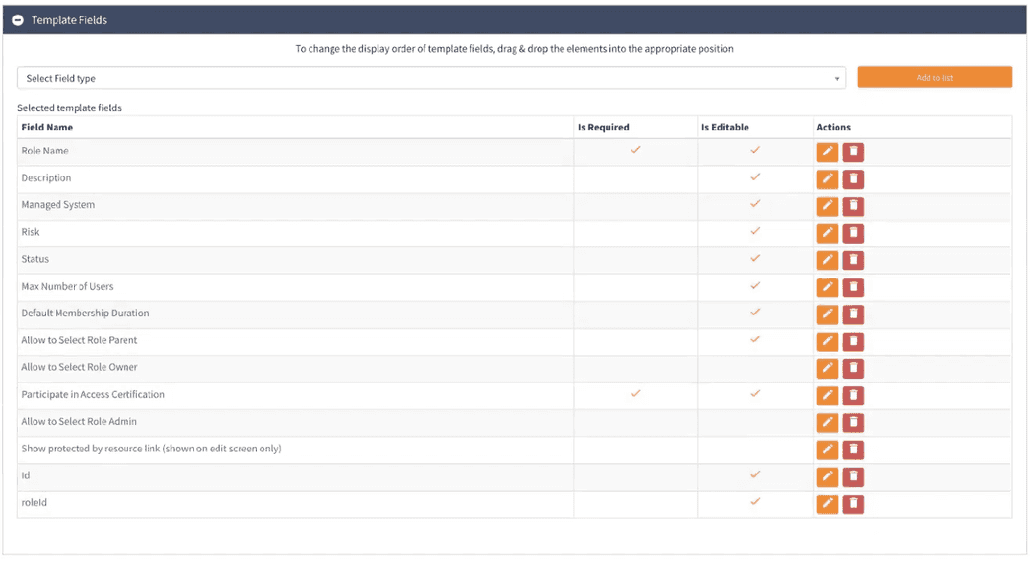
The role creation and edit pages are template based. It means, that you can remove or add the required field at your own discretion and according to your business needs. To amend the template go to Administration -> Page templates -> Default Role Template and click Edit.
In the screen shown in the figure below, you can add and/or remove a field, make it required and editable as needed.
Updating an existing role
To update an existing role, follow the steps below:
- Find an existing role as described here
- This will render the template described above. Click on the
Editicon - Amend the values as needed and click
Savebutton.
Adding/deleting users from a role
Find the user you want to add to a specific role. Then, Go to User Entitlements and click Add button.
In the menu opened, add the respective role as needed by completing the fields. In case filling the End Date field will automatically delete the user from a respective Role.
The alternative way of adding the user to respected Role is to use Synchronization service, based on their HR data in the source system via CSV file, as shown here, or a connector, as shown here.


